Vue Element UI 之富文本插件实现图片调整大小(quill-image-resize-module)、图片粘贴(quill-image-drop-module)
第一坑:报错
第二坑:报错
 执行 npm install,重启运行,没有作用……
发布日期:2021-10-13 12:43:50
浏览次数:2
分类:技术文章
本文共 2408 字,大约阅读时间需要 8 分钟。
quill-image-drop-module:允许粘贴图像并将其拖放到编辑器
quill-image-resize-module:允许调整图像大小
环境:vue cli3
第一次写这个功能,出现了一些意想不到的报错
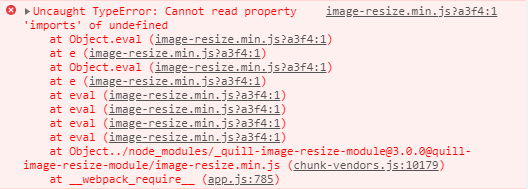
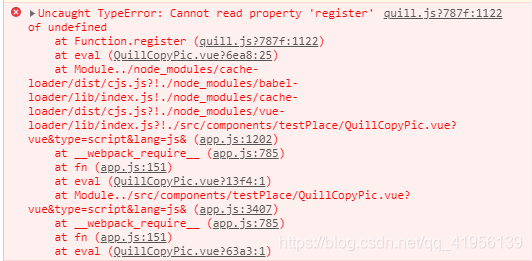
Cannot read property 'imports' of undefinedCannot read property 'register' of undefined
一、正确方式
1.安装插件依赖
1、安装 quill-editor
cnpm install vue-quill-editorcnpm install quill // 这个要安装,否则报错 Cannot read property 'imports' of undefined
2、安装 两个插件
cnpm install quill-image-resize-module --savecnpm install quill-image-drop-module --save
2.使用插件
2.1 在mian.js中
// 引入富文本编辑器import VueQuillEditor from 'vue-quill-editor'// 富文本编辑器对应的样式import 'quill/dist/quill.core.css'import 'quill/dist/quill.snow.css'import 'quill/dist/quill.bubble.css'// 注册富文本编辑器组件为全局组件Vue.use(VueQuillEditor)
2.2 在vue.config.js配置文件中
const webpack = require("webpack")module.exports = { // 配置插件参数 configureWebpack: { plugins: [ new webpack.ProvidePlugin({ 'window.Quill': 'quill' }) ] }} 2.3 在组件中使用
二、我的调错过程
第一坑:报错Cannot read property 'imports' of undefined
1、代码
2、调 bug
百度的过程中,发现这是一个坑哎,好多人掉进去,哈哈哈
终于,在中看到满意的答案:需要安装一个Quill插件
话不多说,安装先走起
npm install quill-image-resize-module --save
嗯……好像还有一点点小问题,那么直接 npm install
嗯,npm install 就是好用,缺啥都给补齐了
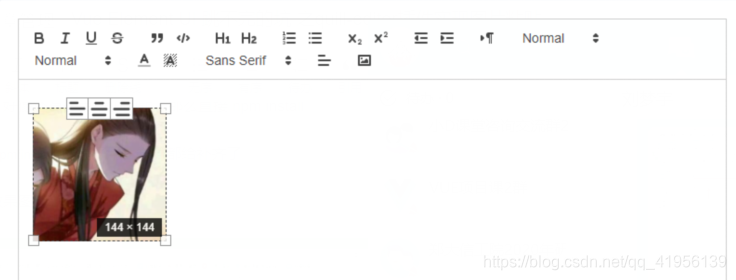
附上效果图:
第二坑:报错Cannot read property 'register' of undefined
1、代码
2、调 bug
warning in ./src/components/testPlace/QuillCopyPic.vue?vue&type=script&lang=js& "export 'default' (imported as 'ImageDrop') was not found in 'quill-image-drop-module' 执行 npm install,重启运行,没有作用…… 看看引用,需要加上 { }
import { ImageDrop } from 'quill-image-drop-module' 刷新,没有报错了,但是无法实现粘贴
第三坑:使用谷歌浏览器,实现粘贴图片还需要修改插件
参考:
火狐浏览器完美支持,是因为火狐自带粘贴图片功能,而谷歌只支持一半,Safari浏览器完全不支持。所以需要修改quill-image-drop-module源文件
在node_modules里找到quill-image-drop-module文件,打开index.js。 里面只有五个函数,一个构造函数,两个粘贴删除监听函数,以及两个功能函数。
修改handlePaste() 粘贴函数,添加浏览器判断:
handlePaste(evt) { if (evt.clipboardData && evt.clipboardData.items && evt.clipboardData.items.length) { this.readFiles(evt.clipboardData.items, dataUrl => { const userAgent = navigator.userAgent; // 取得浏览器的userAgent字符串 if (userAgent.indexOf('Firefox') > -1) { const selection = this.quill.getSelection(); if (selection) { } else { setTimeout(() => this.insert(dataUrl), 0); } } else { setTimeout(() => this.insert(dataUrl), 0); } }); }} 效果图:(因为写了图片上传服务器,所以粘贴之后立即自动完成图片上传)
转载地址:https://blog.csdn.net/qq_41956139/article/details/104967299 如侵犯您的版权,请留言回复原文章的地址,我们会给您删除此文章,给您带来不便请您谅解!
发表评论
最新留言
感谢大佬
[***.8.128.20]2024年03月24日 20时21分29秒
关于作者

喝酒易醉,品茶养心,人生如梦,品茶悟道,何以解忧?唯有杜康!
-- 愿君每日到此一游!
推荐文章
Anaconda
2019-04-26
NumPy库入门
2019-04-26
简单的留言板网页
2019-04-26
如何快速的搭建Apache+MySQL+PHP+PERL的环境
2019-04-26
初识JavaScript
2019-04-26
JavaScript的常用互动方法
2019-04-26
JavaScript的DOM操作
2019-04-26
JavaScript的事件响应与网页交互
2019-04-26
JavaScript实现的网页计算器功能
2019-04-26
英语四六级考试忘记准考证?怎么办?
2019-04-26
JavaScript内置对象
2019-04-26
JavaScript的游览器对象
2019-04-26
DOM对象,控制HTML对象
2019-04-26
制作一个表格,显示班级的学生信息
2019-04-26
JavaScript的选项卡操作
2019-04-26
Linux常用命令及文件处理命令
2019-04-26
Linux常见目录及作用
2019-04-26
文件链接命令
2019-04-26
Oracle篇--05 Oracle 视图、序列、约束
2019-04-26
【Java面试题四】sql面试题(1)
2019-04-26
白红宇的个人博客 - 记录点点滴滴的事 - 您是第 306323097 位访客
访问时间: 2024-04-20 00:55:05
访问IP: 18.226.177.223
Copyright © 2020 - 2023 blog.css8.cn 京ICP备2021015314号-1
手机版