本文共 5776 字,大约阅读时间需要 19 分钟。
注意⚠️:因为项目需要,更新和修正的更多内容保留在个人的笔记中,见谅!
1. 中心点对齐的计算方法
我们常常需要得出缩放前后某个像素位置和原始位置的精确坐标值,这时候就需要考虑几何中心点对齐,以下分析都是基于中心点对齐的缩放。缩放过程中,我们需要为目标图像dstImg上的每个像素位置找到与之对应的原图像srcImg的位置,并把srcImg上对应的像素值填入dstImg的该坐标位置处。若映射回原图srcImg的坐标位置不是整数,那么就需要做插值,算出映射回去的非整数坐标位置上的原图上的像素值是多少,因此就会有缩放过程中选择使用几阶了。
注意:图像坐标系从0开始,0,1,2,3... 分别位于每一个像素cell的中心。

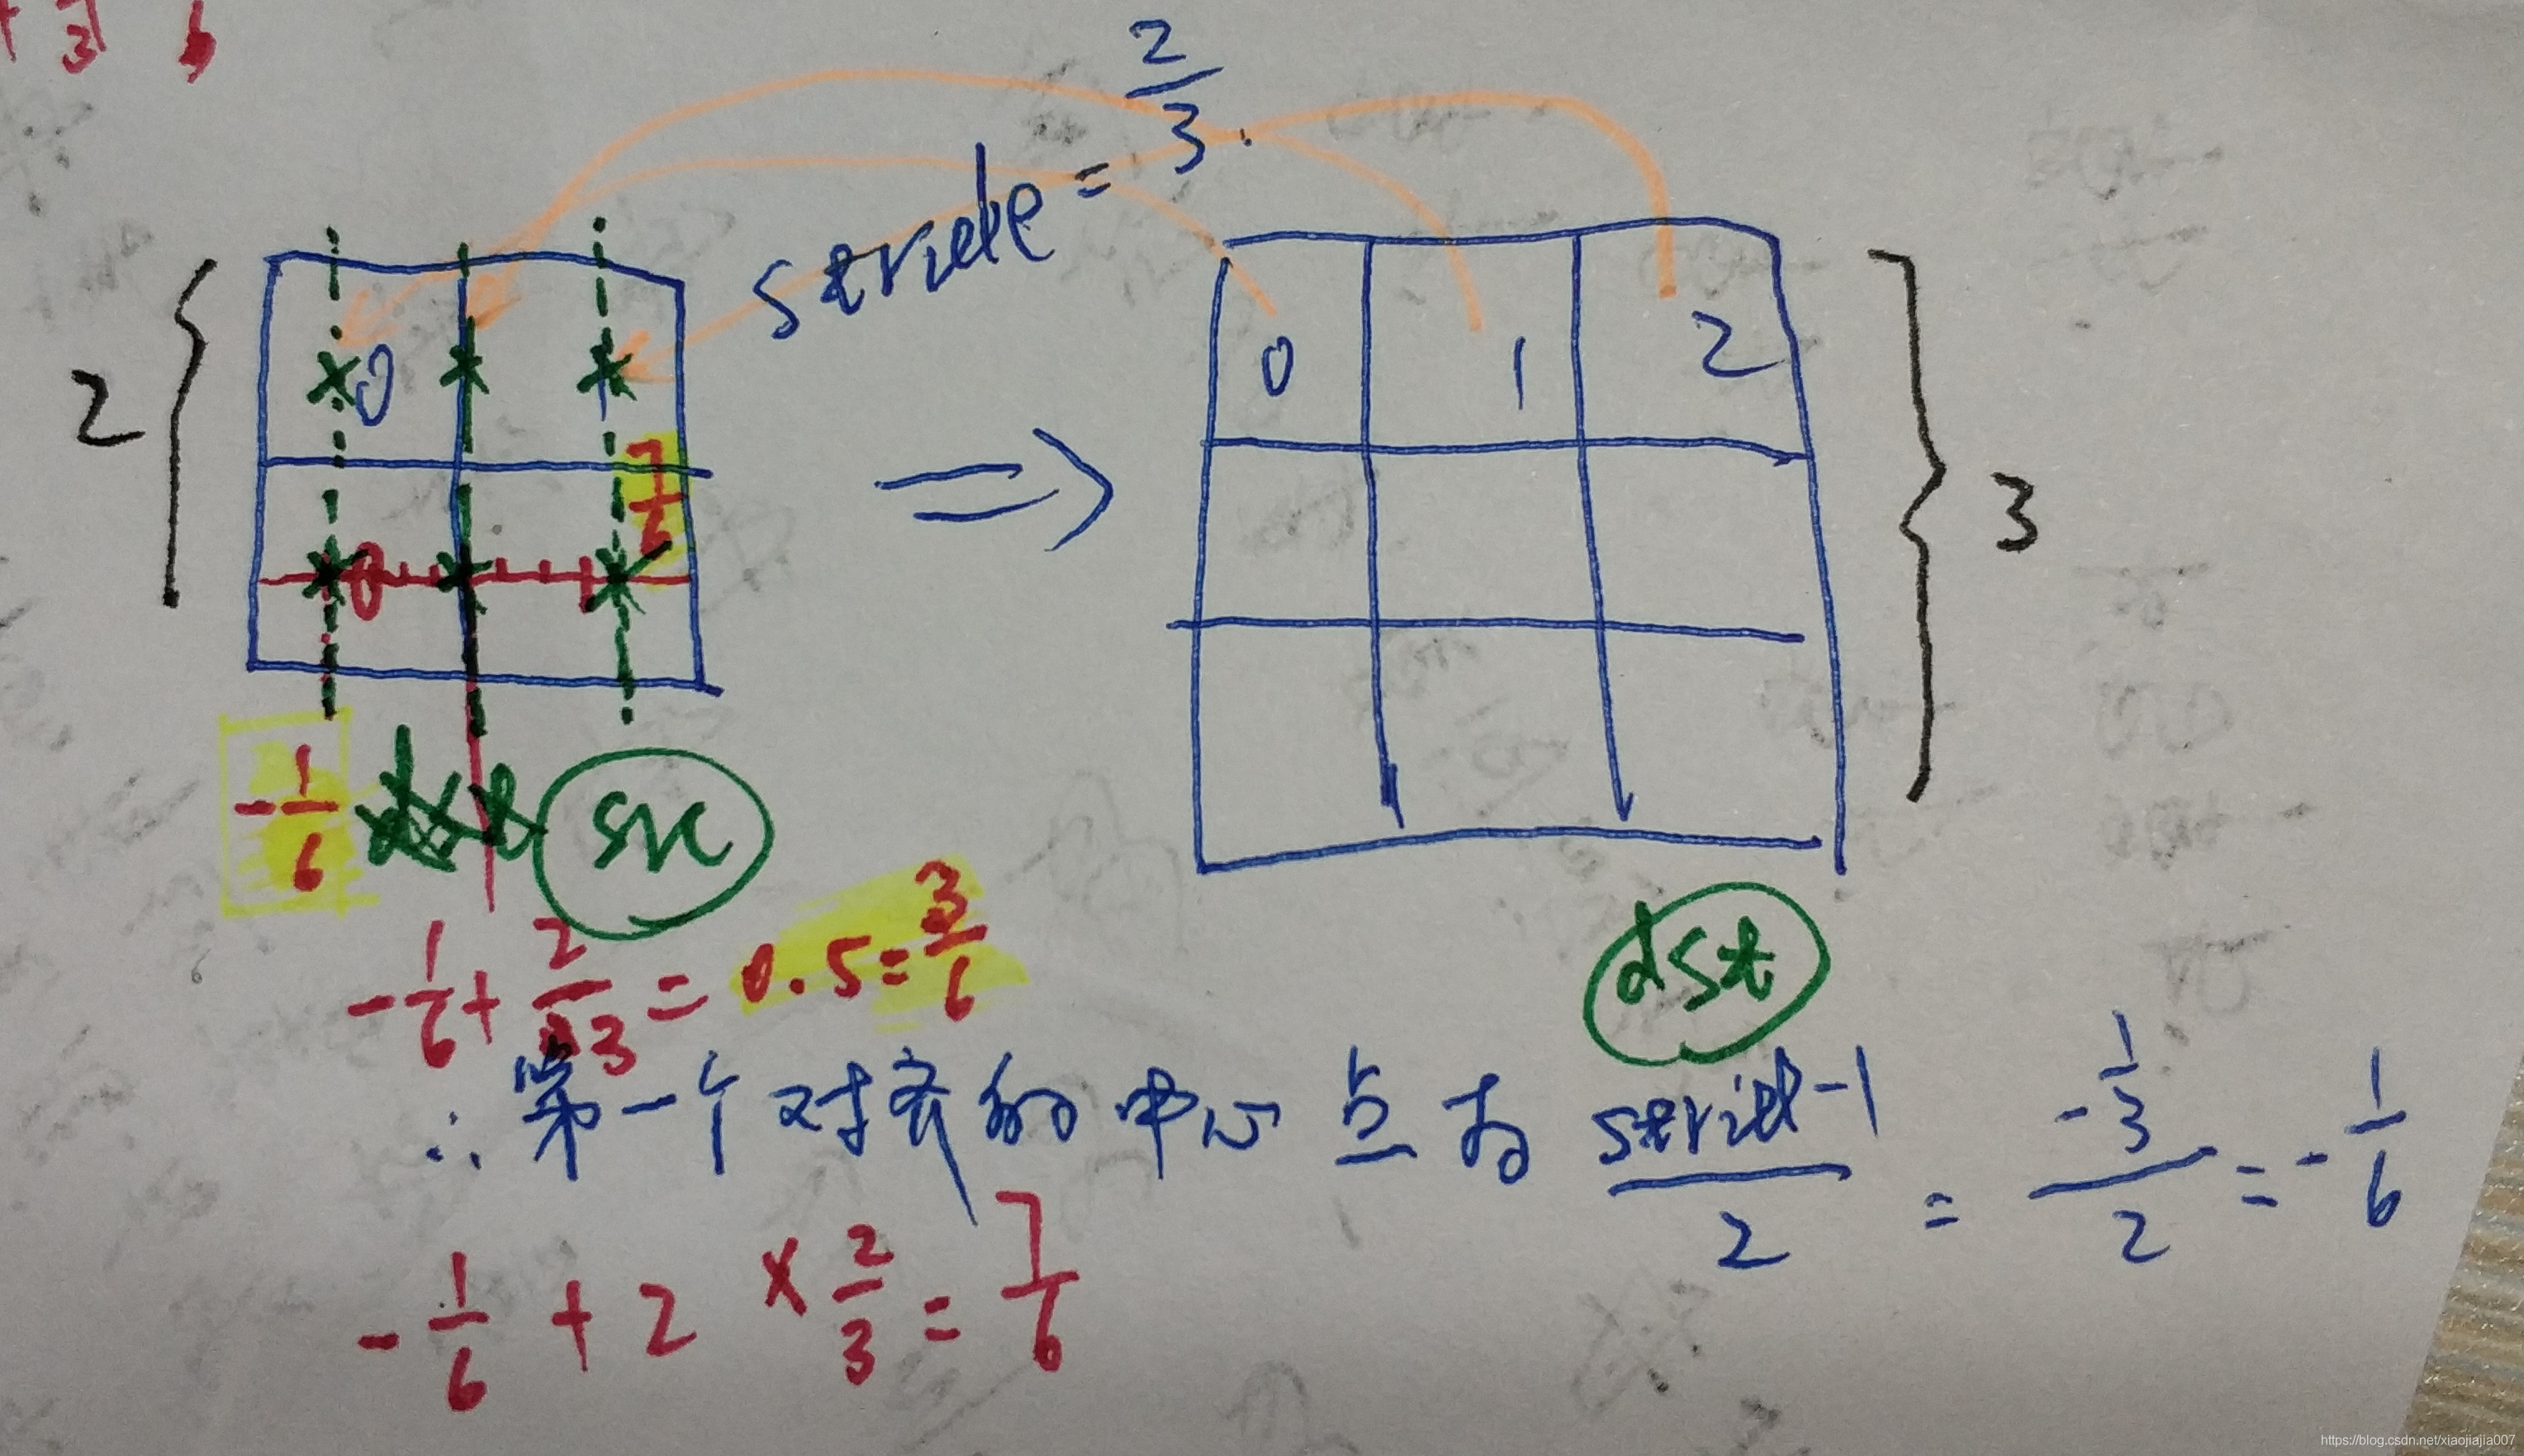
上面的公式可以这样理解,对于x坐标的映射关系为:srcX = dstX*(srcX/dstX) + [0+(stride-1)] / 2,其中[]内左侧0是srcImg上第一个像素方格的坐标,右侧(stride-1)是srcImg上的stride长度的右侧图像坐标,两者的均值就是中间点坐标(因为把像素pixel看成了有面积的cell,那么精确的位置应该在cell中心)。其中stridex=srcW/dstW。
为了加强理解,再来一个例子,这个例子是为了说明图像的放大或者缩小将会影响 [0+(stride-1)] / 2 的符号。
下图的例子是把原图缩小了,即放大了2/3倍,我们来计算一下在dst中的第一个像素位置应该对应于原图src中的位置是(stride-1)/2=-1/6,映射到了原始图像src的第一个像素的左侧了。
2. 流行第三方库中的缩放对齐方法的比较
首先对插值算法做一个了解,有两个博客写的非常好,见下面链接
(1)OpenCV双线性插值中的几何中心点对齐问题的插值方法见下文:
(2)关于OpenCV, TensorFlow, Pytorch等rescale的align_corner的区别详解(权威)
OpenCV中 cv2.resize()函数就使用了中心点对齐,所不同的是对于边界像素的处理使用了reflection border mode? scikit-image库的缩放行为和cv2.resize()保持一致。
[0,1,2,3,4,5] resize2times
--> [-0.25, 0.25, 0.75, 1.25, 1.75, 2.25, 2.75, 3.25, 3.75, 4.25, 4.75, 5.25] # 严格的中心点对齐
--> [0, 0.25, 0.75, 1.25, 1.75, 2.25, 2.75, 3.25, 3.75, 4.25, 4.75, 5] # OpenCV中心点对齐对边界值的处理
注意OpenCV中的cv2.warpAffine和cv2.resize()行为并不一致!
x = np.array([[0, 1, 2, 3, 4, 5]], dtype='float32')M = np.array([[2, 0, 0], [0, 1, 0]], dtype='float32')print cv2.warpAffine(x, M, dsize=(12,1), borderMode=cv2.BORDER_REFLECT).tolist()
cv2.warpAffine() 对于[0,1,2,3,4,5] resize2times 返归结果是 [0.0, 0.5, 1.0, 1.5, 2.0, 2.5, 3.0, 3.5, 4.0, 4.5, 5.0, 5.0]
而PIL库的缩放行为和cv2.resize一致 (有的博客说的不对,他们说和cv2.warpAffine一致)。
import PIL
import PIL.Image as Image import numpy as np x = np.array([[0, 1, 2, 3, 4, 5]], dtype='float32') img = Image.fromarray(x) resize_img = img.resize((12,1), resample=PIL.Image.BILINEAR) resize_x = np.array(resize_img) resize_x >>> array([[0. , 0.25, 0.75, 1.25, 1.75, 2.25, 2.75, 3.25, 3.75, 4.25, 4.75, 5. ]], dtype=float32)(3)Pytorch中Upsample的align_corners的讨论:
Here is a simple illustration I made showing how a 4x4 image is upsampled to 8x8.
When
align_corners=True, pixels are regarded as a grid of points. Points at the corners are aligned.When
align_corners=False, pixels are regarded as 1x1 areas. Area boundaries, rather than their centers, are aligned.
3. 中心点对齐的缩放在卷积网络结构设计中的注意事项
- OpenCV缩放图片是基于中心点对齐的,
- Pytorch中 mode='bilinear', align_corners=False 与OpenCV中的保持一致,
- Pytorch中 mode='bilinear', align_corners=True 与TensorFlow中的align_corners=True的条件下保持一致。
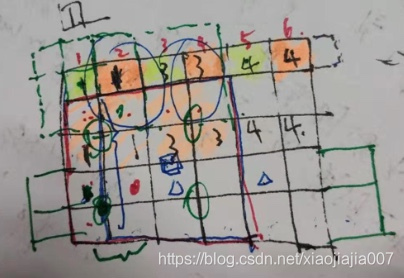
我们在做kernel=3, stride=2下采样的卷积时,如果输入是偶数,因为卷积核总是从左侧开始滑动,那么最后一个feaute map单元格就不会被卷积核滑动到(如下图黄色位置是卷积滑动到的地方),所以下一张生成的feature map就会感觉向左侧偏移了一个像素单元格。如果是使用Upsample(scale_factor=2, mode='nearest’)则刚好如同在小尺寸的feature map的每个像素单元右侧(下图橙色位置)重复插入与之相邻的左侧像素值(依次插入了1,3,4),这样就把之前造成的向左侧滑动一个像素点的偏移抵消了。
import torchx = tensor([[0., 1., 2., 3., 4., 5.]])x=x.view(1,1,6,1)x =tensor([[[[0.], [1.], [2.], [3.], [4.], [5.]]]])m = torch.nn.Upsample(scale_factor=2, mode='bilinear', align_corners=False)
>>>m(x)
tensor([[[[0.0000, 0.0000], [0.2500, 0.2500], [0.7500, 0.7500], [1.2500, 1.2500], [1.7500, 1.7500], [2.2500, 2.2500], [2.7500, 2.7500], [3.2500, 3.2500], [3.7500, 3.7500], [4.2500, 4.2500], [4.7500, 4.7500], [5.0000, 5.0000]]]])m = torch.nn.Upsample(scale_factor=2, mode='bilinear', align_corners=True)
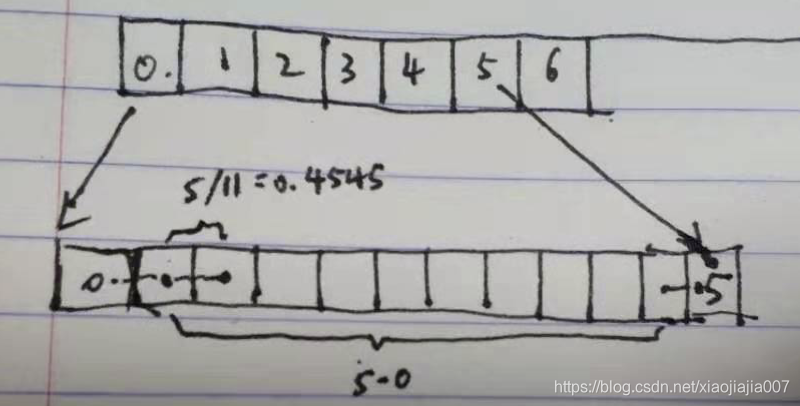
# 此时pytroch把像素看作没有面积的点,那么放大两倍之后相邻像素值点差值为: (5-1)/(12-1)=0.4545, 12-1=11是间隔的数目,如下图:
>>>m(x)
tensor([[[[0.0000, 0.0000], [0.4545, 0.4545], [0.9091, 0.9091], [1.3636, 1.3636], [1.8182, 1.8182], [2.2727, 2.2727], [2.7273, 2.7273], [3.1818, 3.1818], [3.6364, 3.6364], [4.0909, 4.0909], [4.5455, 4.5455], [5.0000, 5.0000]]]])m = torch.nn.Upsample(scale_factor=2, mode='nearest')
>>> m(x)
tensor([[[[0., 0.], [0., 0.], [1., 1.], [1., 1.], [2., 2.], [2., 2.], [3., 3.], [3., 3.], [4., 4.], [4., 4.], [5., 5.], [5., 5.]]]])
4. 补充(待确认):在segmentation分割问题中的resize问题
(1)为了更好的分割评测性能应该使用'bilinear', align_corners=True
上面1~3所述的可以用于检测任务,因为位于图像边缘处的目标比较少,不明显影响检测结果。而分割任务中边缘像素值也会很明显影响评测结果,需要额外注意!
对于分割任务应该align_corners=True,此时把像素当作没有面积的点,并且图像和特征图边缘处补充像素,做到严格的图像边缘像素和内部像素都对齐。
此时
A nice approach when enlarging an image is to make it so that
output_size-1is divisible byinput_size-1.That way, the scale factor becomes an integer, and this minimizes the amount of output pixels interpolated from subpixels in the source image (不光减少了插值的次数,也避免了原始图像像素向外插值从而出现新的值,使得边界值更准).
x = np.array([[0,1,2,3,4,5,6]], dtype='float32')t = tf.constant(x[np.newaxis,:,:,np,newaxis]) # tensorflow needs a batch axis and a channel axissess = tf.Session()print sess.run(tf.image.resize_bilinear(t, [1,13], align_corners=True))[0,:,:,0].tolist()
这里把 [0,1,2,3,4,5,6] --> [0.0, 0.5, 1.0, 1.5, 2.0, 2.5, 3.0, 3.5, 4.0, 4.5, 5.0, 5.5, 6.0], 避免了外插值,而且减少了超像素位置的插值次数。
若使用cv2.warpAffine()也能与之等效,它是把像素视为没有面积的点,同样的我们可以有:
x = np.array([[0, 1, 2, 3, 4, 5,6]], dtype='float32')M = np.array([[2, 0, 0], [0, 1, 0]], dtype='float32')t=cv2.warpAffine(x, M, dsize=(13,1), borderMode=cv2.BORDER_REFLECT).tolist()
>>> t
[[0.0, 0.5, 1.0, 1.5, 2.0, 2.5, 3.0, 3.5, 4.0, 4.5, 5.0, 5.5, 6.0]]
详情见:
这正是DeepLabV3的做法。
(2) 更深入的探讨
Regarding your question on "which alignment is better for NN training", multiple approaches are possible as long as you are consistent. Here is my own favorite set of rules that we have followed in our semantic image segmentation system:
"DeepLab's Four Alignment Rules":
(1) Use of odd-sized kernels in all convolution and pooling ops. (2) Use of SAME boundary conditions in all convolution and pooling ops. (3) Use align_corners=True when upsampling feature maps with bilinear interpolation. (4) Use of inputs with height/width equal to a multiple of the output_stride, plus one (for example, when the CNN output stride is 8, use height or width equal to8 * n + 1, for somen, e.g., image HxW set to 321x513).
Upsampling and Image Segmentation with Tensorflow and TF-Slim:
转载地址:https://blog.csdn.net/xiaojiajia007/article/details/100150726 如侵犯您的版权,请留言回复原文章的地址,我们会给您删除此文章,给您带来不便请您谅解!
发表评论
最新留言
关于作者
