本文共 11792 字,大约阅读时间需要 39 分钟。
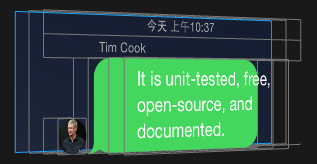
是一个优雅的iOS消息类UI库。JSQMessagesViewController使用UICollectionView来展示消息,其UI布局用Reveal来查看是如下的形式:
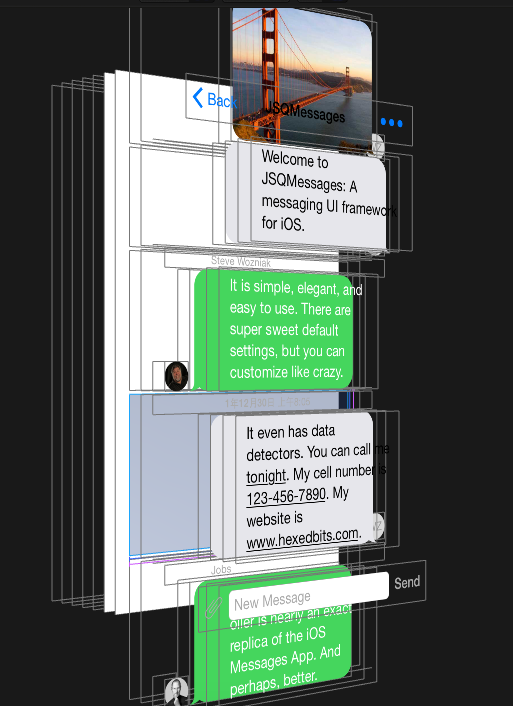
- 底部的输入框:
JSQMessagesInputToolbar - 接收的消息Cell:
JSQMessagesCollectionViewCellIncoming - 发送的消息Cell:
JSQMessagesCollectionViewCellOutgoing
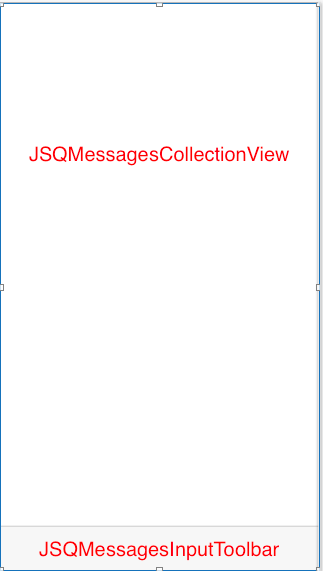
JSQMessagesViewController的布局如下,基本由两部分组成:JSQMessagesCollectionView和底部的JSQMessagesInputToolbar,主要有两个约束,JSQMessagesInputToolbar的高度约束和JSQMessagesInputToolbar的底部距离JSQMessagesViewController的底部的margin约束。
键盘事件处理JSQMessagesKeyboardController
JSQMessagesInputToolbar中的JSQMessagesComposerTextView在编辑时,会触发keyboard事件。例如在keyboard弹起时,JSQMessagesCollectionView的frame或者contentInset要改变,JSQMessagesInputToolbar的位置要上移。
JSQMessagesViewController中keyboard事件的处理主要通过JSQMessagesKeyboardController类处理,在keyboard的frame改变的时候它会通过代理和通知,来告知JSQMessagesViewController做出何种的改变。 JSQMessagesKeyboardController支持拖动手势,可以实现keyboard的拖动。效果如下: 
JSQMessagesKeyboardController这个idea是来自Daniel Amitay的
JSQMessagesKeyboardController的主要逻辑是,通过beginListeningForKeyboard方法来开始监听keyboard。
- (void)beginListeningForKeyboard{ if (self.textView.inputAccessoryView == nil) { self.textView.inputAccessoryView = [[UIView alloc] init]; } //注册通知 [self jsq_registerForNotifications];} 其注册的通知有UIKeyboardDidShowNotification,UIKeyboardWillChangeFrameNotification、UIKeyboardDidChangeFrameNotification、UIKeyboardDidHideNotification。
UIKeyboardDidShowNotification 通知时,会获取到keyboardView,并给拖动手势添加上事件: - (void)jsq_didReceiveKeyboardDidShowNotification:(NSNotification *)notification{ //获取到keyboardView self.keyboardView = self.textView.inputAccessoryView.superview; [self jsq_setKeyboardViewHidden:NO]; [self jsq_handleKeyboardNotification:notification completion:^(BOOL finished) { //拖动手势的事件 [self.panGestureRecognizer addTarget:self action:@selector(jsq_handlePanGestureRecognizer:)]; }];} 重写了self.keyboardView的setter方法,在setter的时候会使用KVO来观察keyboardView的frame的变化:
- (void)setKeyboardView:(UIView *)keyboardView{ if (_keyboardView) { [self jsq_removeKeyboardFrameObserver]; } _keyboardView = keyboardView; if (keyboardView && !_jsq_isObserving) { //添加KVO观察者 观察frame [_keyboardView addObserver:self forKeyPath:NSStringFromSelector(@selector(frame)) options:(NSKeyValueObservingOptionOld | NSKeyValueObservingOptionNew) context:kJSQMessagesKeyboardControllerKeyValueObservingContext]; _jsq_isObserving = YES; }} 每种类型的通知处理方法都会调用- (void)jsq_handleKeyboardNotification:(NSNotification *)notification completion:(JSQAnimationCompletionBlock)completion方法:
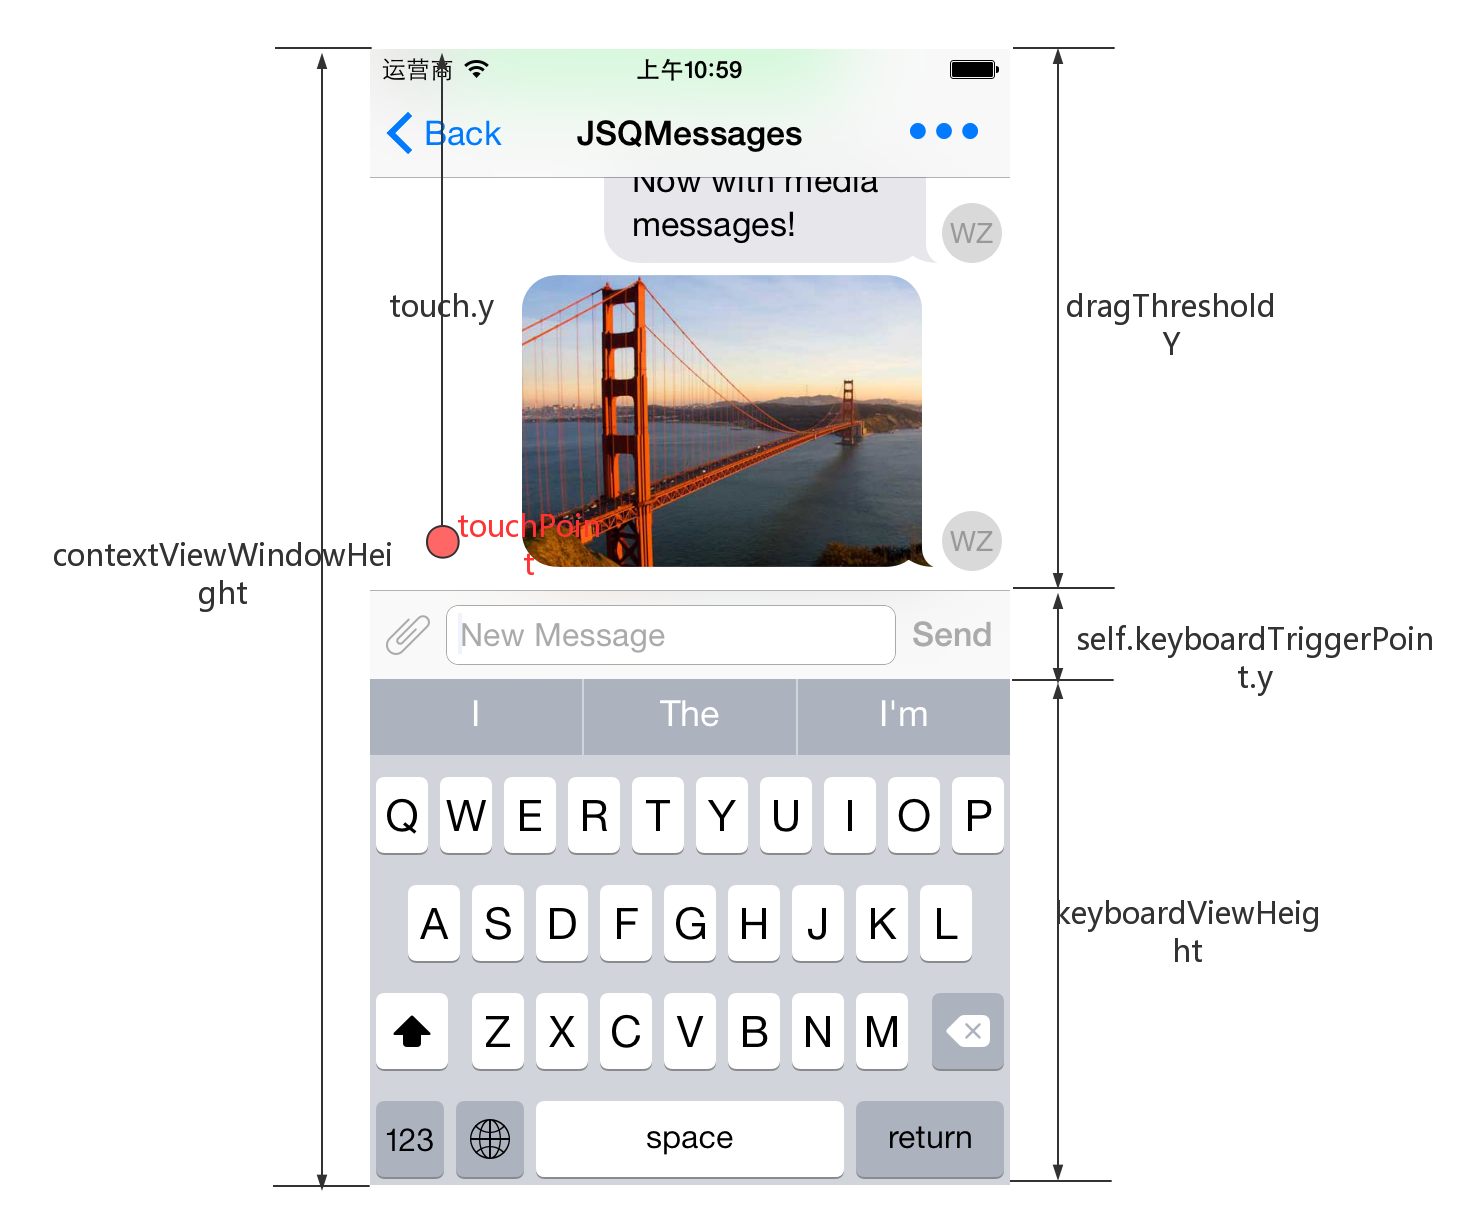
- (void)jsq_handleKeyboardNotification:(NSNotification *)notification completion:(JSQAnimationCompletionBlock)completion{ NSDictionary *userInfo = [notification userInfo]; //键盘frame CGRect keyboardEndFrame = [userInfo[UIKeyboardFrameEndUserInfoKey] CGRectValue]; if (CGRectIsNull(keyboardEndFrame)) { return; } //curve动画曲线 UIViewAnimationCurve animationCurve = [userInfo[UIKeyboardAnimationCurveUserInfoKey] integerValue]; NSInteger animationCurveOption = (animationCurve << 16); //动画时间 double animationDuration = [userInfo[UIKeyboardAnimationDurationUserInfoKey] doubleValue]; //转换keyboardEndFrame CGRect keyboardEndFrameConverted = [self.contextView convertRect:keyboardEndFrame fromView:nil]; //动画 [UIView animateWithDuration:animationDuration delay:0.0 options:animationCurveOption animations:^{ [self jsq_notifyKeyboardFrameNotificationForFrame:keyboardEndFrameConverted]; } completion:^(BOOL finished) { if (completion) { completion(finished); } }];}- (void)jsq_notifyKeyboardFrameNotificationForFrame:(CGRect)frame{ //通知代理 [self.delegate keyboardController:self keyboardDidChangeFrame:frame]; //抛出通知 [[NSNotificationCenter defaultCenter] postNotificationName:JSQMessagesKeyboardControllerNotificationKeyboardDidChangeFrame object:self userInfo:@{ JSQMessagesKeyboardControllerUserInfoKeyKeyboardDidChangeFrame : [NSValue valueWithCGRect:frame] }];} 拖动手势的处理逻辑如下图:
UITextView自增长
在输入信息的时候,UITextView的高度会随着输入内容的大小而自动调节。
JSQMessagesViewController的方式是通过KVO的方式来观察JSQMessagesInputToolbar的textView的contentSize的变化
- (void)jsq_addObservers{ if (self.jsq_isObserving) { return; } [self.inputToolbar.contentView.textView addObserver:self forKeyPath:NSStringFromSelector(@selector(contentSize)) options:NSKeyValueObservingOptionOld | NSKeyValueObservingOptionNew context:kJSQMessagesKeyValueObservingContext]; self.jsq_isObserving = YES;} 然后处理在- (void)observeValueForKeyPath:(NSString *)keyPath ofObject:(id)object change:(NSDictionary *)change context:(void *)context方法中处理:
- (void)observeValueForKeyPath:(NSString *)keyPath ofObject:(id)object change:(NSDictionary *)change context:(void *)context{ if (context == kJSQMessagesKeyValueObservingContext) { if (object == self.inputToolbar.contentView.textView && [keyPath isEqualToString:NSStringFromSelector(@selector(contentSize))]) { CGSize oldContentSize = [[change objectForKey:NSKeyValueChangeOldKey] CGSizeValue]; CGSize newContentSize = [[change objectForKey:NSKeyValueChangeNewKey] CGSizeValue]; CGFloat dy = newContentSize.height - oldContentSize.height; [self jsq_adjustInputToolbarForComposerTextViewContentSizeChange:dy]; [self jsq_updateCollectionViewInsets]; if (self.automaticallyScrollsToMostRecentMessage) { [self scrollToBottomAnimated:NO]; } } }} 创建气泡和头像图片
如下图所示,气泡图片有两种类型,发送的和接收的,每种气泡图片对应两种状态,一个正常的,一个高亮。
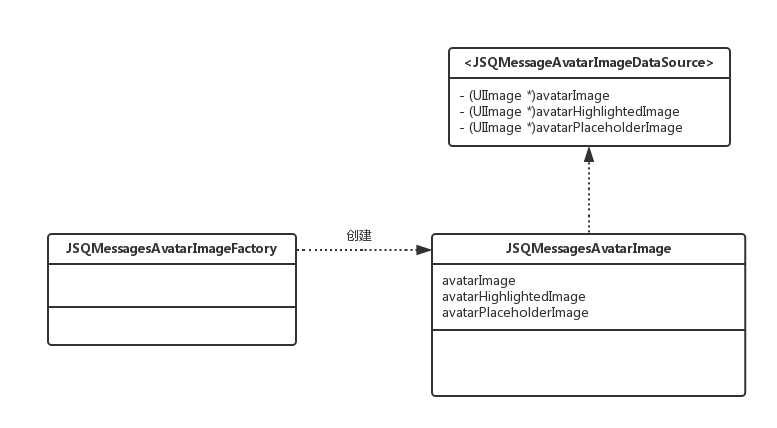
头像图片也有两种状态,正常的和高亮的。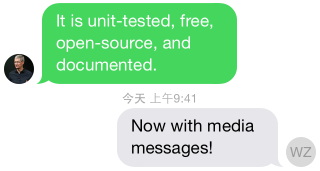
聊天气泡图片
聊天气泡图片是在一张名为”bubble_min.png”
JSQMessagesViewController中,表示气泡的类是JSQMessagesBubbleImage类,它实现了JSQMessageBubbleImageDataSource协议。JSQMessageBubbleImageDataSource协议,有两个方法,一个是提供正常的bubble图片,一个是提供高亮bubble图片。通过JSQMessagesBubbleImageFactory来创建JSQMessagesBubbleImage。 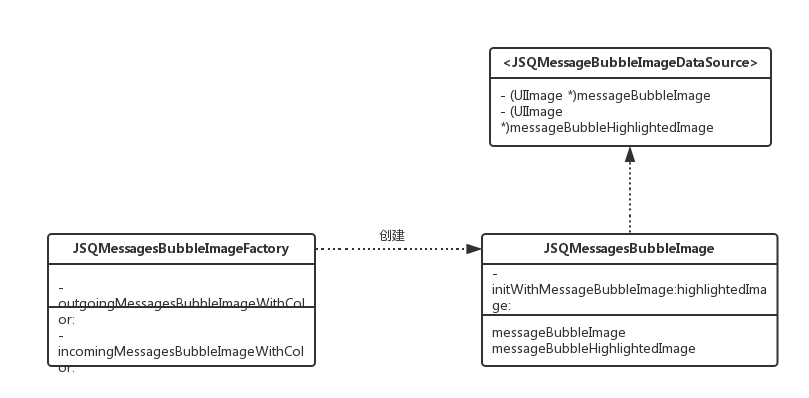
创建图片的主要方式是,做遮罩,然后填充颜色:
- (UIImage *)jsq_imageMaskedWithColor:(UIColor *)maskColor{ NSParameterAssert(maskColor != nil); CGRect imageRect = CGRectMake(0.0f, 0.0f, self.size.width, self.size.height); UIImage *newImage = nil; UIGraphicsBeginImageContextWithOptions(imageRect.size, NO, self.scale); { CGContextRef context = UIGraphicsGetCurrentContext(); CGContextScaleCTM(context, 1.0f, -1.0f); CGContextTranslateCTM(context, 0.0f, -(imageRect.size.height)); //mask CGContextClipToMask(context, imageRect, self.CGImage); CGContextSetFillColorWithColor(context, maskColor.CGColor); CGContextFillRect(context, imageRect); newImage = UIGraphicsGetImageFromCurrentImageContext(); } UIGraphicsEndImageContext(); return newImage;} 水平镜像图片的方法为:
- (UIImage *)jsq_horizontallyFlippedImageFromImage:(UIImage *)image{ return [UIImage imageWithCGImage:image.CGImage scale:image.scale orientation:UIImageOrientationUpMirrored];} 拉伸图片的方法为:
- (UIImage *)jsq_stretchableImageFromImage:(UIImage *)image withCapInsets:(UIEdgeInsets)capInsets{ return [image resizableImageWithCapInsets:capInsets resizingMode:UIImageResizingModeStretch];} 聊天头像图片
avatar图片与bubble图片类似,如下:
创建圆形的图片方法,如下:
/** * 创建带有文字的头像 * * @param initials 文字 * @param backgroundColor 背景颜色 * @param textColor 文字颜色 * @param font 字体大小 * @param diameter 直径 * * @return 创建后的图片 */+ (UIImage *)jsq_imageWitInitials:(NSString *)initialsbackgroundColor:(UIColor *)backgroundColor textColor:(UIColor *)textColor font:(UIFont *)font diameter:(NSUInteger)diameter{ NSParameterAssert(initials != nil); NSParameterAssert(backgroundColor != nil); NSParameterAssert(textColor != nil); NSParameterAssert(font != nil); NSParameterAssert(diameter > 0); CGRect frame = CGRectMake(0.0f, 0.0f, diameter, diameter); NSDictionary *attributes = @{ NSFontAttributeName : font, NSForegroundColorAttributeName : textColor }; CGRect textFrame = [initials boundingRectWithSize:frame.size options:(NSStringDrawingUsesLineFragmentOrigin | NSStringDrawingUsesFontLeading) attributes:attributes context:nil]; CGPoint frameMidPoint = CGPointMake(CGRectGetMidX(frame), CGRectGetMidY(frame)); CGPoint textFrameMidPoint = CGPointMake(CGRectGetMidX(textFrame), CGRectGetMidY(textFrame)); CGFloat dx = frameMidPoint.x - textFrameMidPoint.x; CGFloat dy = frameMidPoint.y - textFrameMidPoint.y; CGPoint drawPoint = CGPointMake(dx, dy); UIImage *image = nil; UIGraphicsBeginImageContextWithOptions(frame.size, NO, [UIScreen mainScreen].scale); { CGContextRef context = UIGraphicsGetCurrentContext(); CGContextSetFillColorWithColor(context, backgroundColor.CGColor); CGContextFillRect(context, frame); [initials drawAtPoint:drawPoint withAttributes:attributes]; image = UIGraphicsGetImageFromCurrentImageContext(); } UIGraphicsEndImageContext(); return [JSQMessagesAvatarImageFactory jsq_circularImage:image withDiameter:diameter highlightedColor:nil];}/** * 创建圆形的头像 * * @param image 图片 * @param diameter 直径 * @param highlightedColor 高亮颜色 * * @return 图片 */+ (UIImage *)jsq_circularImage:(UIImage *)image withDiameter:(NSUInteger)diameter highlightedColor:(UIColor *)highlightedColor{ NSParameterAssert(image != nil); NSParameterAssert(diameter > 0); CGRect frame = CGRectMake(0.0f, 0.0f, diameter, diameter); UIImage *newImage = nil; UIGraphicsBeginImageContextWithOptions(frame.size, NO, [UIScreen mainScreen].scale); { CGContextRef context = UIGraphicsGetCurrentContext(); UIBezierPath *imgPath = [UIBezierPath bezierPathWithOvalInRect:frame]; //clip [imgPath addClip]; //绘制 [image drawInRect:frame]; if (highlightedColor != nil) { CGContextSetFillColorWithColor(context, highlightedColor.CGColor); CGContextFillEllipseInRect(context, frame); } newImage = UIGraphicsGetImageFromCurrentImageContext(); } UIGraphicsEndImageContext(); return newImage;} JSQMessagesCollectionView
JSQMessagesCollectionView继承自UICollectionView。类之间的关系如下图所示:
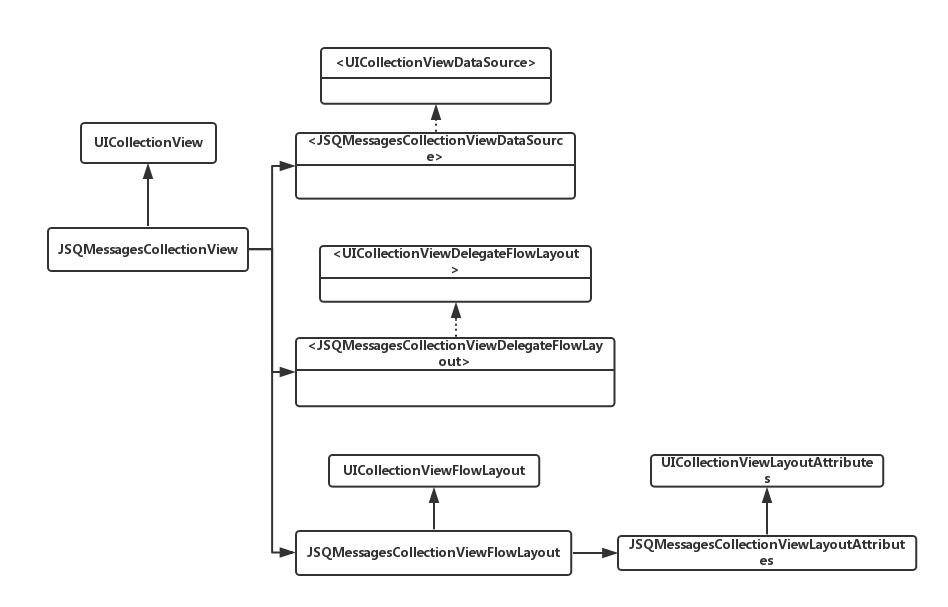
JSQMessagesCollectionViewCell
JSQMessagesCollectionViewCell是一个抽象类,它有两个实体类:JSQMessagesCollectionViewCellIncoming和JSQMessagesCollectionViewCellOutgoing。collection view的基本布局如下:
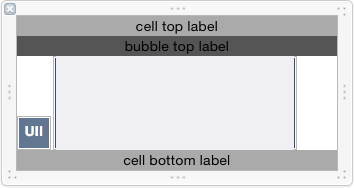
- cell top label: 用来显示时间戳
- bubble top label: 用来显示消息的发送者
- cell bottom label: 用来显示消息的发送状态
- JSQMessagesCellTextView:显现消息的文本
- messageBubbleImageView:显示气泡
- avatarImageView:显示头像
聊天气泡大小的计算是由JSQMessagesCollectionViewFlowLayout计算的。计算bubble的大小是- (CGSize)messageBubbleSizeForItemAtIndexPath:(NSIndexPath *)indexPath方法。
计算item的大小是- (CGSize)sizeForItemAtIndexPath:(NSIndexPath *)indexPath方法。 基本就是通过字符串来计算size:CGRect stringRect = [[messageItem text] boundingRectWithSize:CGSizeMake(maximumTextWidth, CGFLOAT_MAX) options:(NSStringDrawingUsesLineFragmentOrigin | NSStringDrawingUsesFontLeading) attributes:@{ NSFontAttributeName : self.messageBubbleFont } context:nil]; 转载地址:https://windzen.blog.csdn.net/article/details/48442181 如侵犯您的版权,请留言回复原文章的地址,我们会给您删除此文章,给您带来不便请您谅解!
发表评论
最新留言
关于作者
