unity-shader之截图(抓屏)功能、常用的cginc、multi_complie多条件、移动平台的基本优化
 代码
代码 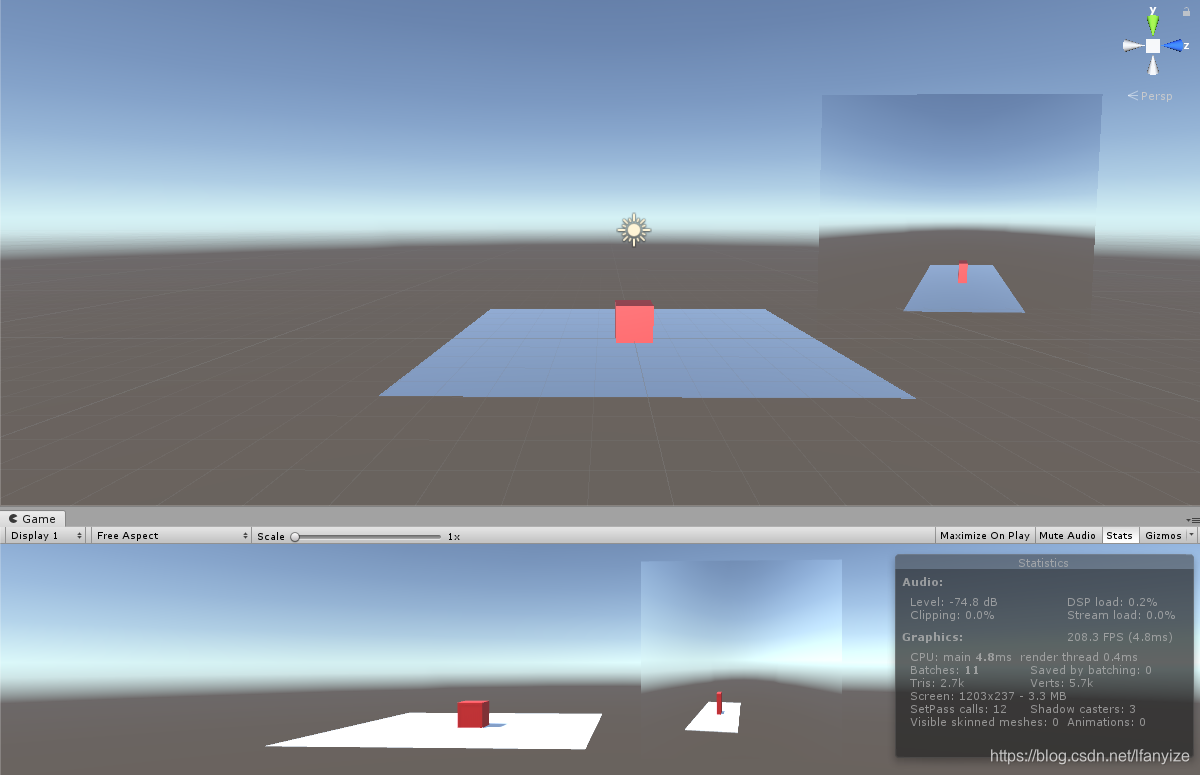 由于接受截屏的物体尺寸大小与场景截屏尺寸不一样所以场景中的物体会被拉伸,角度与摄像机的角度有关。
发布日期:2021-05-07 17:59:11
浏览次数:17
分类:技术文章
本文共 4101 字,大约阅读时间需要 13 分钟。
GrabPass
使用抓屏通道
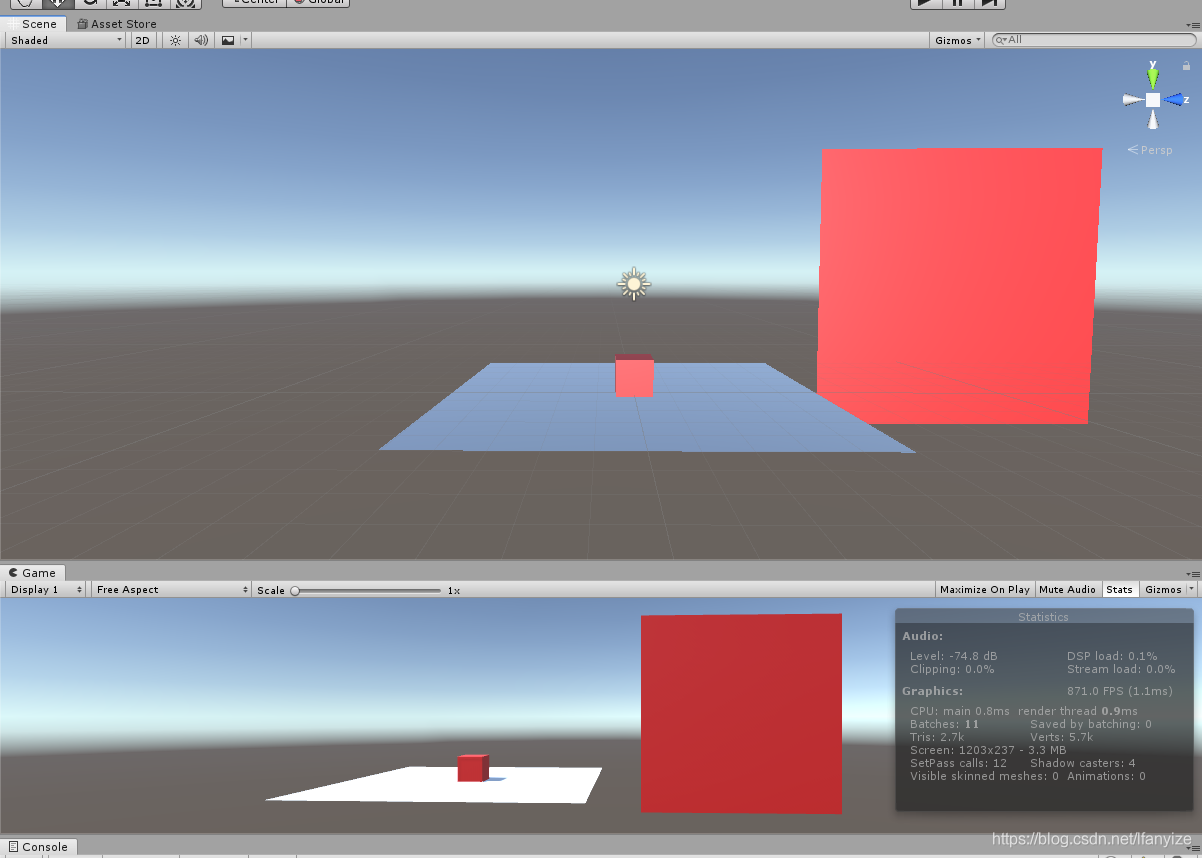
GrabPass[]或者GrabPass{“纹理名称”}; 如果不指定纹理名称,将会默认的将纹理生成到_GrabTexture中,后面的Pass通道使用这个变量来获得抓屏纹理 场景: 代码 Shader "Custom/Grab_Shader"{ Properties { _MainTex ("Texture", 2D) = "white" { } } SubShader { Tags { "RenderType"="Opaque" "Queue" = "OverLay"}//OverLay是保证这个通道是最后被绘制这个时候再去截屏就能将整个屏幕都截取 LOD 100 GrabPass{ //如果在这里定义一个纹理的名称,那么在下面就要同样声明一下,截屏的纹理就储存到了这个变量里面 }//截屏通道,如果在这里不指定名字就会默认使用_GrabTexture进行保存 Pass { CGPROGRAM #pragma vertex vert #pragma fragment frag #include "UnityCG.cginc" struct appdata { float4 vertex : POSITION; float2 uv : TEXCOORD0; }; struct v2f { float2 uv : TEXCOORD0; float4 vertex : SV_POSITION; }; sampler2D _MainTex; float4 _MainTex_ST; sampler2D _GrabTexture;//所以截屏的纹理保存到这里 float4 _GrabTexture_ST; v2f vert (appdata v) { v2f o; o.vertex = mul(UNITY_MATRIX_MVP,v.vertex); o.uv = TRANSFORM_TEX(v.uv, _GrabTexture); return o; } fixed4 frag (v2f i) : SV_Target { // sample the texture fixed4 col = tex2D(_GrabTexture, i.uv); return col; } ENDCG } }} 使用shader后的场景
由于接受截屏的物体尺寸大小与场景截屏尺寸不一样所以场景中的物体会被拉伸,角度与摄像机的角度有关。 常用的cginc
Cginc文件:定义宏,帮助函数等,放在CGIncludes下面,开发人员可以开发自己的成功include文件
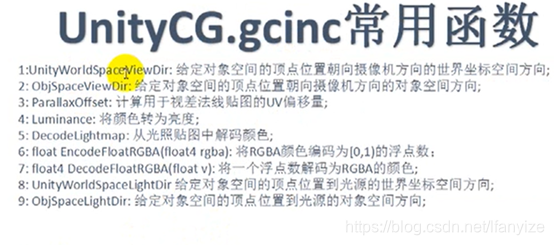
常用的cginc文件: HLSL.Support.cginc协助多平台开发的一些宏等,系统自动包含 UnityShaderVarirables.cginc全局变量自动包含 UnityCG.cginc常用的帮助函数 AutoLight.cginc 光照和阴影功能 Lighting.cginc 表面着色器的关照模型 TerrainEngine.cginc 地形制备的光照着色函数UnityCG.gcinc常用函数
通道复用
1.编写过的Pass可以重复使用,借助UsePass"ShaderPath/PASS_NAME"
2.PASS名字要大写 3.Pass{ name “ONE” } 4.UsePass"Custom/ShaderName/One"...name "ONE"// 没有等号并且不能卸载CGPROGRAM里面 CGPROGRAM #pragma vertex vert #pragma fragment frag #include "UnityCG.cginc"...
使用的时候通过上面4.语句使用
multi_compile 编译多版本的shader
shader代码
Shader "Custom/Mulit_shader"{ Properties { _MainTex ("Texture", 2D) = "white" { } } SubShader { Tags { "RenderType"="Opaque" } LOD 100 Pass { CGPROGRAM #pragma vertex vert #pragma fragment frag //定义一个两个条件编译的开关告诉又两个版本的shader #pragma multi_compile MY_multi_1 MY_multi_2 #include "UnityCG.cginc" struct appdata { float4 vertex : POSITION; float2 uv : TEXCOORD0; }; struct v2f { float2 uv : TEXCOORD0; float4 vertex : SV_POSITION; }; sampler2D _MainTex; float4 _MainTex_ST; v2f vert (appdata v) { v2f o; o.vertex = UnityObjectToClipPos(v.vertex); o.uv = TRANSFORM_TEX(v.uv, _MainTex); return o; } fixed4 frag (v2f i) : SV_Target { fixed4 col; // sample the texture //fixed4 col = tex2D(_MainTex, i.uv); #ifdef MY_multi_1 col = fixed4(1.0,0.0,0.0,1.0); #endif #ifdef MY_multi_2 col = fixed4(0.0,0.0,1.0,1.0); #endif return col; } ENDCG } }} c#控制代码
using System.Collections;using System.Collections.Generic;using UnityEngine;public class Multi_Script : MonoBehaviour{ // Start is called before the first frame update void Start()//在代码里面控制使用哪一个开关不适用那一个开关 { Shader.EnableKeyword("MY_multi_1");//打开条件二 Shader.DisableKeyword("MY_multi_2");//关闭条件1 } // Update is called once per frame void Update() { }} 移动平台的基本优化
移动平台的优化
一. 代码优化- 预先计算好对应的值
- 放心的使用限量相关操作,基本都是硬件实现很高效
- 尽量较少函数调用减少开销 二.尽可能的将计算放在顶点着色器中顶点着色器的调用频率远低于片元着色器 三.集合复杂度考量,在ios平台视口内的顶点数不要超过100k个ios默认的缓冲区就那个大,超过这个数字,底层会做一些操作消耗更多的资源 四.纹理大小为2^n次方大小 五.使用适当的数据类型 float<half<fixed fixed是最高效的 六.尽量慎用同名效果,透明效果GPU要逐像素渲染,耗费资源
转载地址:https://blog.csdn.net/lfanyize/article/details/104126088 如侵犯您的版权,请留言回复原文章的地址,我们会给您删除此文章,给您带来不便请您谅解!
发表评论
最新留言
不错!
[***.144.177.141]2024年04月14日 17时23分34秒
关于作者

喝酒易醉,品茶养心,人生如梦,品茶悟道,何以解忧?唯有杜康!
-- 愿君每日到此一游!
推荐文章
Vue watch监听数据 ECharts异步加载数据
2019-04-26
Vue 3.0引入axios
2019-04-26
网页自动适配 Mac 的 Dark Mode
2019-04-26
The server encountered an unexpected condition that prevented it from fulfilling the request.
2019-04-26
linux安装FastDFS+Nginx
2019-04-26
FastDFS上传文件示例
2019-04-26
Zookeeper集群
2019-04-26
SpringDataJPA入门及四种查询方式
2019-04-26
Spring Cloud Eureka & Spring Cloud Feign
2019-04-26
Spring Cloud Config & Spring Cloud Bus
2019-04-26
微服务容器部署与 jenkins 持续集成
2019-04-26
容器管理与容器监控
2019-04-26
java爬虫框架—WebMagic
2019-04-26
Java 基础之反射
2019-04-26
一起来学MySQL—常用内置函数
2019-04-26
Spring 核心 之 IOC
2019-04-26
一起来学MySQL—事务的隔离级别
2019-04-26
直连线和交叉线的区别
2019-04-26
数据库视频—使用.Net访问SQL Server
2019-04-26
白红宇的个人博客 - 记录点点滴滴的事 - 您是第 306202584 位访客
访问时间: 2024-04-19 12:35:34
访问IP: 3.135.183.187
Copyright © 2020 - 2023 blog.css8.cn 京ICP备2021015314号-1
手机版