Android 自定义虚线View
发布日期:2021-07-30 03:26:04
浏览次数:4
分类:技术文章
本文共 3540 字,大约阅读时间需要 11 分钟。
虚线的需求,总是觉得要是用图片没得那么看着舒心,适配性也不好。定义一个虚线DashedLineView继承自View。
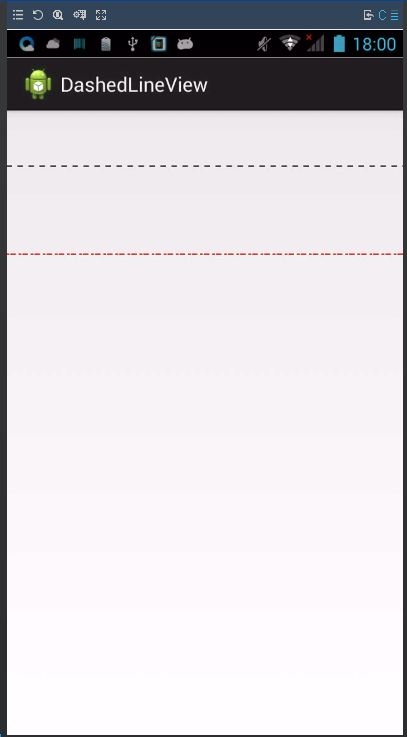
效果图: 自定义第一步是永远都不变的自定义属性,在attrs.xml中:
然后就是在view的构造方法中来获取:
TypedArray typedArray = context.obtainStyledAttributes(attributeSet,R.styleable.dashedline); lineColor = typedArray.getColor(R.styleable.dashedline_lineColor, Color.BLACK); lineLength =(int) typedArray.getDimension(R.styleable.dashedline_lineLength,10); lineSpace =(int) typedArray.getDimension(R.styleable.dashedline_lineSpace,10); typedArray.recycle();
接下来就是初始化画笔和路径了:
this.mPaint = new Paint(); this.mPath = new Path(); this.mPaint.setStyle(Paint.Style.STROKE); this.mPaint.setColor(lineColor); this.mPaint.setAntiAlias( true);//消除锯齿 this.mPaint.setStrokeWidth(4);//画笔的尺寸
然后使用DashPathEffect这个效果来做虚线。
这个东西有两个参数new DashPathEffect(float[] float, int offset), 假如float = { 1, 2, 3, 4},效果即是:绘制长度1的实线,再绘制长度2的空白,再绘制长度3的实线,再绘制长度4的空白,依次重复下去。使mian_activity.xml:
MainActivity中:其实这部分完全可以直接写到自定义view中去。
public class MainActivity extends Activity { private DashedLineView line_1,line_2; @Override protected void onCreate(Bundle savedInstanceState) { super.onCreate(savedInstanceState); setContentView(R.layout.activity_main); // line_1 默认效果 line_2 = (DashedLineView) findViewById(R.id.line_2); line_2.setMyStyle(new DashPathEffect(new float[]{ 5,2,10,5}, 1)); }} 最后贴一个DashedLineView的完整代码:
public class DashedLineView extends View { private int lineColor; private int lineLength; private int lineSpace; private Paint mPaint = null; private Path mPath = null; private PathEffect pe = null; private float[] arrayOfFloat; public DashedLineView(Context paramContext) { this(paramContext, null); } public DashedLineView(Context context, AttributeSet attributeSet) { super(context, attributeSet); TypedArray typedArray = context.obtainStyledAttributes(attributeSet,R.styleable.dashedline); lineColor = typedArray.getColor(R.styleable.dashedline_lineColor, Color.BLACK); lineLength =(int) typedArray.getDimension(R.styleable.dashedline_lineLength,10); lineSpace =(int) typedArray.getDimension(R.styleable.dashedline_lineSpace,10); typedArray.recycle(); this.mPaint = new Paint(); this.mPath = new Path(); this.mPaint.setStyle(Paint.Style.STROKE); this.mPaint.setColor(lineColor); this.mPaint.setAntiAlias( true);//消除锯齿 this.mPaint.setStrokeWidth(4);//画笔的尺寸 arrayOfFloat = new float[2]; //假如arrayOfFloat = { 1, 2, 3, 4};效果即是:绘制长度1的实线,再绘制长度2的空白,再绘制长度3的实线,再绘制长度4的空白,依次重复下去 arrayOfFloat[0] =px2sp(context,lineLength);//线长度 arrayOfFloat[1] =px2sp(context,lineSpace);//空隙长度 this.pe = new DashPathEffect(arrayOfFloat, 1);//参数1为偏移量 } @Override protected void onDraw(Canvas canvas) { super.onDraw(canvas); this. mPath.moveTo(0.0F, 0.0F);//画笔移动到x=0;y=0位置, this. mPath.lineTo(getMeasuredWidth(), 0.0F);//从到(0,0)位置,画线到(getMeasuredWidth(),0); this. mPaint.setPathEffect(this.pe); canvas.drawPath(this.mPath,this.mPaint); } public void setMyStyle(PathEffect p){ this.pe = p; invalidate(); } public static int px2sp(Context context, float pxValue) { float fontScale = context.getResources().getDisplayMetrics().scaledDensity; return (int) (pxValue / fontScale + 0.5f); }} demo下载地址:
转载地址:https://blog.csdn.net/u010886975/article/details/52840639 如侵犯您的版权,请留言回复原文章的地址,我们会给您删除此文章,给您带来不便请您谅解!
发表评论
最新留言
逛到本站,mark一下
[***.202.152.39]2024年03月26日 07时31分14秒
关于作者

喝酒易醉,品茶养心,人生如梦,品茶悟道,何以解忧?唯有杜康!
-- 愿君每日到此一游!
推荐文章
【物联网实训项目】------(七)家庭智慧安防系统之人脸验证
2019-04-26
日常琐事(一)
2019-04-26
数据结构----绪论
2019-04-26
篇章二线性表---基础知识
2019-04-26
篇章二线性表---常见操作
2019-04-26
回溯法关于图
2019-04-26
04 Python数据类型之元组、集合
2019-04-26
05 Python之条件与循环
2019-04-26
06 Python之函数调用与定义
2019-04-26
07 Python之Numpy库
2019-04-26
08 Python之Pandas库选择查看、选择
2019-04-26
09 Python之Pandas库之数据处理与规整
2019-04-26
10 Python之Matplotlib库
2019-04-26
11 Python总结之股票数据量化分析
2019-04-26
12 Python总结之蒙特卡洛模拟
2019-04-26
13 Python总结之估值
2019-04-26
14 Python总结之风险管理
2019-04-26
15 Python总结之数据分析与挖掘
2019-04-26
16 Python总结之舆情时间序列可视化
2019-04-26
数据结构和算法的知识图谱
2019-04-26
白红宇的个人博客 - 记录点点滴滴的事 - 您是第 306338652 位访客
访问时间: 2024-04-20 02:14:26
访问IP: 3.134.104.173
Copyright © 2020 - 2023 blog.css8.cn 京ICP备2021015314号-1
手机版