linux(centos)系统安装activemq
发布日期:2021-10-05 01:18:08 浏览次数:2 分类:技术文章

本文共 4093 字,大约阅读时间需要 13 分钟。

一、前期准备

a) 首先从官网上下载Jdk 8 for Linux x64到window下。

b) 我这边用的最小安装,所以没有安装centos自带的openjdk,如果你安装时,不是最小安装的话,可能集成了系统的openjdk,所以我们先要删除自带的openjdk,具体步骤如下:

  1. 在系统终端输入:rpm -qa | grep java,如果有openjdk的话,会出现类似于XXXX_openjdk_XXX的信息。(可能有多条)

  2. 删除openjdk,在终端输入:rpm -e –-nodeps XXXX_openjdk_XXX 。即可删除自带的openjdk。(如果有多条openjdk,依次执行命令删除)

rpm -e --nodeps rpm -qa | grep java

二、Jdk的安装

a) 我们登录超级用户

su root 之后会提示输入密码。

进入www(路径可以自己选择)

cd www
mkdir javaweb
b) 我们进入javaweb,:

c) 解压jdk压缩包

tar –xzvf jdk-8u45-linux-x64.gz
e) 进入jdk1.8.0_161文件夹,输入pwd 获取目录jdk1.8.0_161绝对路径

cd jdk1.8.0_161

pwd
/www/javaweb/jdk1.8.0_161

三、jdk的配置

a) 使用vim命令打开系统的环境变量配置文件:

vi /etc/profile

b) 在profile文件最后加入:

JAVA

export JAVA_HOME=jdk的绝对路径(我的是:/www/javaweb/jdk1.8.0_161)

export PATH= P A T H : PATH: PATH:JAVA_HOME/bin

c) 使profile生效

source /etc/profile

四、配置验证

a) 首先,我们输入java –version,会得到:

java version “1.8.0_45”

Java™ SE Runtime Environment (build 1.8.0_45-b14)

Java HotSpot™ 64-Bit Server VM (build 25.45-b02, mixed mode)

b) 我们再输入javac,会得出:

Usage: javac 
where possible options include: -g Generate all debugging info -g:none Generate no debugging info -g:{
lines,vars,source} Generate only some debugging info -nowarn Generate no warnings -verbose Output messages about what the compiler is doing -deprecation Output source locations where deprecated APIs are used -classpath
Specify where to find user class files and annotation processors -cp
Specify where to find user class files and annotation processors -sourcepath
Specify where to find input source files -bootclasspath
Override location of bootstrap class files -extdirs
Override location of installed extensions -endorseddirs
Override location of endorsed standards path -proc:{ none,only} Control whether annotation processing and/or compilation is done. -processor
[,
,
...] Names of the annotation processors to run; bypasses default discovery process -processorpath
Specify where to find annotation processors -parameters Generate metadata for reflection on method parameters -d
Specify where to place generated class files -s
Specify where to place generated source files -h
Specify where to place generated native header files -implicit:{ none,class} Specify whether or not to generate class files for implicitly referenced files -encoding
Specify character encoding used by source files -source
Provide source compatibility with specified release -target
Generate class files for specific VM version -profile
Check that API used is available in the specified profile -Werror Terminate compilation if warnings occur @
Read options and filenames from file

c) 如果得到以上两步正确结果的话,恭喜你,你的jdk8就已经配置好了。

activemq是消息中间件,可以用来 解耦、消峰、异步

需要先安装jdk环境:https://www.cnblogs.com/pxblog/p/10512886.html

1、下载文件 (也可以直接再Linux上下载,第二步有说明)

下载:apache-activemq-5.14.0-bin.tar.gz

可以在官网下载:http://activemq.apache.org/activemq-5140-release.html

2、上传文件到 /usr/local/src中(路径可以自己选择)

也可以直接使用 wget命令进行下载,下载的文件会保存到你当前的目录底下

wget https://archive.apache.org/dist/activemq/5.14.0/apache-activemq-5.14.0-bin.tar.gz

3、解压压缩包

1

tar -zxvf apache-activemq-5.14.0-bin.tar.gz
4、进入文件目录

1

cd apache-activemq-5.14.0/bin
启动activemq

1

./activemq start
 查看activemq进程

1

ps -ef| grep activemq

5、查看防火墙端口是否开放

如果使用了云服务器需要先开启8161(web管理页面端口)、61616(activemq服务监控端口) 两个端口

1firewall-cmd --list-ports #查看防火墙开放端口列表  

如果没有8161和61616这两个端口,增加开放这两个端口 (具体解释可以看:https://www.cnblogs.com/pxblog/p/12222150.html)

[root@host-172-16-2-46 bin]# firewall-cmd --zone=public --add-port=8161/tcp --permanent      #开放8161端口success[root@host-172-16-2-46 bin]# firewall-cmd --zone=public --add-port=61616/tcp --permanent     #开放61616端口

success

[root@host-172-16-2-46 bin]# firewall-cmd --reload #重启防火墙
success
  启动防火墙:service firewalld start

6、打开web管理页面

http://服务器IP:8161/admin

默认用户名密码 admin/admin
在这里插入图片描述
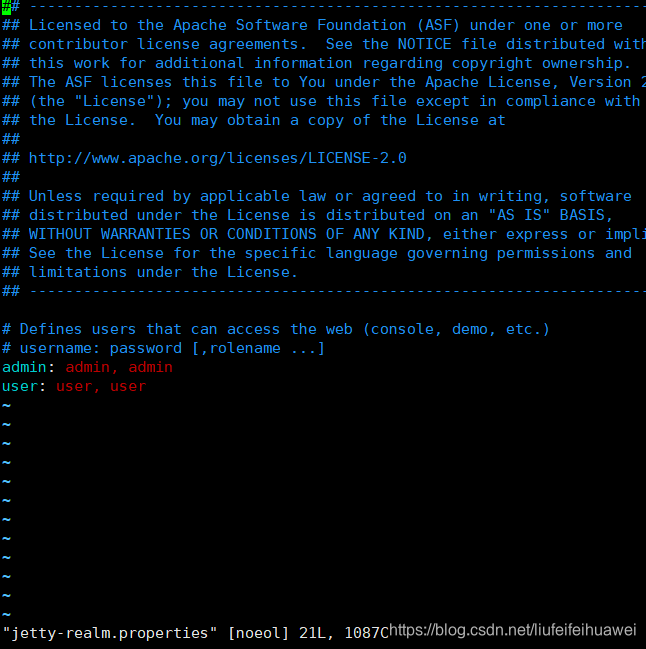
可以在安装目录的conf/jetty-realm.properties文件中修改默认密码
在这里插入图片描述

7、增加新账号密码

打开conf/activemq.xml文件

1

[root@host-172-16-2-46 conf]# vim activemq.xml
在broker标签下添加以下代码(账号和密码可以自己设置,这就是开发连接使用的账号密码)

如同所示

在这里插入图片描述

转载地址:https://blog.csdn.net/liufeifeihuawei/article/details/116940006 如侵犯您的版权,请留言回复原文章的地址,我们会给您删除此文章,给您带来不便请您谅解!

上一篇:Windows系统安装ActiveMQ
下一篇:linux 删除文件

发表评论

最新留言

表示我来过!
[***.240.166.169]2024年04月04日 22时04分51秒