本文共 14213 字,大约阅读时间需要 47 分钟。
发布订阅模式
vue响应式原理的核心之一就是发布订阅模式。它定义的是一种依赖关系,当一个状态发生改变的时候,所有依赖这个状态的对象都会得到通知。
比较典型的就是买东西,比如A想买一个小红花,但是它缺货了,于是A就留下联系方式,等有货了商家就通过A的联系方式通知他。后来又来了B、C、D…,他们也想买小红花,于是他们都留下了联系方式,商家把他们的联系方式都存到小红花的通知列表,等小红花有货了,一并通知这些人。
在上面这个例子中,可以抽象出来发布订阅的两个类:
- Dep类:商家。Dep类有一个数组(小红花的通知列表),来存放订阅信息;还有两个操作:添加订阅者信息、通知订阅者。
- Watcher类: A、B、C、D每个人都是一个Watcher类。Watcher类提供回调函数,也就是收到通知的要做什么。
class Dep { constructor(){ this.subs = [] //存放订阅者信息 } addSub(watcher){ //添加订阅者 this.subs.push(watcher) } notify(){ //通知所有订阅者 this.subs.forEach((sub) => { sub.update() }) }}class Watcher{ constructor(cb){ this.cb = cb //订阅者在收到通知要执行的操作 } update(){ this.cb && this.cb() }}const a = new Watcher(()=>{ console.log('A收到,小红花到货了')})const b = new Watcher(()=>{ console.log('B收到,小红花到货了')})const dep = new Dep()dep.addSub(a)dep.addSub(b)dep.notify() 
数据劫持
在vue中,响应式数据可以类比成上面例子中的小红花,通过发布订阅的模式来监听数据状态的变化,通知视图进行更新。那么,是在何时进行订阅,何时进行发布,这就要用到数据劫持。
vue使用Object.defineProperty()进行数据劫持。
let msg = "hello"const data = {};Object.defineProperty(data, 'msg', { enumerable: true, configurable: true, get() { //读取data.msg时会执行get函数 console.log('get msg') return msg; }, set(newVal) { //为data.msg赋值时会执行set函数 console.log('set msg') msg = newVal; }});data.msg //'get msg'data.msg = 'hi' //'set msg' 通过Object.defineProperty定义的属性,在取值和赋值的时候,我们都可以在它的get、set方法中添加自定义逻辑。当data.msg的值更新时,每一个取值data.msg的地方也需要更新,可视为此处要订阅data.msg,因此 在get方法中添加watcher。data.msg重新赋值时,要通知所有watcher进行相应的更新,因此 在set方法中notify所有watcher。
在vue中,定义在data中的数据都是响应式的,因为vue对data中的所有属性进行了数据劫持。
function initData (vm) { var data = vm.$options.data; observe(data, true); }function observe (value, asRootData) { var ob = new Observer(value); return ob}//Observer的作用就是对数据进行劫持,将数据定义成响应式的var Observer = function Observer (value) { if (Array.isArray(value)) { //当数据是数组,数组劫持的方式与对象不同 if (hasProto) { protoAugment(value, arrayMethods); } else { copyAugment(value, arrayMethods, arrayKeys); } this.observeArray(value); } else { //当数据是对象,递归对象,将对象的每一层属性都使用Object.defineProperty劫持,如 {a: {b: {c: 1}}} this.walk(value); }}; 使用vue时,data中经常会有数组,和对象不同,它的数据劫持不能通过Object.defineProperty来实现,下面我们分别来简单实现一下。
对象
对象的数据劫持,首先遍历对象的所有属性,对每一个属性使用Object.defineProperty劫持,当属性的值也是对象时,递归。
function observeObject(obj){ //递归终止条件 if(!obj || typeof obj !== 'object') return Object.keys(obj).forEach((key) => { let value = obj[key] //递归对obj属性的值进行数据劫持 observeObject(value) let dep = new Dep() //每个属性都有一个依赖数组 Object.defineProperty(obj,key,{ enumerable: true, configurable: true, get(){ dep.addSub(watcher) //伪代码, 添加watcher return value }, set(newVal){ value = newVal //obj属性重新赋值后,对新赋的值也进行数据劫持,因为新赋的值可能也是一个对象 / ** let a = { b: 1 } a.b = {c: 1} **/ observeObject(value) dep.notify() //伪代码, 通知所有watcher进行更新 } }) })} 数组
数组状态的变化主要有两种: 一是数组的项的变化,二是数组长度的变化。因此数组的数据劫持也是考虑这两方面。
- 数组项的劫持:
function observeArr(arr){ for(let i=0; i vue对于数组项是简单数据类型的情况没有劫持,这也导致了vue数组使用的一个问题,当数组项是简单数据类型时,修改数据项时视图并不会更新。
{ {item}}
data:{ arr: [1,2,3]},methods:{ changeArr(){ this.arr[0] = 5 }} - 数组长度变化的劫持是通过重写7个可以改变原数组长度的方法(
push, pop, shift, unshift, splice, sort, reverse)实现的。
let arrayProto = Array.prototype;let arrayMethods = Object.create(arrayProto); //arrayMethods继承自Array.prototypelet methodsToPatch = [ 'push', 'pop', 'shift', 'unshift', 'splice', 'sort', 'reverse'];methodsToPatch.forEach((method) => { //重写这7个方法 arrayMethods[method] = function(...args) { let result = arrayProto[method].apply(this,args) //调用原有的数组方法 let inserted; switch (method) { case 'push': case 'unshift': inserted = args; break case 'splice': inserted = args.slice(2); break } if (inserted) { //push、unshift、splice可能加入新的数组元素,这里也要对新元素进行劫持 observeArray(inserted); } dep.notify(); //伪代码, 通知所有watcher进行更新 return result }})arr.__proto__ = arrayMethods //arr是需要进行劫持的数组,修改它原有的原型链方法。 实现一个简单的双向数据绑定
- 第一步,初始化。
class Vue { constructor(options){ this.$data = options.data this.$getterFn = options.getterFn observe(this.$data) // 将定义在options.data中的数据作响应式处理 //options.getterFn是一个取值函数,模拟页面渲染时要做的取值操作 new Watcher(this.$data, this.$getterFn.bind(this), key => { console.log(key + "已修改,视图刷新") }) }} - 第二步,实现observe方法。主要就是用到上面的发布订阅模式和数据劫持。
function observe(data){ if(!data || typeof data !== 'object') return let ob; //为数据创建observer时,会将observer添加到数据属性,如果数据已经有observer,会直接返回该observer if (data.hasOwnProperty('__ob__') && data.__ob__ instanceof Observer) { ob = data.__ob__; }else{ ob = new Observer(data) } return ob}class Observer { constructor(data){ this.dep = new Dep() //将dep挂载到observer上,用于处理data是数组的情况 Object.defineProperty(data, '__ob__', { //将observer挂载到要data上,方便通过data访问dep属性和walk、observeArray方法 enumerable: false, configurable: false, value: this }) if(Array.isArray(data)){ //如果是数组,重写数组的7个方法,对数组的每一项作响应式处理 data.__proto__ = arrayMethods this.observeArray(data) }else{ this.walk(data) } } walk(data){ let keys = Object.keys(data) keys.forEach((key) => { defineReactive(data, key) }) } observeArray(data){ data.forEach((val) => { observe(val) }) }}//重写数组的7个方法let arrayProto = Array.prototype;let arrayMethods = Object.create(arrayProto); //arrayMethods继承自Array.prototypelet methodsToPatch = [ 'push', 'pop', 'shift', 'unshift', 'splice', 'sort', 'reverse'];methodsToPatch.forEach((method) => { arrayMethods[method] = function(...args) { //将一个不定数量的参数表示为一个数组 let result = arrayProto[method].apply(this,args) //调用原有的数组方法 let inserted; switch (method) { case 'push': case 'unshift': inserted = args; break case 'splice': inserted = args.slice(2); break } if (inserted) { //push、unshift、splice可能加入新的数组元素,这里也要对新元素进行劫持 this.__ob__.observeArray(inserted); } this.__ob__.dep.notify('array') //触发这个数组dep的notify方法 return result }})function defineReactive(data,key){ let dep = new Dep() //每个属性对应一个dep,来管理订阅 let value = data[key] //当value是数组时,不会为数组的每个属性添加dep,而是为整个数组添加一个dep。 //当数组执行上面那7个方法时,就触发这个dep的notify方法 this.__ob__.dep.notify('array') let childOb = observe(value) Object.defineProperty(data,key,{ enumerable: true, configurable: true, get(){ //添加订阅者。Dep.target是一个全局对象。它指向当前的watcher Dep.target && dep.addSub(Dep.target) if(Array.isArray(value)) { Dep.target && childOb.dep.addSub(Dep.target) } return value }, set(newVal){ if(newVal === value) return value = newVal observe(value) dep.notify(key) } })} 
Dep.target = nullclass Watcher{ constructor(data,getterFn,cb){ this.cb = cb Dep.target = this getterFn() Dep.target = null } update(key){ this.cb && this.cb(key) }} 关键就是:
Dep.target = thisgetterFn()Dep.target = null
在new Watcher()时,就会执行这三行代码。Dep.target = this将当前创建的watcher赋值给Dep.target这个全局变量,执行getterFn()时,会对取vm.$data中的值,上面已经将vm.$data作了响应式处理,所以取它值的时候就会执行各属性的get方法。
get(){ //此时Dep.target指向当前的watcher,此时就将当前watcher添加到这个属性对应的订阅数组里。 Dep.target && dep.addSub(Dep.target) if(Array.isArray(value)) { Dep.target && childOb.dep.addSub(Dep.target) //如果属性对应的值是数组,就将当前watcher添加到该数组对应的订阅数组里。 } return value}, 这样就完成了对需要访问的属性添加watcher的操作,然后将Dep.target还原成null。
测试代码:(渲染视图也是对data里的属性取值,如{
{msg.m}},添加watcher,完成订阅。这里我们就简单访问取值来进行模拟)let vm = new Vue({ el: '#root', data:{ msg: { m: "hello world" }, arr: [ {a: 1}, {a: 2} ] }, getterFn(){ console.log(this.$data.msg.m) this.$data.arr.forEach((item) => { console.log(item.a) }) }}) 效果:
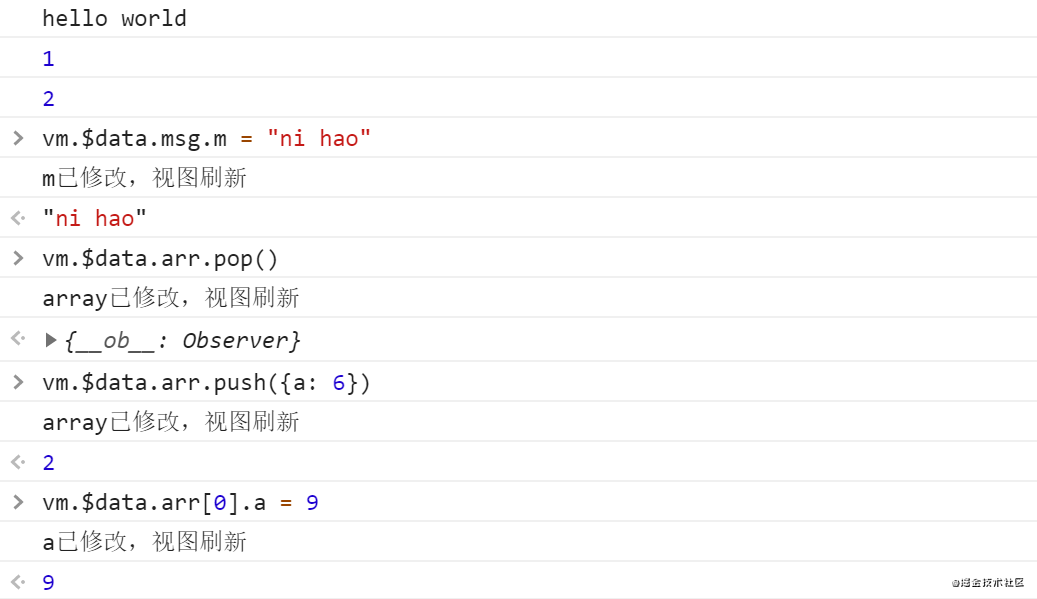 可以看到,getterFn访问过的数据,在修改值时就会触发watcher的回调函数。
 vue的几种watcher
vue里面主要有三种watcher:
- 渲染watcher: 当渲染用到的data数据变化时,重新渲染页面
- computed watcher: 当data数据变化时,更新computed的值
- user watcher: 当要watch的数据变化时,执行watch定义的回调函数
渲染watcher
渲染watcher是在vm.$mount()方法执行时创建的。
Vue.prototype.$mount = function () { var updateComponent = function () { vm._update(vm._render(), hydrating); }; //updateComponent就是进行视图渲染的函数,对data中数据的取值的操作就是在该函数中完成 new Watcher(vm, updateComponent, noop, options,true);}; Watcher的构造函数:
var Watcher = function Watcher (vm,expOrFn,cb,options,isRenderWatcher) { this.vm = vm; if (options) { ... this.lazy = !!options.lazy; //主要用于computed watcher } else { this.deep = this.user = this.lazy = this.sync = false; } this.cb = cb; if (typeof expOrFn === 'function') { this.getter = expOrFn; //expOrFn对应上面的updateComponent方法 } else { this.getter = parsePath(expOrFn); } //如果this.lazy为false,就立即执行this.get() //所以在创建watcher的时候就会执行updateComponent方法 this.value = this.lazy? undefined: this.get(); };Watcher.prototype.get = function get () { pushTarget(this); //类比上面简易版的Dep.target = this var value; var vm = this.vm; value = this.getter.call(vm, vm); //执行取值函数,完成watcher订阅 popTarget(); //类比上面简易版的Dep.target = null return value}; 在渲染watcher创建的时候,就立即执行取值函数,完成响应式数据的依赖收集。可以看出,定义在data中的数据,它们的watcher都是同一个,就是在vm.$mount()方法执行时创建的watcher。watcher的update方法:
Watcher.prototype.update = function update () { if (this.lazy) { this.dirty = true; } else if (this.sync) { this.run(); } else { queueWatcher(this); //渲染watcher会走这里的逻辑,其实最终都会执行this.run(),只是这里用队列进行优化 }};Watcher.prototype.run = function run () { var value = this.get(); //又会执行updateComponent方法} 定义在data中的数据,它们的watcher都是同一个,当data每一次数据中数据更新时,都会执行watcher.update()。渲染watcher的update()最终会执行updateComponent方法,如果一次性修改N个data属性时,比如下面例子中的change,理论上会执行N次updateComponent(),很明显,这是不科学的。
作为优化,维护一个watcher队列,每次执行watcher.update()就尝试往队列里面添加watcher(queueWatcher(this)),如果当前watcher已经存在于队列中,就不再添加。最后在nextTick中一次性执行这些watcher的run方法。
这样,如果一次性修改N个data属性时,实际上只会执行一次updateComponent()
data:{ msg: "hello", msg2: "ni hao"}, methods:{ change(){ this.msg = "hi" this.msg2 = "hi" }}, computed watcher
data:{ msg: "hello"},computed: { newMsg(){ return this.msg + ' computed' }}, { {newMsg}}
当msg更新时,newMsg也会更新。因为computed会对访问到的data数据(这里是msg)进行订阅。
function initComputed (vm, computed) { var watchers = vm._computedWatchers = Object.create(null); for (var key in computed) { var userDef = computed[key]; var getter = typeof userDef === 'function' ? userDef : userDef.get; watchers[key] = new Watcher( //watcher的取值函数就是我们在computed中定义的函数 vm, getter || noop, noop, computedWatcherOptions // { lazy: true } ); if (!(key in vm)) { defineComputed(vm, key, userDef); } } } 在initComputed的时候,创建了watcher,它有个属性lazy: ture。在watcher的constructor中,lazy: ture表示创建watcher的时候不会执行取值函数,所以,此时watcher并没有加入msg的订阅数组。
this.value = this.lazy? undefined: this.get();
只有在页面对computed进行取值{ {newMsg}}的时候,watcher才会加入msg的订阅数组。这里主要来看看defineComputed方法,它的大致逻辑如下:
function defineComputed (target,key,userDef) { // target:vm, key: newMsg Object.defineProperty(target, key, { enumerable: true, configurable: true, get: function computedGetter () { //当视图对newMsg进行取值的时候会执行这里 var watcher = this._computedWatchers && this._computedWatchers[key]; if (watcher) { if (watcher.dirty) { //这里要对照Watcher的构造函数来看,默认watcher.dirty = watcher.lazy,首次执行为true watcher.evaluate(); //会执行watcher.evaluate() } if (Dep.target) { watcher.depend(); } return watcher.value } }, set: userDef.set || noop });}Watcher.prototype.evaluate = function evaluate () { this.value = this.get(); //执行watcher的取值函数,返回取值函数执行的结果,并将watcher添加到msg的订阅数组 this.dirty = false; //this.dirty置为false,用于缓存。}; computed watcher有个属性dirty,用于标记是否执行取值函数。
1、初始化watcher时,watcher.dirty = watcher.lazy,值为true。页面第一次访问newMsg时就会执行watcher.evaluate()
2、取值完成后,watcher.dirty = false。下一次页面再取值就会直接返回之前计算得到的值 watcher.value 。
3、如果watcher订阅的 msg 发生变化,就会通知执行watcher的 watcher.update()。lazy属性为true的watcher执行update方法是watcher.dirty = true,这样页面取值newMsg就会重新执行取值函数,返回新的值。这样就实现了computed的缓存功能。
Watcher.prototype.update = function update () { if (this.lazy) { this.dirty = true; } else if (this.sync) { this.run(); } else { queueWatcher(this); }}; user watcher
watch:{ msg(newValue,oldValue){ console.log(newValue,oldValue) } }, 或者这样:
mounted(){ this.$watch('msg',function(newValue,oldValue){ console.log(newValue,oldValue) })} user watcher的核心方法就是vm.$watch:
Vue.prototype.$watch = function (expOrFn,cb,options) { //核心就是这里 //expOrFn ---> msg //cb ---> 用户自己定义的回调函数,function(oldValue,newValue){console.log(oldValue,newValue)} var watcher = new Watcher(vm, expOrFn, cb, options); };} 和渲染watcher、 computed watcher的expOrFn不同,user watcher 的expOrFn是个表达式。
//watcher的构造函数中if (typeof expOrFn === 'function') { this.getter = expOrFn;} else { this.getter = parsePath(expOrFn);} 创建user watcher时,会根据这个表达式完成取值操作,添加watcher到订阅数组。
expOrFn: 'msg' -----> vm.msgexpOrFn: 'obj.a' -----> vm.obj ----->vm.obj.a
deep:true时,会递归遍历当前属性对应的值,将watcher添加到所有属性上,每一次修改某一个属性都会执行watcher.update()。
Watcher.prototype.get = function get () { pushTarget(this); var value; var vm = this.vm; value = this.getter.call(vm, vm); if (this.deep) { traverse(value); //递归遍历取值,每次取值都添加该watcher到取值属性的订阅数组。 } popTarget(); return value}; vue源码系列文章:
转载地址:https://blog.csdn.net/ynweiy/article/details/115241555 如侵犯您的版权,请留言回复原文章的地址,我们会给您删除此文章,给您带来不便请您谅解!
发表评论
最新留言
关于作者
