本文共 11435 字,大约阅读时间需要 38 分钟。
面试经常问到的一个问题就是webapck的原理,要理解一个东西的原理,最深刻的方式就是自己去实现一次。下面我们就一起手写webpack核心代码,彻底搞懂webpack原理。
webpack的基础使用:
、 、功能预期
我们将要手写的webpack有以下功能:
1、能将模块化的js文件,打包生成一个js文件,模块中的ES6代码转换为ES5代码,在html文件中引入后能够直接运行在浏览器。
2、模块化的js文件支持esm和cjs的导入导出方式。
3、支持loader选项。
4、支持plugin选项。
基础功能的实现
使用方式
需要打包的文件:
//src/index.jsimport { msg } from './hello.js'const worldModule = require('./world.js')console.log(msg)console.log('hi ' + worldModule.world) //src/hello.jsimport { world } from './world.js'export const msg = 'hello ' + world //src/world.jsexport const world = 'world'
打包配置文件:
const path = require('path')module.exports = { mode: 'none', entry: './src/index.js', output: { filename: 'bundle.js', path: path.resolve(__dirname, 'dist') }} 在package.json中添加script字段:
"scripts": { "myPack": "node ./lib/my-pack.js --config webpack.config.js"}, 这样我们就能通过npm run myPack执行打包命令。最终结果将是在dist目录下生成一个bundle.js,将bundle.js引入html文件并在浏览器打开,将会输出:

流程分析
npm run myPack实际上执行的是node ./lib/my-pack.js --config webpack.config.js
我们在项目下新建一个lib文件夹,用于存放将要实现的打包工具的代码。
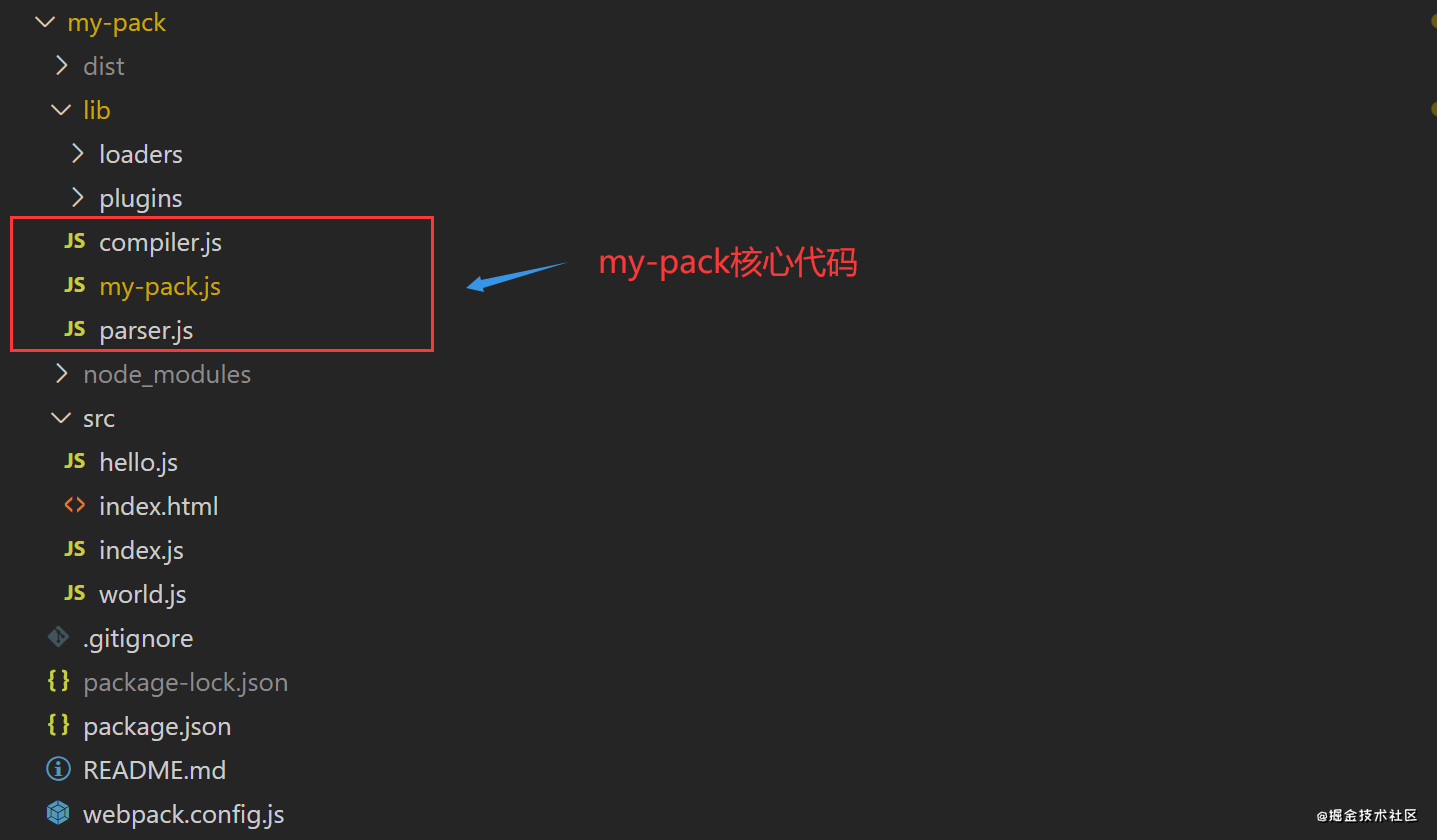
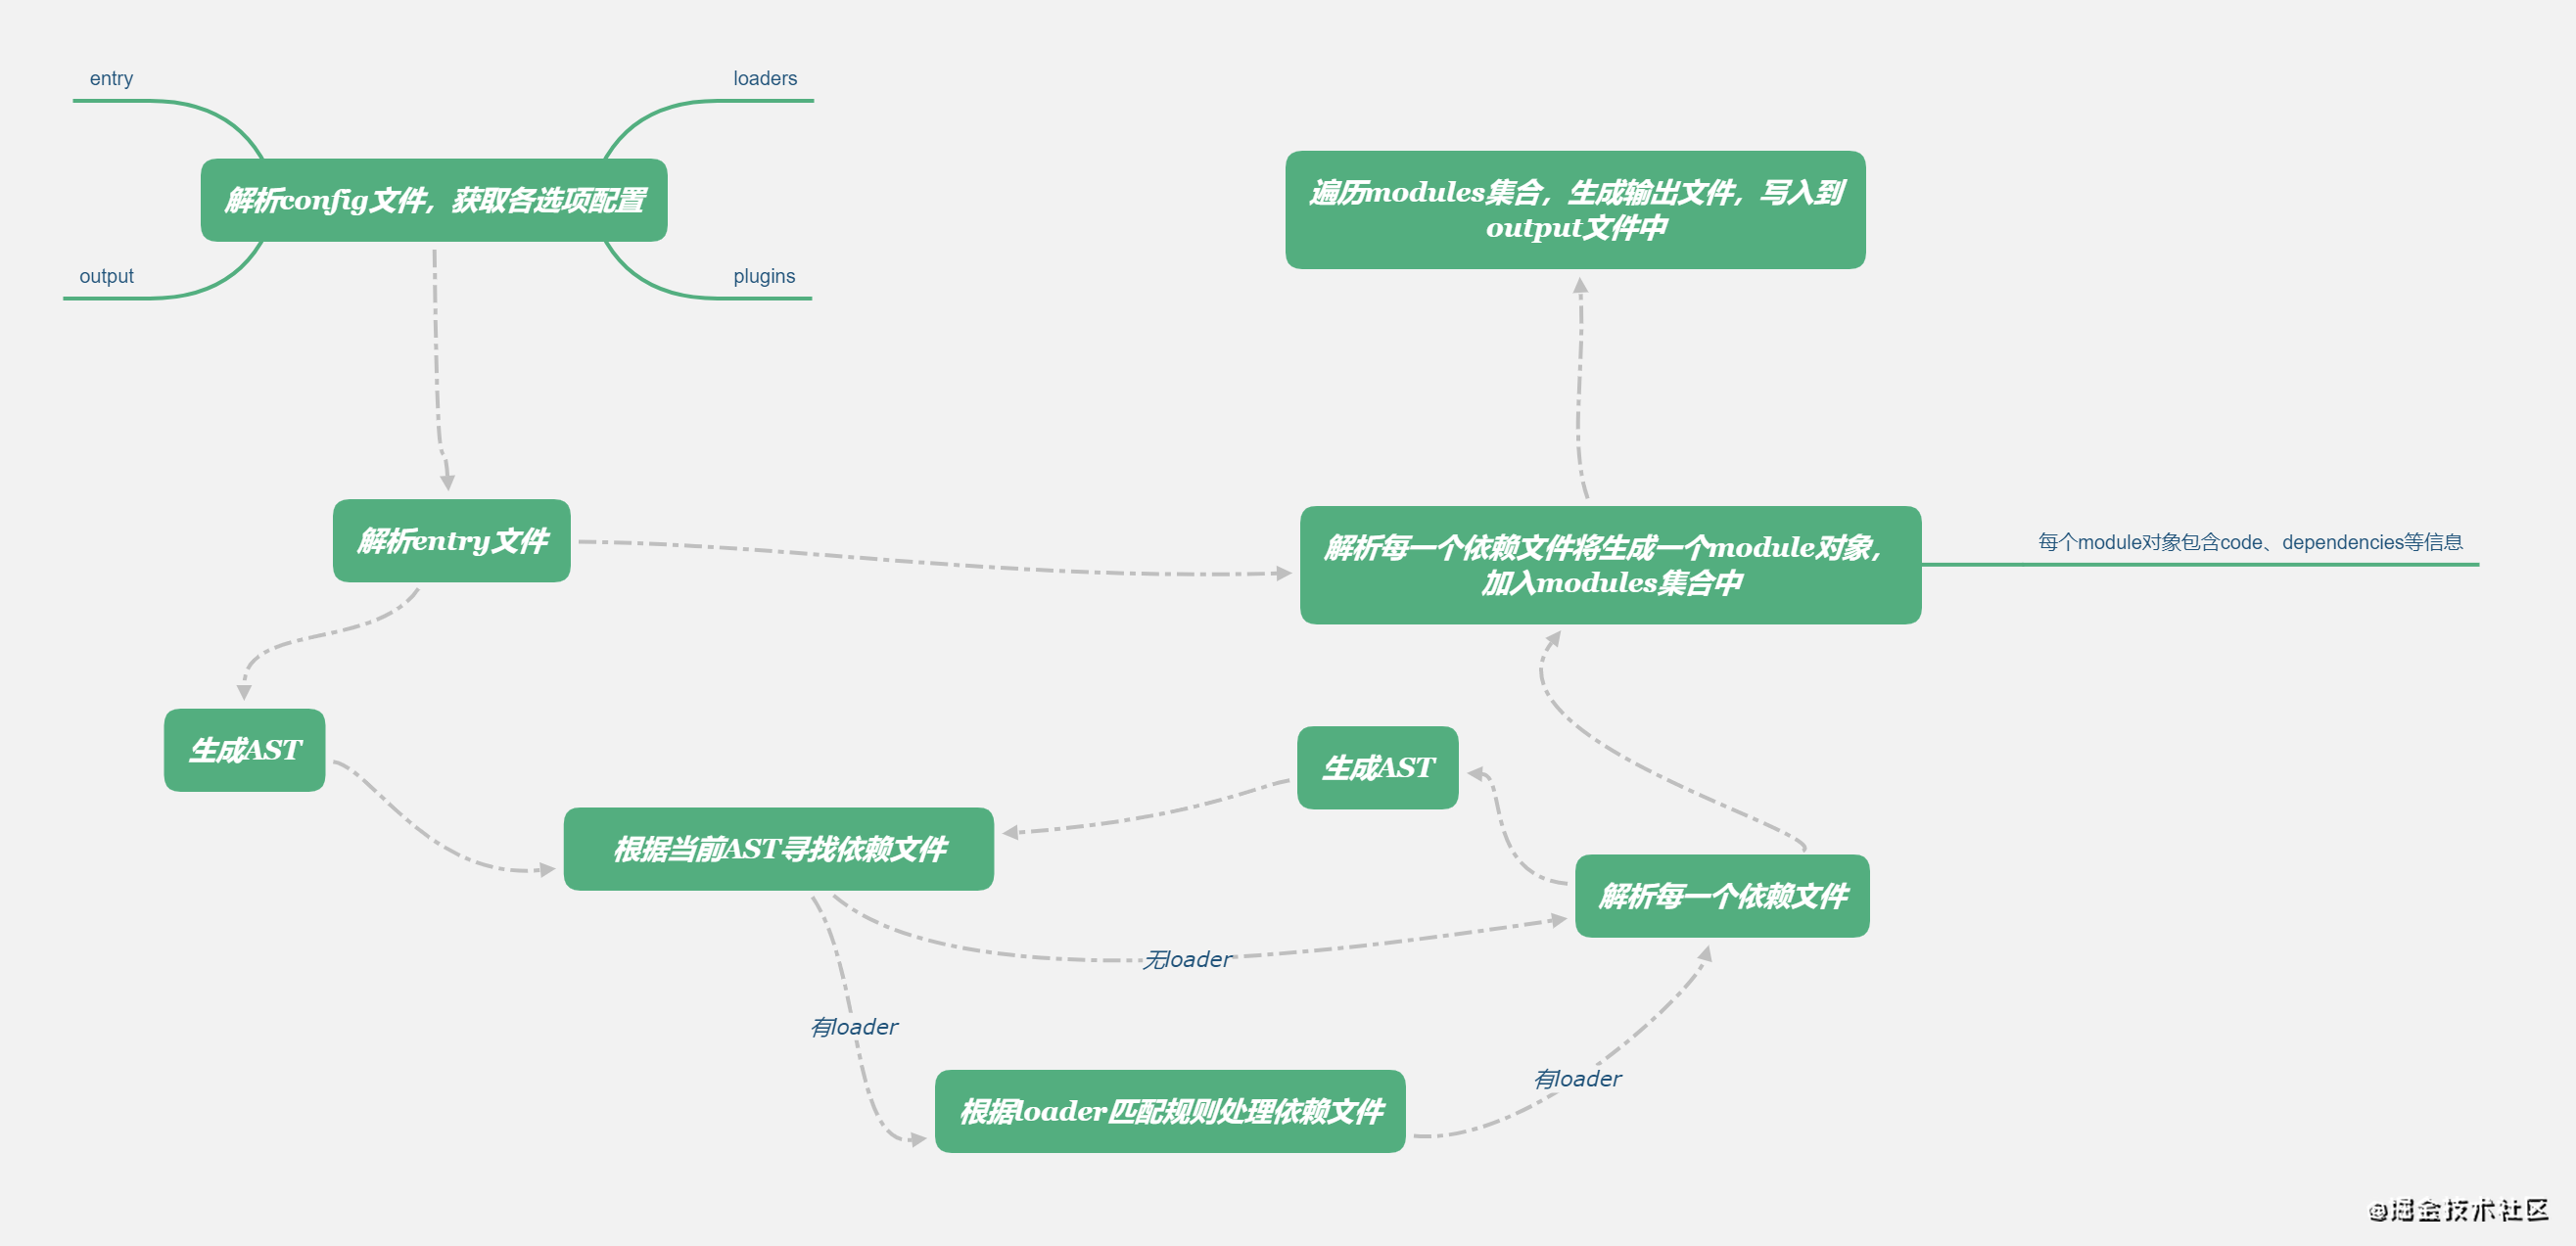
首先,我们来看看webpack的打包流程,如下图所示,主要有这样几个步骤:
1、解析config文件,获取配置选项,包括entry、output、loader、plugin等。
2、从entry文件开始,解析entry文件,获取依赖文件列表。
3、遍历依赖文件列表,逐个解析每个依赖文件,获取新的依赖,由此,递归地构建一个依赖关系图。在这个过程中,如果指定了loader,则先用loader处理匹配文件,再解析。
4、根据依赖关系图生成打包后代码,输出到output指定的文件中。
获取配置项
我们支持在package.json中指定配置文件,如没指定,则默认用项目根目录下的webpack.config.js,hmmm,不是很重要,可以略过。
确定配置文件后,获取配置项,并传入Compiler,然后执行Compiler的run方法,这是整个my-pack的流程控制方法。
const path = require("path")const Compiler = require("./Compiler")let configPath = path.resolve(process.cwd(), './webpack.config.js') //默认用项目根目录下的`webpack.config.js`//获取命令行参数,如指定了--config,则获取紧跟其后的配置文件名const argv = process.argv const index = argv.findIndex((value) => value === '--config')if(index >= 0 && argv[index+1]){ configPath = path.resolve(process.cwd(), argv[index+1])}const config = require(configPath) //获取配置项const compiler = new Compiler(config) //将配置项传入Compilercompiler.run() //执行Compiler的run方法 整体过程
Compiler类是控制整个打包过程的类,它的结构如下:
const parser = require('./parser')class Compiler{ constructor (config) { //解析配置选项 this.config = config this.entry = config.entry this.output = config.output this.execPath = process.cwd() //Node.js 进程的当前工作目录,在这里也就是项目根目录 this.modules = Object.create(null) //用于所有依赖文件生成的module的集合 } run () { //主要分为以下两个步骤 this.buildModule(path.resolve(this.execPath, this.entry)) //构建依赖关系图 this.emitFile() //生成打包文件 } }module.exports = Compiler 构建依赖关系图
buildModule (filename) { let key = path.relative(this.execPath, filename) //获取文件基于项目根目录的相对路径,作为它在module集合的key key = './' + key.replace(/\\/g,'/') if(this.modules[key]) return //如果模块已经存在于集合中,则返回 //编译解析文件,得到转换成es5的文件源码和它的依赖数组 const { dependencies, code } = parser.parse(filename,this.config) this.modules[key] = { //根据文件源码和它的依赖数组生成module,并加入到依赖集合中 code: code, dependencies: dependencies } //遍历文件的依赖数组,递归执行buildModule方法,直到遍历完所有依赖文件,这时this.modules中将是项目所有依赖module的集合 dependencies.forEach((dependency) => { const absPath = path.resolve(this.execPath, dependency) this.buildModule(absPath) })} 对于每个要解析的文件,通过parser.parse(filename,this.config)得到它的依赖数组和转换成es5的文件源码。
parser.parse处理文件的过程:
1、首先通过@babel/parser将文件源代码生成抽象语法树ast;
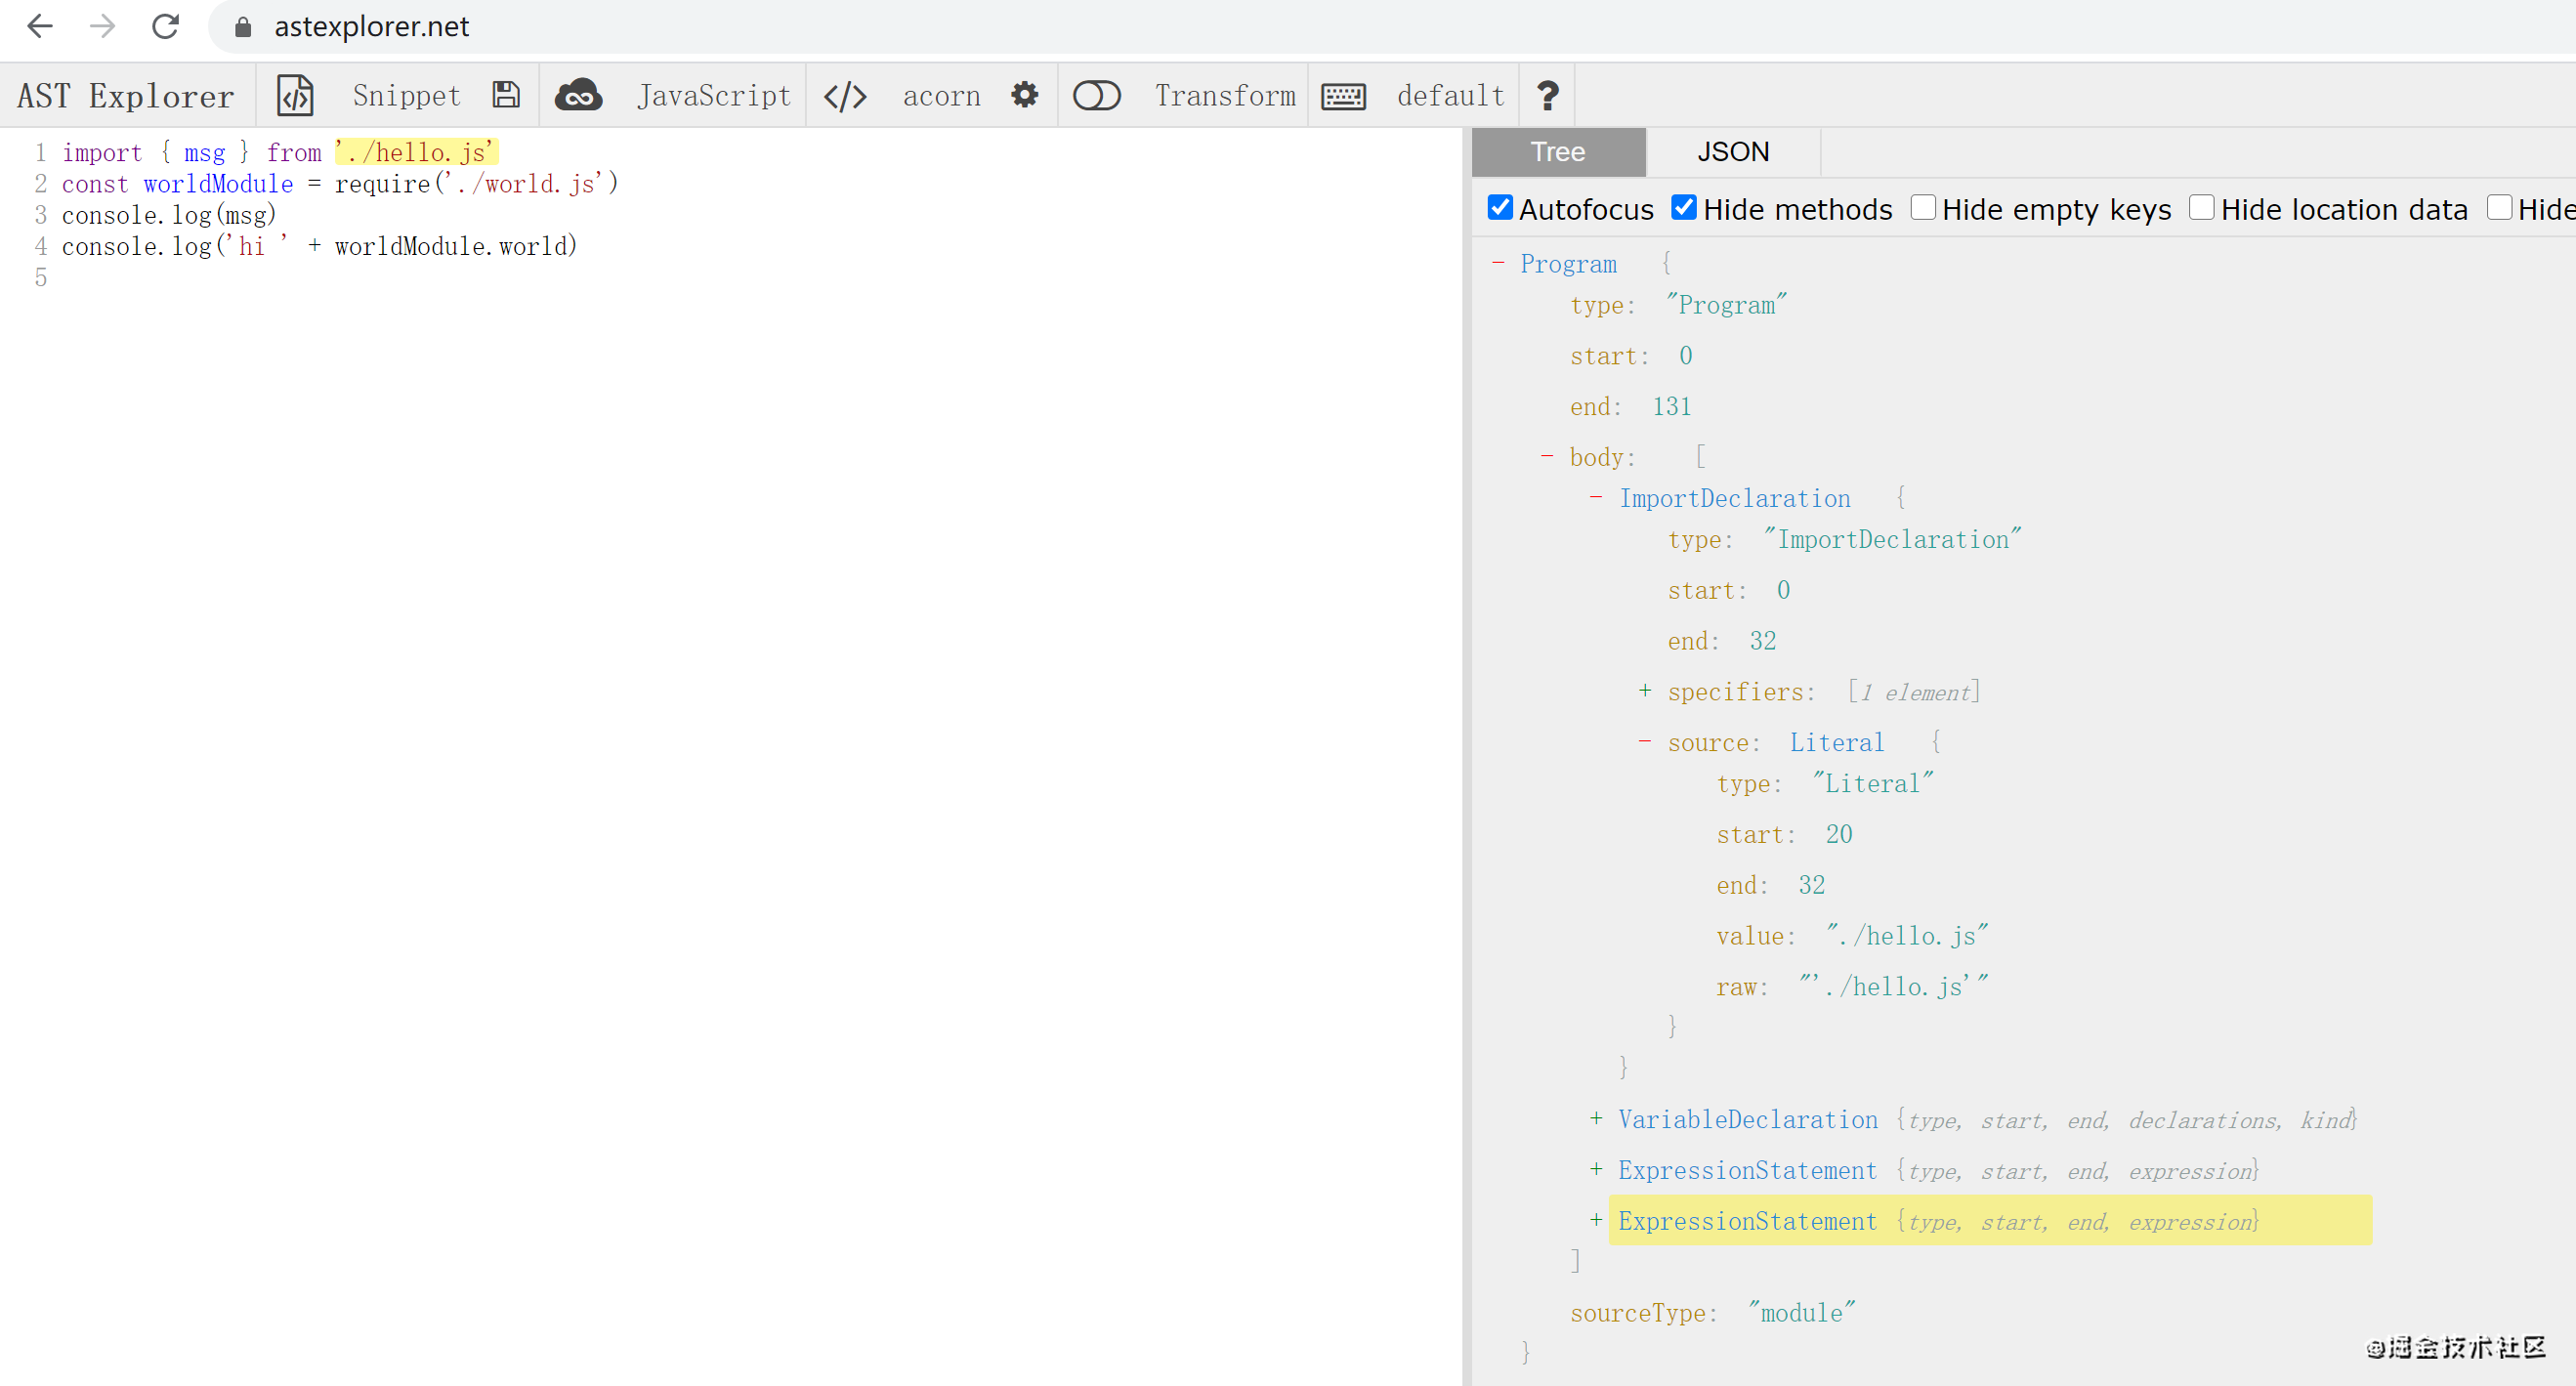
2、然后使用@babel/traverse遍历这个抽象语法树,找到reuqire和import的文件,记录到依赖数组中;在这里统一将ast中文件的引用路径修改成基于项目根目录的路径,比如这里的'./hello.js'修改成'./src/hello.js',与上面modules集合的各个key值对应。
3、最后通过@babel/core基于修改后的ast生成es5代码
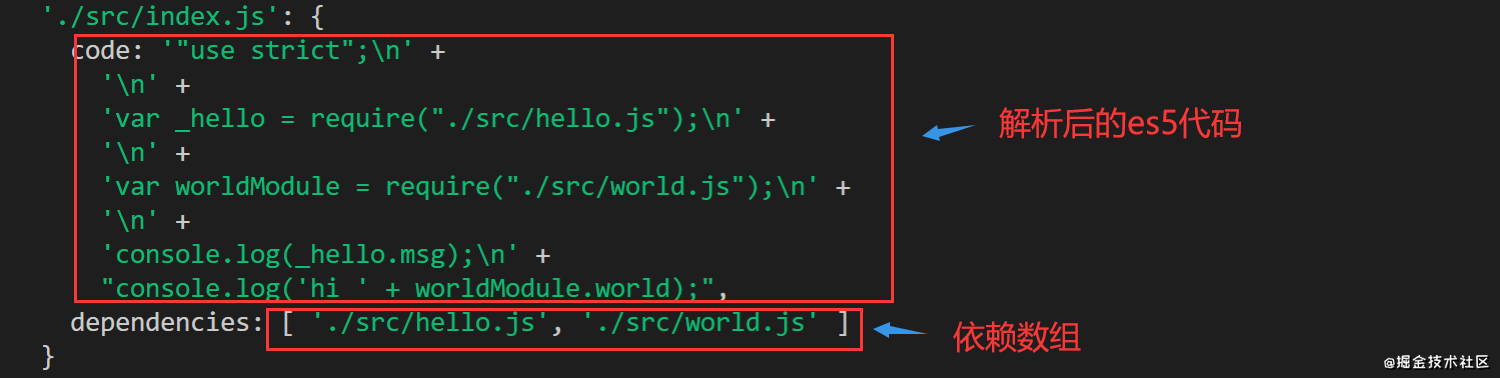
const babelParser = require("@babel/parser")const traverse = require("@babel/traverse").defaultconst babel = require('@babel/core') parse (filename,config) { const ast = this.genAST(filename,config) //生成ast抽象语法树 const dependencies = [] const dirname = path.dirname(filename) traverse(ast, { //遍历ast,获取依赖,并加入依赖数组 CallExpression({node}){ if(node.callee.name === 'require'){ //通过require导入 let moduleFile = path.resolve(dirname, node.arguments[0].value) moduleFile = path.relative(root, moduleFile) moduleFile = './' + moduleFile.replace(/\\/g,'/') node.arguments[0].value = moduleFile dependencies.push(moduleFile) //加入依赖数组 } }, ImportDeclaration({node}){ //通过import导入 let moduleFile = path.resolve(dirname, node.source.value) moduleFile = path.relative(root, moduleFile) moduleFile = './' + moduleFile.replace(/\\/g,'/') node.source.value = moduleFile dependencies.push(moduleFile) //加入依赖数组 } }) const { code } = babel.transformFromAst(ast, null, { //基于ast生成es5代码 presets: ["@babel/preset-env"] }) return { //返回解析后的es5代码和依赖数组 code, dependencies } }, genAST (filename,config) { let sourceCode = fs.readFileSync(filename, 'utf8') const ast = babelParser.parse(sourceCode,{ sourceType: 'module' //解析es6模块 }) return ast.program}, parse处理的每一个文件都生成一个module对象,该module对象至少包括code和dependencies这两个字段,以./src/index.js为例,我们看看得到的code和dependencies:
接下来,我们要做的就是遍历dependencies数组,对每一项执行buildModule方法,直到遍历完所有依赖文件,就得到了所有依赖module对象。
dependencies.forEach((dependency) => { const absPath = path.resolve(this.execPath, dependency) this.buildModule(absPath)}) 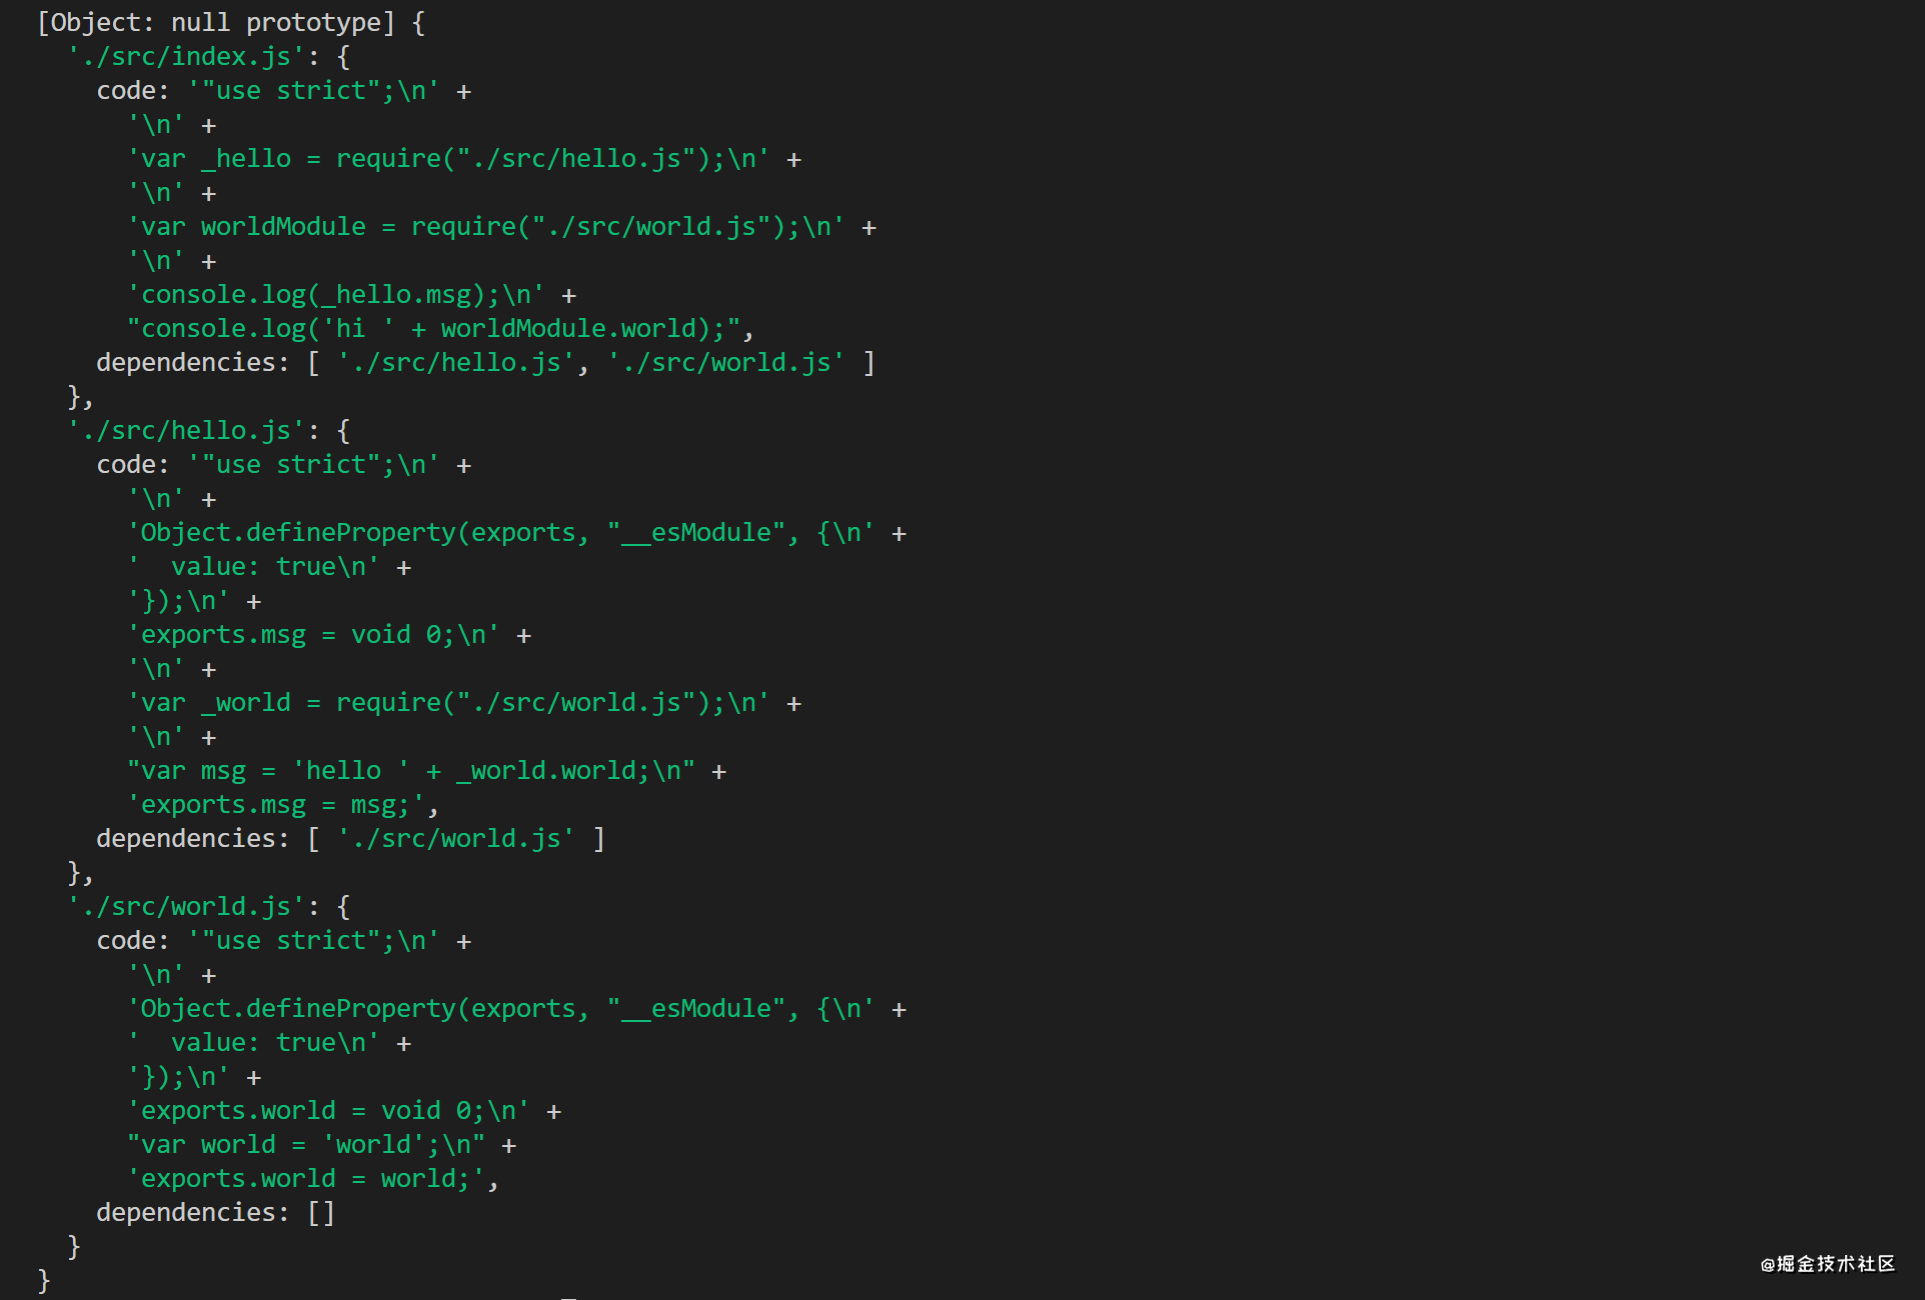
生成bundle文件
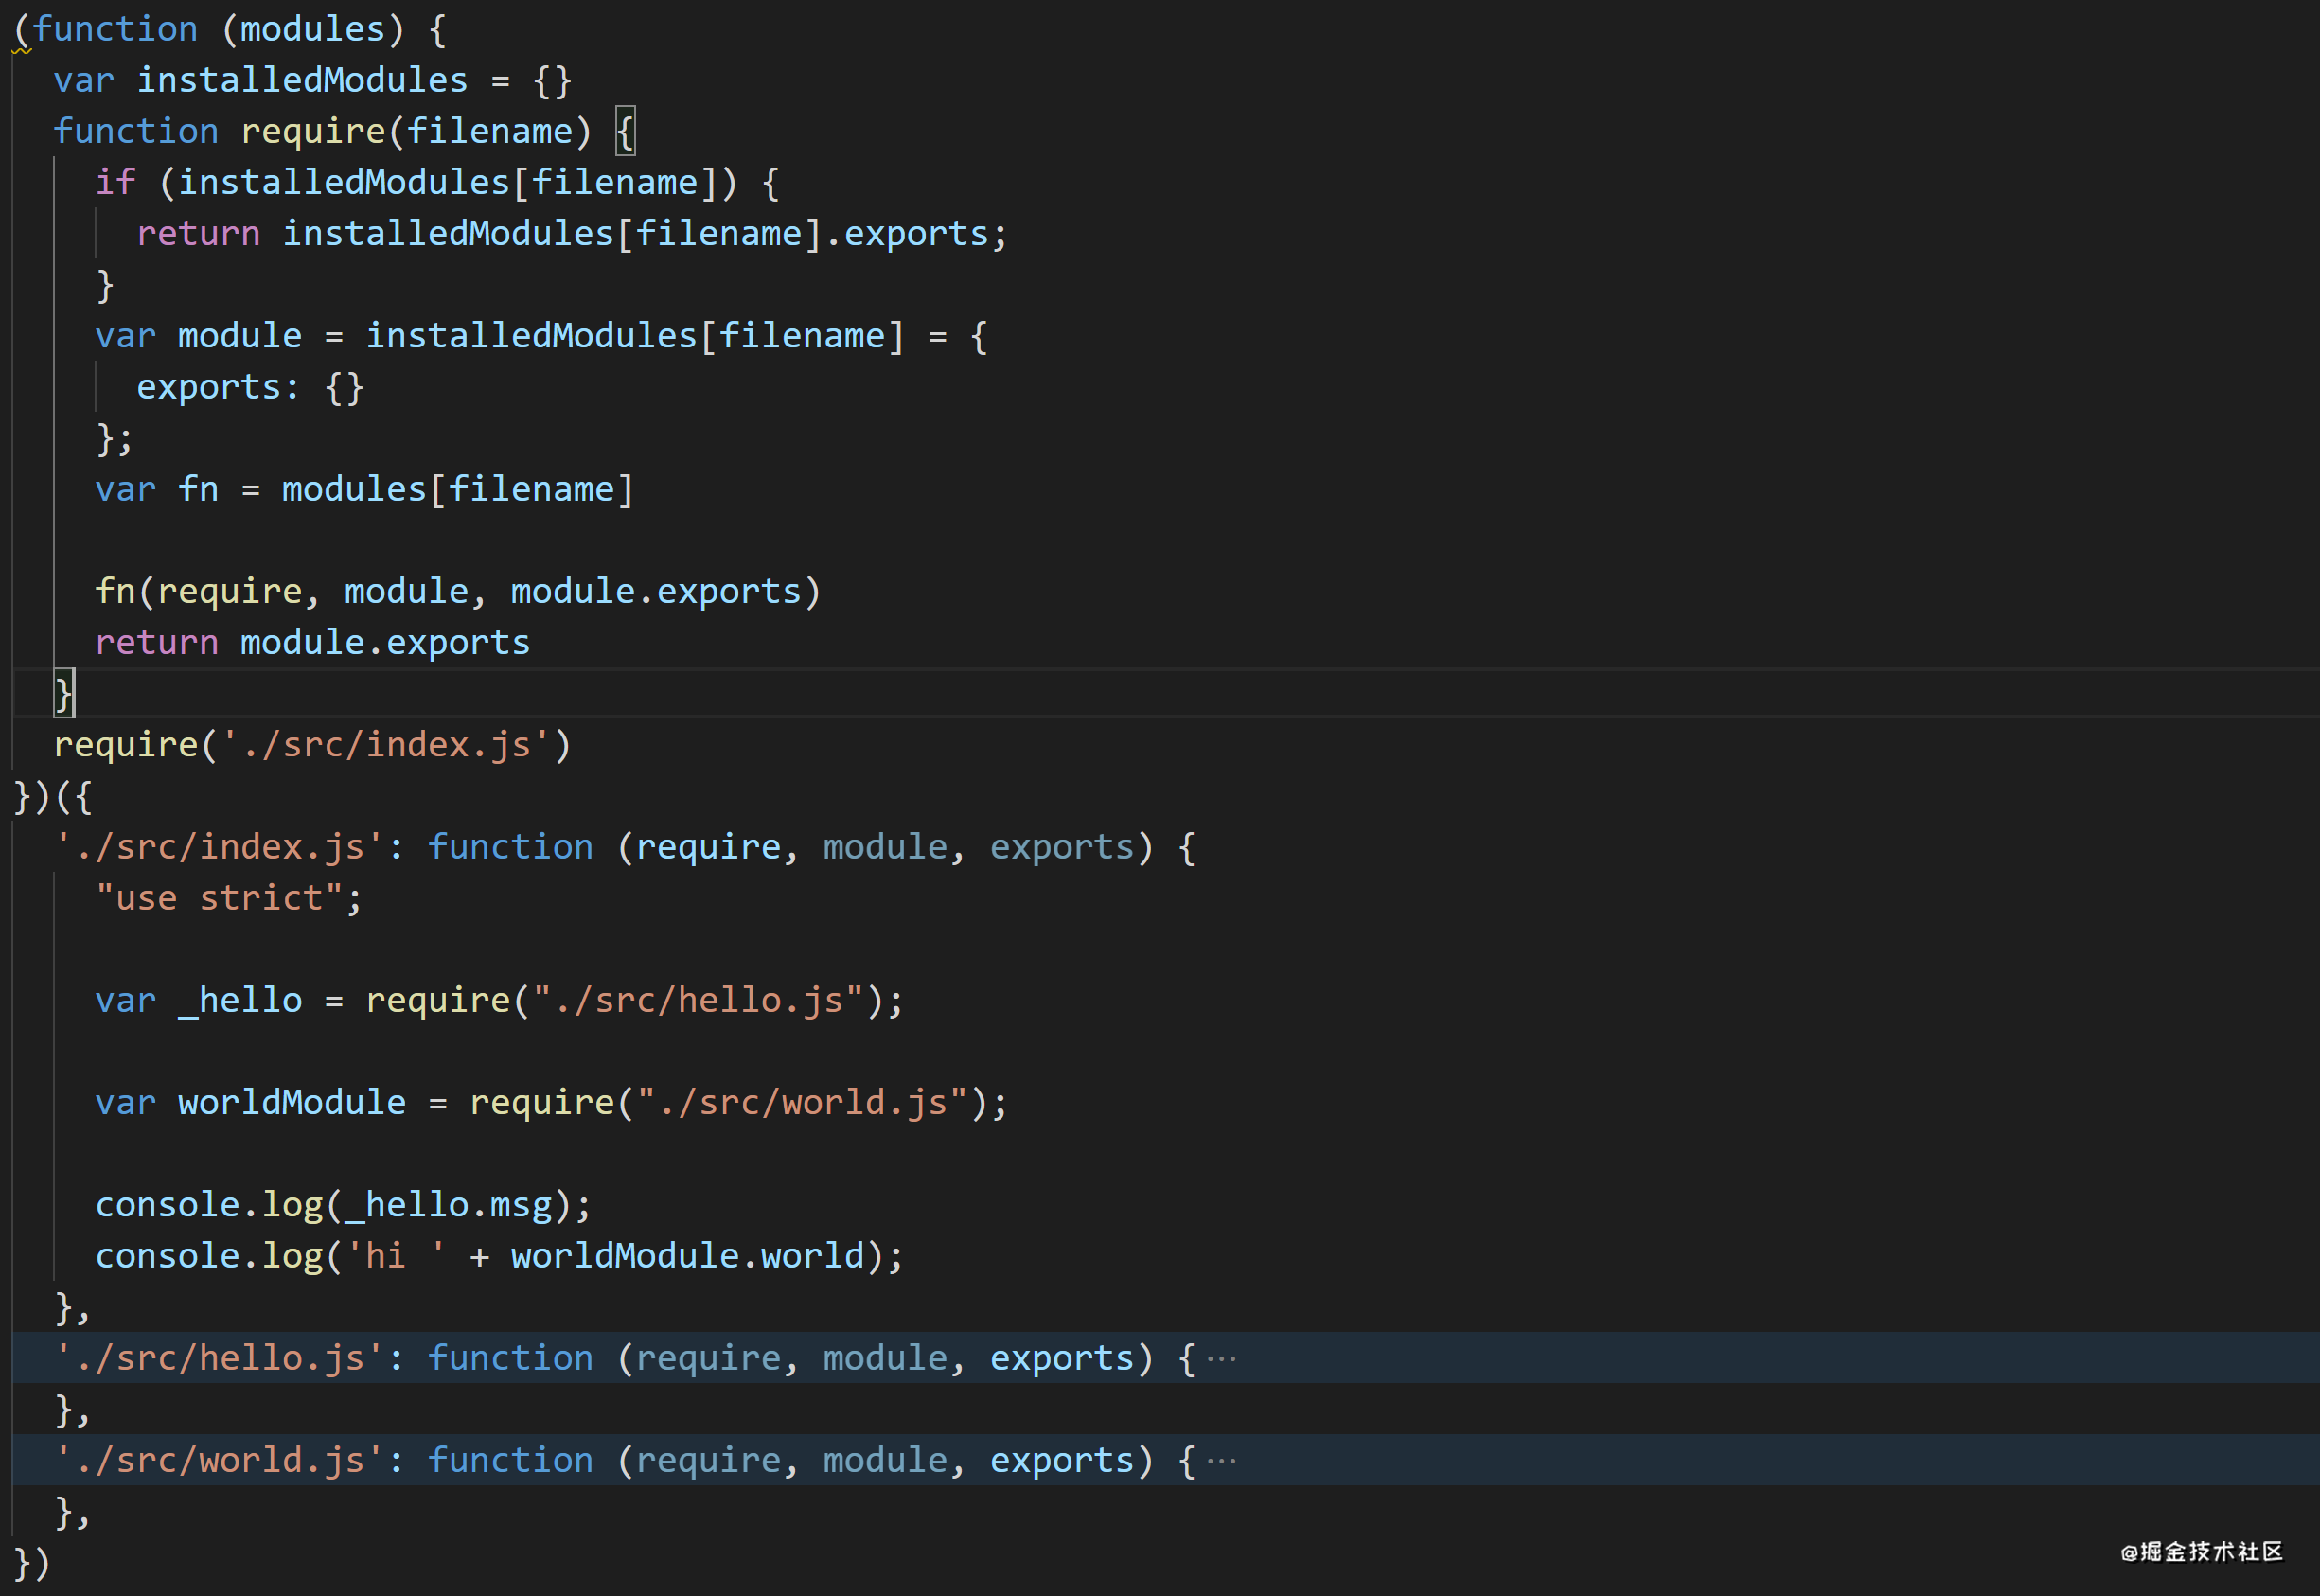
生成bundle文件实质上是拼接出一个bundle.js文件内容的字符串,然后通过fs.writeFileSync写入到bundle.js文件。我们就仿照实际webpack的打包文件()来拼接字符串。整个输出文件是一个自执行函数。
每一个module对象的code将作为一个匿名函数的代码块,通过调用这个匿名函数,执行模块代码:
let modules = ''Object.keys(this.modules).forEach((key) => { //遍历依赖模块集合,拼接字符串 modules += `'${key}': function(require, module, exports){ //用匿名函数包裹 模块code ${this.modules[key].code} },`}) 从上面解析后的code中,我们可以看到,直接运行code有一个问题,就是require和exports没有定义,所以在生成的打包文件中定义require方法和exports对象,并作为参数传给包裹它的匿名函数。
var installedModules = {}function require(filename){ //定义require方法 if(installedModules[filename]) { //若是已经加载过的模块,直接从缓存中取 return installedModules[filename].exports; } var fn = modules[filename] //获取模块包裹匿名函数 var module = installedModules[filename] = { //并缓存模块 exports: {} //定义exports对象 } fn(require, module, module.exports) //执行匿名函数 return module.exports} 完整代码如下:
emitFile () { const output = path.resolve(this.output.path,this.output.filename) //输出文件名 let modules = '' Object.keys(this.modules).forEach((key) => { // modules += `'${key}': function(require, module, exports){ ${this.modules[key].code} },` }) const bundle = `(function(modules){ //自执行函数 var installedModules = {} function require(filename){ //定义require方法 if(installedModules[filename]) { return installedModules[filename].exports; } var fn = modules[filename] var module = installedModules[filename] = { exports: {} //定义exports对象 } fn(require, module, module.exports) //执行模块包裹匿名函数,也就是执行模块代码 return module.exports //返回模块导出对象 } require('${this.entry}') //加载入口文件 })({ ${modules} //所有模块拼接的字符串 })` fs.writeFileSync(output, bundle, 'utf-8') //将字符串写入output指定文件 } 生成的bundle.js如下:(屏幕装不下,就把./src/hello.js和./src/world.js折叠了)
加上loader
loader本身是一个函数,接受源文件作为参数,并返回转换的结果。在基础功能上,我们将加上loader的使用。这里我们使用两个loader,一个是去掉console,一个是在每个文件加上作者信息。
module: { rules: [ { test: /\.js$/, use: [ path.resolve(__dirname, 'lib/loaders/remove-console-loader.js'), path.resolve(__dirname, 'lib/loaders/add-author-loader.js') ] } ]}, 修改也很简单,就是在用parser处理文件时,第一步就是判断文件是否被loader匹配,如匹配,调用loader处理文件内容,再返回处理后的结果,进行下一步的解析成ast,后面就和基础版一样了。
initLoader (filename,config) { let source = fs.readFileSync(filename, 'utf8') const rules = config.module && config.module.rules //获取rules数组 rules && rules.forEach((rule) => { //遍历rules const { test, use } = rule //获取匹配规则和loader数组 let l = use.length - 1 if(test.test(filename)){ //文件名如匹配得上 function execLoader(){ const loader = require(use[l--]) //从最后一个loader开始执行 (loader的执行顺序是从右向左) source = loader(source) //将执行结果重新赋给source if(l>=0){ //如果前面还有loader,执行loader,直到use数组里的所有loader执行完毕 execLoader() } } execLoader() } }) return source},genAST (filename,config) { const sourceCode = this.initLoader(filename,config) //先使用loader处理文件,返回处理后的结果 const ast = babelParser.parse(sourceCode,{ sourceType: 'module' }) return ast.program}, 重新打包执行之后,再运行,就会发现控制台没有console.log的内容了。并且每个module代码的结尾都加上了作者信息。
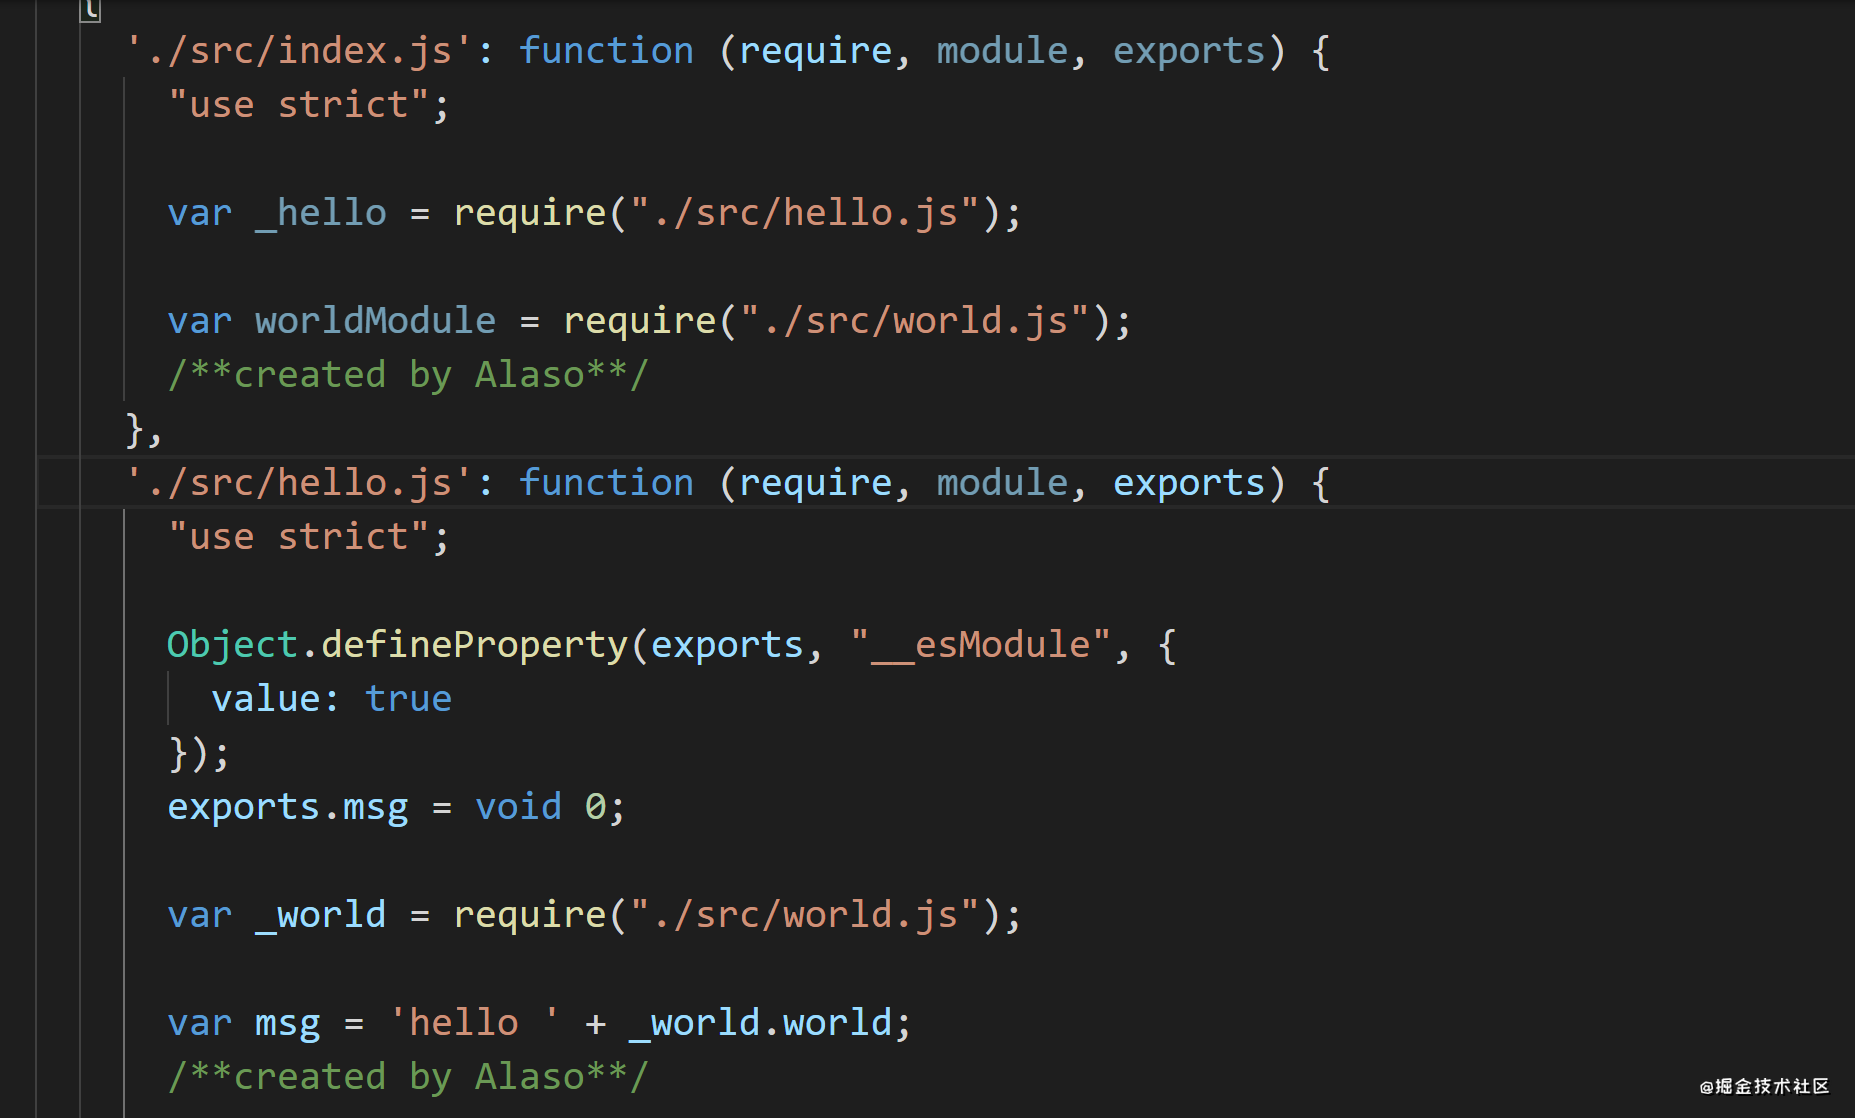
//remove-console-loader.jsfunction loader(source){ const newSource = source.replace(/console\.log\([\s\S]*\)/g,'') return newSource}module.exports = loader //add-author-loader.jsfunction loader(source){ return source + '/**created by Alaso**/'}module.exports = loader 加上plugin
plugin的执行需要借助tapable,tapable是一个类似于 Node.js中的 EventEmitter的库,参考
简单起见,这里我们就使用它的SyncHook(同步钩子),用起来比较像订阅发布。
const hook = new SyncHook()hook.tap('hello', () => { //订阅hook console.log('hello');})hook.tap('world', () => { //订阅hook console.log('world');})hook.call() //发布hook 插件plugin的实现思路就是订阅webpack的各种钩子,和vue的生命周期钩子类似,webpack在整个打包流程中也有各种生命周期,如entryOption、run、compile、emit等,它们标志着打包流程的不同阶段。
对于每一个生命周期,我们用SyncHook注册一个钩子,在插件中订阅相关的钩子,当程序运行到某个生命周期,就发布对应的钩子,订阅了这个钩子的插件就会执行。
按照webpack官方约定,webpack 插件是一个具有 apply 方法的 JavaScript 对象。apply 方法会被 webpack compiler 调用,并且在 整个 编译生命周期都可以访问 compiler 对象。
我们模仿html-webpack-plugin(创建html文件去承载输出的bundle)写一个插件。
首先,在webpack.config.js中添加:
plugins: [ new HtmlPlugin({ template: './src/index.html', //用到的模板文件 filename: 'newIndex.html' //生成的html文件命名 })] HtmlPlugin的实现:
const fs = require('fs')const path = require('path')const cheerio = require('cheerio')class HtmlPlugin { constructor (options) { this.template = options.template //解析参数 this.filename = options.filename } apply (compiler) { //按照官方约定,定义apply方法,并将compiler作为参数传入 compiler.hooks.afterEmit.tap('afterEmit',() => { //订阅afterEmit钩子,在compiler.hooks.afterEmit.call()的时候执行下面的内容 //读取模板内容 const template = fs.readFileSync(path.resolve(process.cwd(),this.template), 'utf-8') const $ = cheerio.load(template) //通过cheerio解析template字符串 //cheerio的api类似于jquery,这里我们生成一个script标签,并插入到body中 const script = $(``) $('body').append(script) const htmlFile = $.html() //基于修改后的dom重新生成字符串 const output = path.resolve(compiler.output.path,this.filename) fs.writeFileSync(output, htmlFile, 'utf-8') //将字符串写入到bundle.js所在的目录 }) }}module.exports = HtmlPlugin 我们回到Compiler类,在基础功能上进行修改:
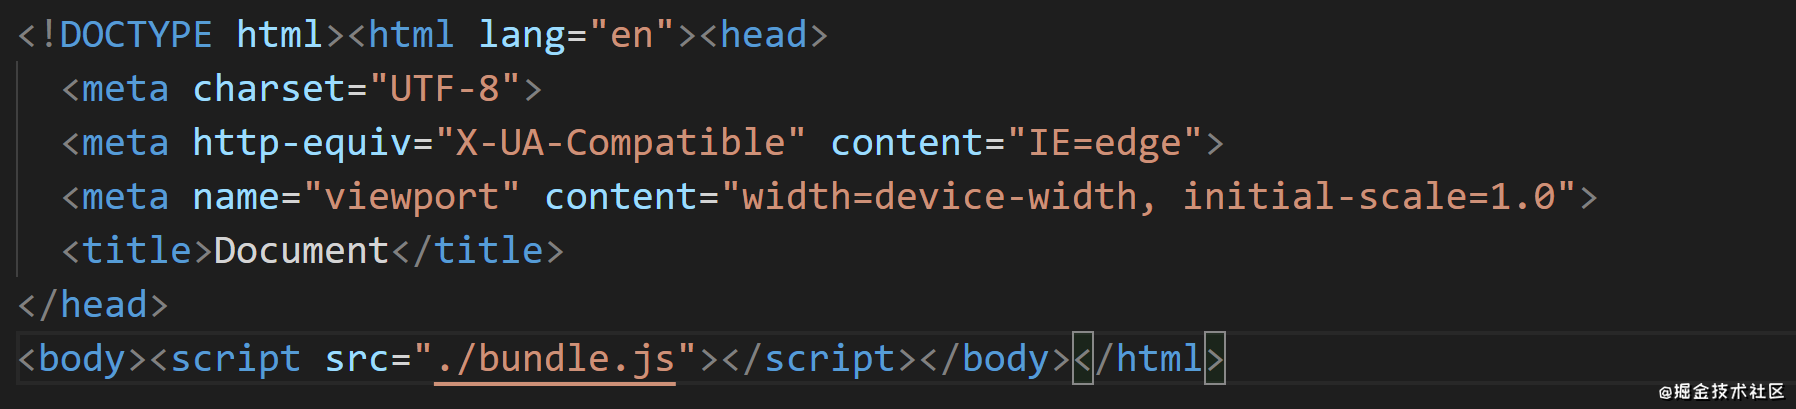
class Compiler{ constructor (config) { ... this.hooks = { //添加各生命周期对应的hooks emit: new SyncHook(), //生成资源到 output 文件之前触发 afterEmit: new SyncHook() //生成资源到 output 文件之前触发 } const plugins = this.config.plugins //获取配置文件中的plugins数组 if(Array.isArray(plugins)){ plugins.forEach((plugin) => { //遍历数组,执行每一个plugin的apply方法,将compiler作为参数传入 plugin.apply(this) 执行plugin的apply方法,订阅生命周期钩子 }) } } run () { //在不同的生命周期,发布对应的钩子 this.buildModule(path.resolve(this.execPath, this.entry)) this.hooks.emit.call() //生成资源到 output 文件之前,发布emit钩子 this.emitFile() this.hooks.afterEmit.call() //生成资源到 output 文件之后,发布afterEmit钩子 }} 再次打包,在dist目录就是生成了一个newIndex.html,内容如下:
项目地址: https://github.com/alasolala/my-pack.git
参考资料
转载地址:https://blog.csdn.net/ynweiy/article/details/115747599 如侵犯您的版权,请留言回复原文章的地址,我们会给您删除此文章,给您带来不便请您谅解!
发表评论
最新留言
关于作者
