本文共 21408 字,大约阅读时间需要 71 分钟。
案例与目标
总体:输入flag,屏幕上出现“恭喜你!”则为正确flag。要求得到正确flag 目标1:提示五位数:比如:24680 目标2:在没有提示五位数的情况下解开。
目标1
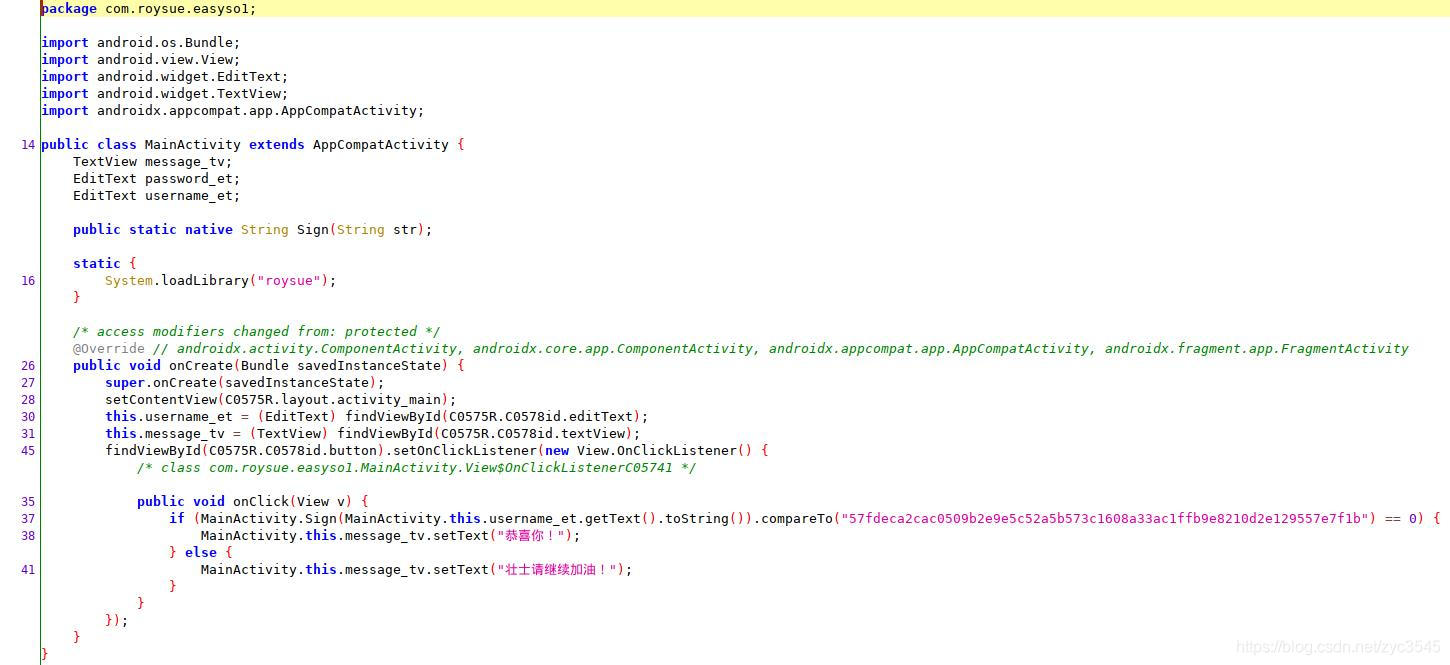
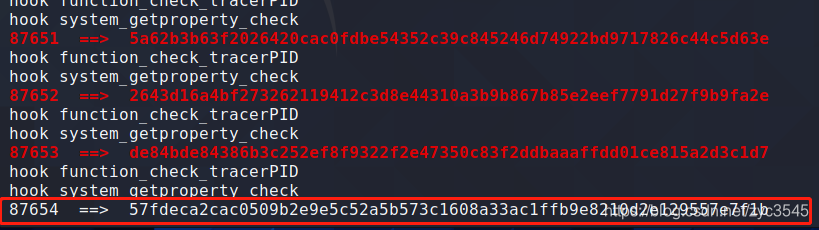
使用jadx分析【提交】点击事件,发现是把username放入Native层变换后与【57fdeca2cac0509b2e9e5c52a5b573c1608a33ac1ffb9e8210d2e129557e7f1b】作比较。
 IDA查看导出函数,没有 Sign() 踪迹,应该是动态注册了,从 registerMethods() 里寻找,尽管这里有一部分干扰代码,还做了ptrace反调试,但并不影响定位函数。
  发现 Sign() 动态注册成了 f**k()。
 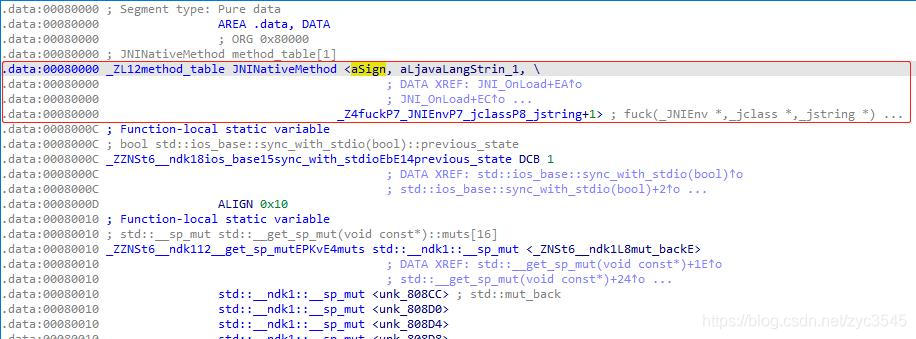 **f**k()**函数伪代码如下,首先它会采取一定的反调试措施,之后再进行加密变换。
 jstring __fastcall fuck(JNIEnv *env, jclass jcls, jstring str_){ jstring v4; // [sp+14h] [bp-C4h] _jmethodID *methodID; // [sp+18h] [bp-C0h] jstring v6; // [sp+28h] [bp-B0h] int i; // [sp+30h] [bp-A8h] jbyte *v8; // [sp+34h] [bp-A4h] _jbyteArray *array; // [sp+38h] [bp-A0h] jobject v10; // [sp+3Ch] [bp-9Ch] _jmethodID *v11; // [sp+40h] [bp-98h] _jclass *v12; // [sp+44h] [bp-94h] _jmethodID *v13; // [sp+48h] [bp-90h] _jobject *v14; // [sp+4Ch] [bp-8Ch] _jclass *v15; // [sp+54h] [bp-84h] _jobject *obj; // [sp+58h] [bp-80h] _jstring *v17; // [sp+5Ch] [bp-7Ch] _jfieldID *fieldID; // [sp+60h] [bp-78h] _jclass *clazz; // [sp+64h] [bp-74h] const char *v20; // [sp+68h] [bp-70h] unsigned __int8 *src; // [sp+6Ch] [bp-6Ch] char *v25; // [sp+8Ch] [bp-4Ch] char *v26; // [sp+A4h] [bp-34h] _WORD v27[4]; // [sp+ABh] [bp-2Dh] BYREF if ( !str_ ) return 0; src = _JNIEnv::GetStringUTFChars(env, str_, 0); v20 = "REAL"; clazz = _JNIEnv::FindClass(env, "android/os/Build"); fieldID = _JNIEnv::GetStaticFieldID(env, clazz, "FINGERPRINT", "Ljava/lang/String;"); v17 = _JNIEnv::GetStaticObjectField(env, clazz, fieldID); if ( function_check_tracerPID() // TracerPID反调试 || system_getproperty_check() // 设备反调试 || (v25 = _JNIEnv::GetStringUTFChars(env, v17, 0), strstr(v25, "aosp")) ) // 系统版本反调试 { v20 = "FAKE"; } strcat(src, v20); obj = j_o0OoOOOO(env, src); v15 = _JNIEnv::FindClass(env, "java/security/MessageDigest"); methodID = _JNIEnv::GetStaticMethodID(env, v15, "getInstance", "(Ljava/lang/String;)Ljava/security/MessageDigest;"); v4 = j_o0OoOOOO(env, "MD5"); v14 = _JNIEnv::CallStaticObjectMethod(env, v15, methodID, v4); v13 = _JNIEnv::GetMethodID(env, v15, "digest", "([B)[B"); v12 = _JNIEnv::FindClass(env, "java/lang/String"); v11 = _JNIEnv::GetMethodID(env, v12, "getBytes", "()[B"); v10 = _JNIEnv::CallObjectMethod(env, obj, v11); array = _JNIEnv::CallObjectMethod(env, v14, v13, v10); v8 = _JNIEnv::GetByteArrayElements(env, array, 0); for ( i = 0; i <= 15; ++i ) sprintf(&v27[i], "%02x", v8[i]); v26 = j_ll11l1l1ll(src); strcat(v26, v27); v6 = j_o0OoOOOO(env, v26); _JNIEnv::ReleaseStringUTFChars(env, str_, src); free(v26); return v6;} function_check_tracerPID() 伪代码如下,通过 /proc/{PID}/status 中的 TracerPid 来检测是否被调试(返回0说明没有被调试,否则返回调试进程PID)。
int function_check_tracerPID(){ std::string::size_type v0; // r0 const char *v1; // r0 int v3; // [sp+8h] [bp-148h] unsigned __int8 *v4; // [sp+Ch] [bp-144h] const char *v5; // [sp+10h] [bp-140h] std::istream *v6; // [sp+28h] [bp-128h] const char *v7; // [sp+30h] [bp-120h] std::string::size_type __pos1; // [sp+34h] [bp-11Ch] __pid_t val; // [sp+4Ch] [bp-104h] char v10; // [sp+53h] [bp-FDh] std::string str; // [sp+54h] [bp-FCh] BYREF std::string v12; // [sp+60h] [bp-F0h] BYREF std::string __str; // [sp+6Ch] [bp-E4h] BYREF std::string v14; // [sp+78h] [bp-D8h] BYREF std::string __s; // [sp+84h] [bp-CCh] BYREF std::ifstream v16; // [sp+90h] [bp-C0h] BYREF v10 = 0; val = getpid(); std::string::basic_string (&__s, "/proc/pid/status"); std::string::basic_string(&v14); __pos1 = std::string::find(&__s, (const std::string::value_type *)"pid", 0); std::to_string(&__str, val); std::string::replace(&__s, __pos1, 3u, &__str); std::string::~string(&__str); v7 = (const char *)std::string::c_str(&__s); _android_log_print(6, "roysuejni", "replace file name => %s", v7); std::ifstream::basic_ifstream(&v16, &__s, 8u); if ( std::ifstream::is_open(&v16) << 31 ) { while ( 1 ) { v6 = std::getline ,std::allocator >((std::istream *)&v16, &v14); if ( !(std::ios::operator bool((const std::ios *)((char *)v6 + *((_DWORD *)v6->_vptr$basic_istream - 3))) << 31) ) break; if ( !std::string::find(&v14, (const std::string::value_type *)"TracerPid", 0) ) { v0 = std::string::find(&v14, (const std::string::value_type *)":", 0); std::string::substr(&v12, &v14, v0 + 1, 0xFFFFFFFF); std::string::operator=(&v14, &v12); std::string::~string(&v12); v5 = (const char *)std::string::c_str(&v14); _android_log_print(6, "roysuejni", "file line => %s", v5); v4 = (unsigned __int8 *)std::string::c_str(&v14); std::string::basic_string (&str, v4); v3 = std::stoi(&str, 0, 10); std::string::~string(&str); if ( v3 ) { v1 = (const char *)std::string::c_str(&v14); _android_log_print(6, "roysuejni", "trace pid => %s, i want to exit.", v1); v10 = 1; break; } } } std::ifstream::close(&v16); } std::ifstream::~ifstream(&v16); std::string::~string(&v14); std::string::~string(&__s); return v10 & 1;} system_getproperty_check() 伪代码如下,检测是否是逆向人员常用的Google手机。
int system_getproperty_check(){ const char *v1; // [sp+Ch] [bp-1F4h] const char *v2; // [sp+18h] [bp-1E8h] size_t maxlen; // [sp+1Ch] [bp-1E4h] char v4; // [sp+27h] [bp-1D9h] char *v5; // [sp+28h] [bp-1D8h] int v6; // [sp+2Ch] [bp-1D4h] int v7; // [sp+30h] [bp-1D0h] int v8; // [sp+34h] [bp-1CCh] char v9[156]; // [sp+58h] [bp-1A8h] BYREF char v10[256]; // [sp+F4h] [bp-10Ch] BYREF v8 = _system_property_get("ro.product.manufacturer", v10); v7 = _system_property_get("ro.product.model", v9); v6 = v8 + v7; v5 = 0; if ( v8 + v7 >= 1 ) { v5 = (char *)malloc(v6 + 2); maxlen = v6 + 2; if ( v8 < 1 ) v2 = &byte_753C3; else v2 = v10; if ( v7 < 1 ) snprintf(v5, maxlen, "%s/%s", v2, &byte_753C3); else snprintf(v5, maxlen, "%s/%s", v2, v9); } v4 = 0; if ( strstr(v5, "Google") || strstr(v5, "Nexus") ) v4 = 1; if ( v5 ) v1 = v5; else v1 = "N/A"; _android_log_print(6, "roysuejni", "[roysue device]: [%s] result is => %d\n", v1, v4 & 1); return v4 & 1;} 最后一道反调试通过设备信息检测是否是逆向人员常用的Google系统。
src = (unsigned __int8 *)_JNIEnv::GetStringUTFChars(env, str_, 0);v20 = "REAL";clazz = _JNIEnv::FindClass(env, "android/os/Build");fieldID = _JNIEnv::GetStaticFieldID(env, clazz, "FINGERPRINT", "Ljava/lang/String;");v17 = (_jstring *)_JNIEnv::GetStaticObjectField(env, clazz, fieldID);...省略...(v25 = (char *)_JNIEnv::GetStringUTFChars(env, v17, 0), strstr(v25, "aosp"))
其加密部分除了明显的MD5,还有一个 j_ll11l1l1ll() 函数,根据其内部特征暂且认为这是常见的AES加密。
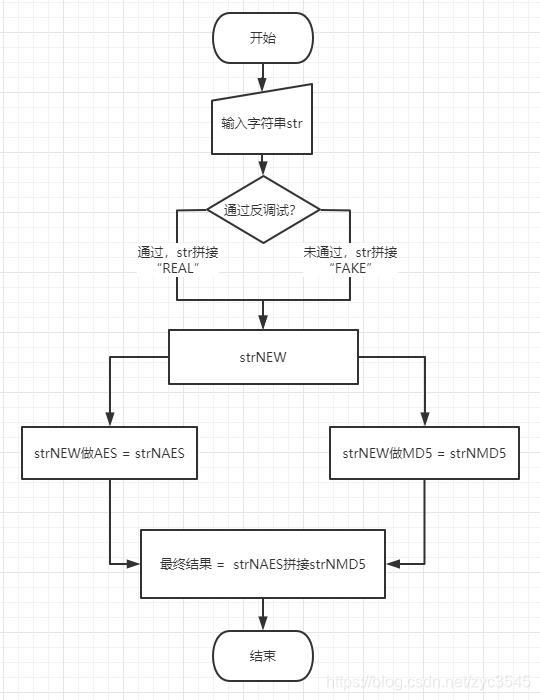
unsigned __int8 *__fastcall ll11l1l1ll(const unsigned __int8 *input){ unsigned __int8 *v2; // [sp+8h] [bp-30h] uint8_t *output; // [sp+Ch] [bp-2Ch] size_t byte_count; // [sp+10h] [bp-28h] uint8_t *iv; // [sp+18h] [bp-20h] uint8_t *key; // [sp+1Ch] [bp-1Ch] char *v8; // [sp+2Ch] [bp-Ch] key = (uint8_t *)ll11lll1l1(); iv = (uint8_t *)ll11l1l1l1(); v8 = (char *)ll11l1l11l(input); byte_count = strlen(v8); output = (uint8_t *)malloc(byte_count); j_qpppqp(output, (uint8_t *)v8, byte_count, key, iv); v2 = j_bbddbbdbb(output, byte_count); free(v8); free(output); free(key); free(iv); return v2;} 综上推测代码流程如图。
Unidbg暴力破解
由于题目给出了答案是“5位数”这一条件,那就可以穷举10000~99999的整数作为字符串传入进行尝试,直到试出正确答案。Unidbg模拟运行不用担心 TracerPid 问题,只需要hook _system_property_get() 返回值,并补充 android.os.Build.FINGERPRINT 环境即可通过反调试。
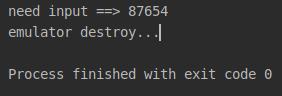
package com.zyc.demo;import com.github.unidbg.AndroidEmulator;import com.github.unidbg.arm.backend.DynarmicFactory;import com.github.unidbg.linux.android.AndroidEmulatorBuilder;import com.github.unidbg.linux.android.AndroidResolver;import com.github.unidbg.linux.android.SystemPropertyHook;import com.github.unidbg.linux.android.SystemPropertyProvider;import com.github.unidbg.linux.android.dvm.*;import com.github.unidbg.memory.Memory;import java.io.File;import java.io.IOException;public class Zuoye4_3 extends AbstractJni { private final AndroidEmulator emulator; private final VM vm; private final String RESULT = "57fdeca2cac0509b2e9e5c52a5b573c1608a33ac1ffb9e8210d2e129557e7f1b"; //need this result public Zuoye5_1() { emulator = AndroidEmulatorBuilder.for32Bit().addBackendFactory(new DynarmicFactory(true)).build(); Memory memory = emulator.getMemory(); memory.setLibraryResolver(new AndroidResolver(23)); SystemPropertyHook systemPropertyHook = new SystemPropertyHook(emulator); systemPropertyHook.setPropertyProvider(new MyProvider()); memory.addHookListener(systemPropertyHook); vm = emulator.createDalvikVM(null); vm.setJni(this); vm.setVerbose(false); DalvikModule dalvikModule = vm.loadLibrary(new File("unidbg-android/src/test/resources/example_binaries/armeabi-v7a/libroysue4_3.so"), false); dalvikModule.callJNI_OnLoad(emulator); } /** * 返回非Google手机信息 */ class MyProvider implements SystemPropertyProvider { @Override public String getProperty(String key) { switch (key) { case "ro.product.manufacturer": return "zycmanufacturer"; case "ro.product.model": return "zycmodel"; } return ""; } } private String crack() { DvmClass dvmClass = vm.resolveClass("com/roysue/easyso1/MainActivity"); for (int i = 10000; i <= 99999; i++) { //brute force attack DvmObject ret = dvmClass.callStaticJniMethodObject(emulator, "Sign(Ljava/lang/String;)Ljava/lang/String;", new Object[]{ String.valueOf(i)}); String forceStr = String.valueOf(ret.getValue()); if (forceStr.compareTo(RESULT) == 0) { return String.valueOf(i); } } return ""; } public static void main(String[] args) { Zuoye4_3 zuoye = new Zuoye4_3(); System.out.println("need input ==> " + zuoye.crack()); zuoye.destroy(); } /** * 补全FINGERPRINT,与aosp不沾边即可。 */ @Override public DvmObject callStaticObjectMethod(BaseVM vm, DvmClass dvmClass, String signature, VarArg varArg) { if (signature.equals("android/os/Build->FINGERPRINT:Ljava/lang/String;")) { String ret = "zyc"; return new StringObject(vm, ret); } return super.callStaticObjectMethod(vm, dvmClass, signature, varArg); } private void destroy() { try { emulator.close(); System.out.println("emulator destroy..."); } catch (IOException e) { e.printStackTrace(); } }} 运行得到【87654】,使用非Google(会被反调试阻碍)手机运行通过。
Frida暴力破解
和上面的原理相同,只要枚举10000~99999的整数即可,这里需要 -f 启动,hook function_check_tracerPID()、system_getproperty_check()、FINGERPRINT三处。
function hookGuard(){ var libroysue = Process.findModuleByName("libroysue.so"); var symbols = libroysue.enumerateExports(); for (var i = 0; i < symbols.length; i++) { var symbol = symbols[i]; if (symbol.name.indexOf("tracerPID") >= 0) { var address = symbol.address; Interceptor.attach(address, { onLeave(retval) { retval.replace(0); console.log("hook function_check_tracerPID"); } }); } if (symbol.name.indexOf("getproperty") >= 0) { Interceptor.attach(symbol.address, { onLeave(retval) { retval.replace(0); console.log("hook system_getproperty_check"); } }); } } var clazz = Java.use("android.os.Build"); clazz.FINGERPRINT.value = "zyc123" console.log("hook FINGERPRINT" + clazz.FINGERPRINT.value);}function hook5_1() { Java.perform(function () { hookGuard(); var MainActivity = Java.use("com.roysue.easyso1.MainActivity"); var num = 10000; while (num < 99999) { var res = MainActivity.Sign(num + ""); if (res == "57fdeca2cac0509b2e9e5c52a5b573c1608a33ac1ffb9e8210d2e129557e7f1b") { console.log(num, " ==> ", res); break; } else { console.error(num, " ==> ", res); } num++; } });} 运行:
目标2
如果没有“5位数”的提示,我们只好更深入研究其加密算法。上面的逆向分析仍存在一片迷雾——暂定为AES加密的部分。首先查看生成key的伪代码:
const uint8_t *ll11lll1l1(){ _BYTE *v1; // [sp+8h] [bp-18h] int i; // [sp+10h] [bp-10h] if ( li11li1o2() ) li11li1o1(); if ( li11li1o0() ) li11li1o3(); if ( li11li1o1() ) li11li1o2(); if ( li11li1o3() ) li11li1o1(); if ( li11li1o1() ) li11li1o0(); if ( li11li1o2() ) li11li1o3(); if ( li11li1o3() ) li11li1o1(); if ( li11li1o1() ) li11li1o0(); v1 = malloc(0x11u); for ( i = 0; i <= 15; ++i ) { switch ( i ) { case 0: v1[i] = 103; break; case 1: v1[i] = 111; break; case 2: v1[i] = 111; if ( li11li1o3() ) li11li1o1(); if ( li11li1o1() ) li11li1o2(); if ( li11li1o2() ) li11li1o0(); if ( li11li1o0() ) li11li1o1(); if ( li11li1o2() ) li11li1o1(); if ( li11li1o0() ) li11li1o3(); if ( li11li1o1() ) li11li1o2(); if ( li11li1o3() ) li11li1o1(); break; case 3: v1[i] = 100; break; case 4: v1[i] = 108; break; case 5: v1[i] = 45; break; case 6: v1[i] = 97; break; case 7: v1[i] = 101; break; case 8: v1[i] = 115; break; case 9: v1[i] = 45; if ( li11li1o1() ) li11li1o0(); if ( li11li1o2() ) li11li1o3(); if ( li11li1o3() ) li11li1o1(); if ( li11li1o1() ) li11li1o0(); if ( li11li1o0() ) li11li1o2(); if ( li11li1o3() ) li11li1o0(); if ( li11li1o0() ) li11li1o3(); if ( li11li1o2() ) li11li1o3(); break; case 10: v1[i] = 107; break; case 11: v1[i] = 101; break; case 12: v1[i] = 121; break; case 13: v1[i] = 49; break; case 14: v1[i] = 50; break; case 15: v1[i] = 52; break; default: continue; } } v1[16] = 0; if ( li11li1o3() ) li11li1o1(); if ( li11li1o1() ) li11li1o2(); if ( li11li1o2() ) li11li1o0(); if ( li11li1o0() ) li11li1o1(); if ( li11li1o2() ) li11li1o1(); if ( li11li1o0() ) li11li1o3(); if ( li11li1o1() ) li11li1o2(); if ( li11li1o3() ) li11li1o1(); return v1;} 生成iv伪代码:
const uint8_t *ll11l1l1l1(){ _BYTE *v1; // [sp+8h] [bp-18h] int i; // [sp+10h] [bp-10h] if ( li11li1o1() ) li11li1o0(); if ( li11li1o2() ) li11li1o3(); if ( li11li1o3() ) li11li1o1(); if ( li11li1o1() ) li11li1o0(); if ( li11li1o0() ) li11li1o2(); if ( li11li1o3() ) li11li1o0(); if ( li11li1o0() ) li11li1o3(); if ( li11li1o2() ) li11li1o3(); v1 = malloc(0x11u); for ( i = 0; i <= 15; ++i ) { switch ( i ) { case 0: v1[i] = 103; if ( li11li1o2() ) li11li1o1(); if ( li11li1o0() ) li11li1o3(); if ( li11li1o1() ) li11li1o2(); if ( li11li1o3() ) li11li1o1(); if ( li11li1o1() ) li11li1o0(); if ( li11li1o2() ) li11li1o3(); if ( li11li1o3() ) li11li1o1(); if ( li11li1o1() ) li11li1o0(); break; case 1: v1[i] = 111; break; case 2: v1[i] = 111; break; case 3: v1[i] = 100; break; case 4: v1[i] = 108; break; case 5: v1[i] = 45; break; case 6: v1[i] = 97; break; case 7: v1[i] = 101; break; case 8: v1[i] = 115; break; case 9: v1[i] = 45; break; case 10: v1[i] = 105; break; case 11: v1[i] = 118; if ( li11li1o0() ) li11li1o2(); if ( li11li1o3() ) li11li1o0(); if ( li11li1o0() ) li11li1o3(); if ( li11li1o2() ) li11li1o3(); if ( li11li1o3() ) li11li1o1(); if ( li11li1o1() ) li11li1o2(); if ( li11li1o2() ) li11li1o0(); if ( li11li1o0() ) li11li1o1(); break; case 12: v1[i] = 49; break; case 13: v1[i] = 50; break; case 14: v1[i] = 51; break; case 15: v1[i] = 53; break; default: continue; } } v1[16] = 0; if ( li11li1o1() ) li11li1o0(); if ( li11li1o2() ) li11li1o3(); if ( li11li1o3() ) li11li1o1(); if ( li11li1o1() ) li11li1o0(); if ( li11li1o0() ) li11li1o2(); if ( li11li1o3() ) li11li1o0(); if ( li11li1o0() ) li11li1o3(); if ( li11li1o2() ) li11li1o3(); return v1;} 生成v8变量伪代码,这个函数显然是在做补位填充,像是“AES/CBC/PKCS7Padding”:
uint8_t *__fastcall ll11l1l11l(const unsigned __int8 *input){ unsigned int i; // [sp+4h] [bp-34h] unsigned int v3; // [sp+Ch] [bp-2Ch] _BYTE *v4; // [sp+14h] [bp-24h] signed int v5; // [sp+1Ch] [bp-1Ch] v5 = strlen(input); v3 = 16 * (v5 / 16) + 16; v4 = malloc(16 * (v5 / 16) + 17); for ( i = 0; i < v3; ++i ) { if ( i >= v5 ) { if ( v5 % 16 ) v4[i] = HEX[v3 - v5]; else v4[i] = HEX[0]; } else { v4[i] = input[i]; } } v4[v3] = 0; return v4;} 主要的加密变换伪代码,可以确认是AES加密:
void __fastcall qpppqp(uint8_t *output, uint8_t *input, uint32_t length, const uint8_t *key, const uint8_t *iv){ __int64 v5; // d17 unsigned __int8 v6; // [sp+Bh] [bp-2Dh] uint32_t i; // [sp+Ch] [bp-2Ch] v6 = length & 0xF; if ( key ) { Key = key; KeyExpansion(); } if ( iv ) Iv = iv; for ( i = 0; i < length; i += 16 ) { v5 = *(input + 1); *output = *input; *(output + 1) = v5; XorWithIv(output); state = output; Cipher(); Iv = output; input += 16; output += 16; } if ( v6 ) { qmemcpy(output, input, v6); memset(&output[v6], 0, 16 - v6); XorWithIv(output); state = output; Cipher(); }} 做完AES之后还有一道Hex变换:
unsigned __int8 *__fastcall bbddbbdbb(const unsigned __int8 *input, size_t len){ size_t i; // [sp+4h] [bp-1Ch] _BYTE *v4; // [sp+8h] [bp-18h] if ( !input || !len ) return 0; v4 = malloc(2 * len + 1); for ( i = 0; i < len; ++i ) { v4[2 * i] = _0123456789abcdef[input[i] >> 4]; v4[2 * i + 1] = _0123456789abcdef[input[i] & 0xF]; } v4[2 * len] = 0; return v4;} 综上分析本题加密流程大致为:
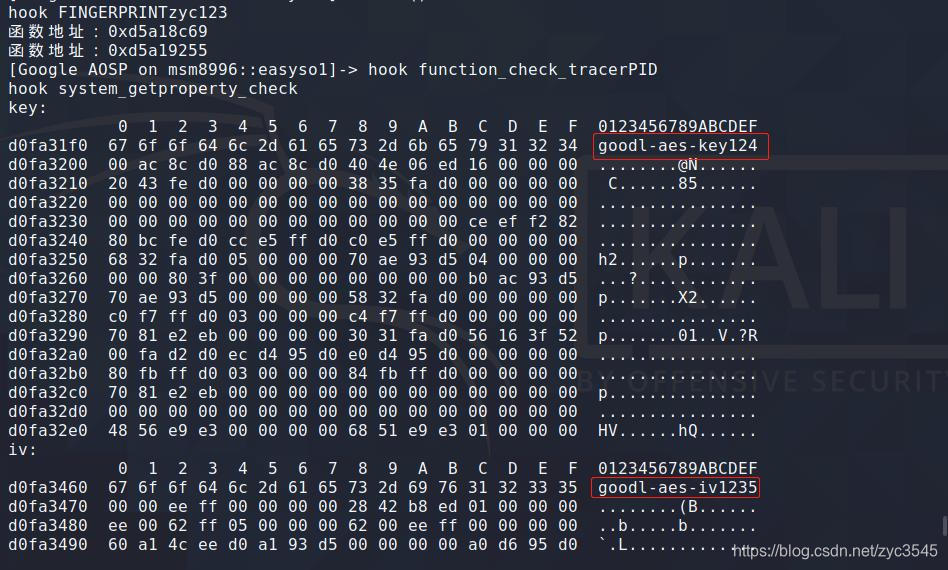
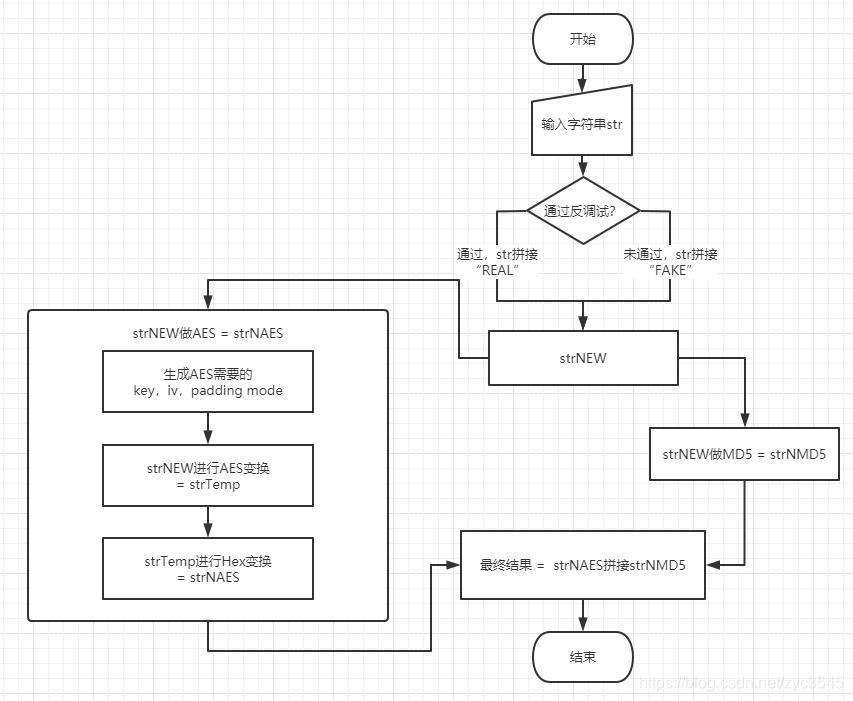 要逆推算法,首先需要获取AES的key,iv,padding mode,其中padding mode已经可以推测是“AES/CBC/PKCS7Padding”,剩余两个我使用Frida hook出来:
 var soAddress = Module.findBaseAddress("libroysue.so");if (soAddress) { var methodKeyAddress = soAddress.add(0x0003CC68 + 1); // thrumb指令集要+1 if (methodKeyAddress) { console.log("函数地址:" + methodKeyAddress); Interceptor.attach(methodKeyAddress, { onLeave(retval) { console.log("key:\n" + hexdump(retval)); } }); }}var methodivAddress = soAddress.add(0x0003D254 + 1); // thrumb指令集要+1if (methodivAddress) { console.log("函数地址:" + methodivAddress); Interceptor.attach(methodivAddress, { onLeave(retval) { console.log("iv:\n" + hexdump(retval)); } });} 得出key为【goodl-aes-key124】,iv为【goodl-aes-iv1235】:
 Hex变换结果为最终字符串去掉末尾MD5部分,即【57fdeca2cac0509b2e9e5c52a5b573c1】,这里用Z3Prover库计算变换之前的每一位数。
 from z3 import *RES = "57fdeca2cac0509b2e9e5c52a5b573c1"inputStr = [BitVec('%d' % i, 32) for i in range(16)]solverInputStr = Solver()for i in range(16): solverInputStr.add(inputStr[i] >> 4 == int(RES[i*2], 16)) solverInputStr.add(inputStr[i] & 0xF == int(RES[i*2+1], 16))if solverInputStr.check() == sat: m = solverInputStr.model() inputRes = [0 for _ in range(16)] for i in range(16): inputRes[int(str(m[i]))] = int((m[m[i]]).as_long()) print("最终变换之前数组:") print(inputRes)else: print('solverInputStr unsat') 得到Hex变换之前(AES变换之后)的数据:
 只要将这段做AES解密,并去掉 REAL 即正确flag,完整代码:
 from z3 import *from Crypto.Cipher import AESRES = "57fdeca2cac0509b2e9e5c52a5b573c1"inputStr = [BitVec('%d' % i, 32) for i in range(16)]solverInputStr = Solver()for i in range(16): solverInputStr.add(inputStr[i] >> 4 == int(RES[i*2], 16)) solverInputStr.add(inputStr[i] & 0xF == int(RES[i*2+1], 16))if solverInputStr.check() == sat: m = solverInputStr.model() inputRes = [0 for _ in range(16)] for i in range(16): inputRes[int(str(m[i]))] = int((m[m[i]]).as_long()) print("最终变换之前数组:") print(inputRes)else: print('solverInputStr unsat') def unpad(text): pad = ord(text[-1]) return text[:-pad]def AESDecrypt(key, iv, enc): cipher = AES.new(bytearray(key,'utf-8') , AES.MODE_CBC, bytearray(iv,'utf-8') ) return unpad(cipher.decrypt(enc).decode("utf-8"))source = AESDecrypt('goodl-aes-key124','goodl-aes-iv1235', (bytearray(inputRes)))print("AES加密前字符串:")print(source)print("flag:")print(source.replace("REAL","")) 得到正确答案:

转载地址:https://blog.csdn.net/zyc3545/article/details/117627955 如侵犯您的版权,请留言回复原文章的地址,我们会给您删除此文章,给您带来不便请您谅解!
发表评论
最新留言
关于作者
