使用飞桨PaddleHub实现将视频动作转化为皮影戏
 项目实现过程中使用的Python版本为3.7.0,其他依赖库的版本分别为cv2 4.5.1.48、matplotlib 2.2.2、numpy 1.19.3、tensorflow 2.4.1。
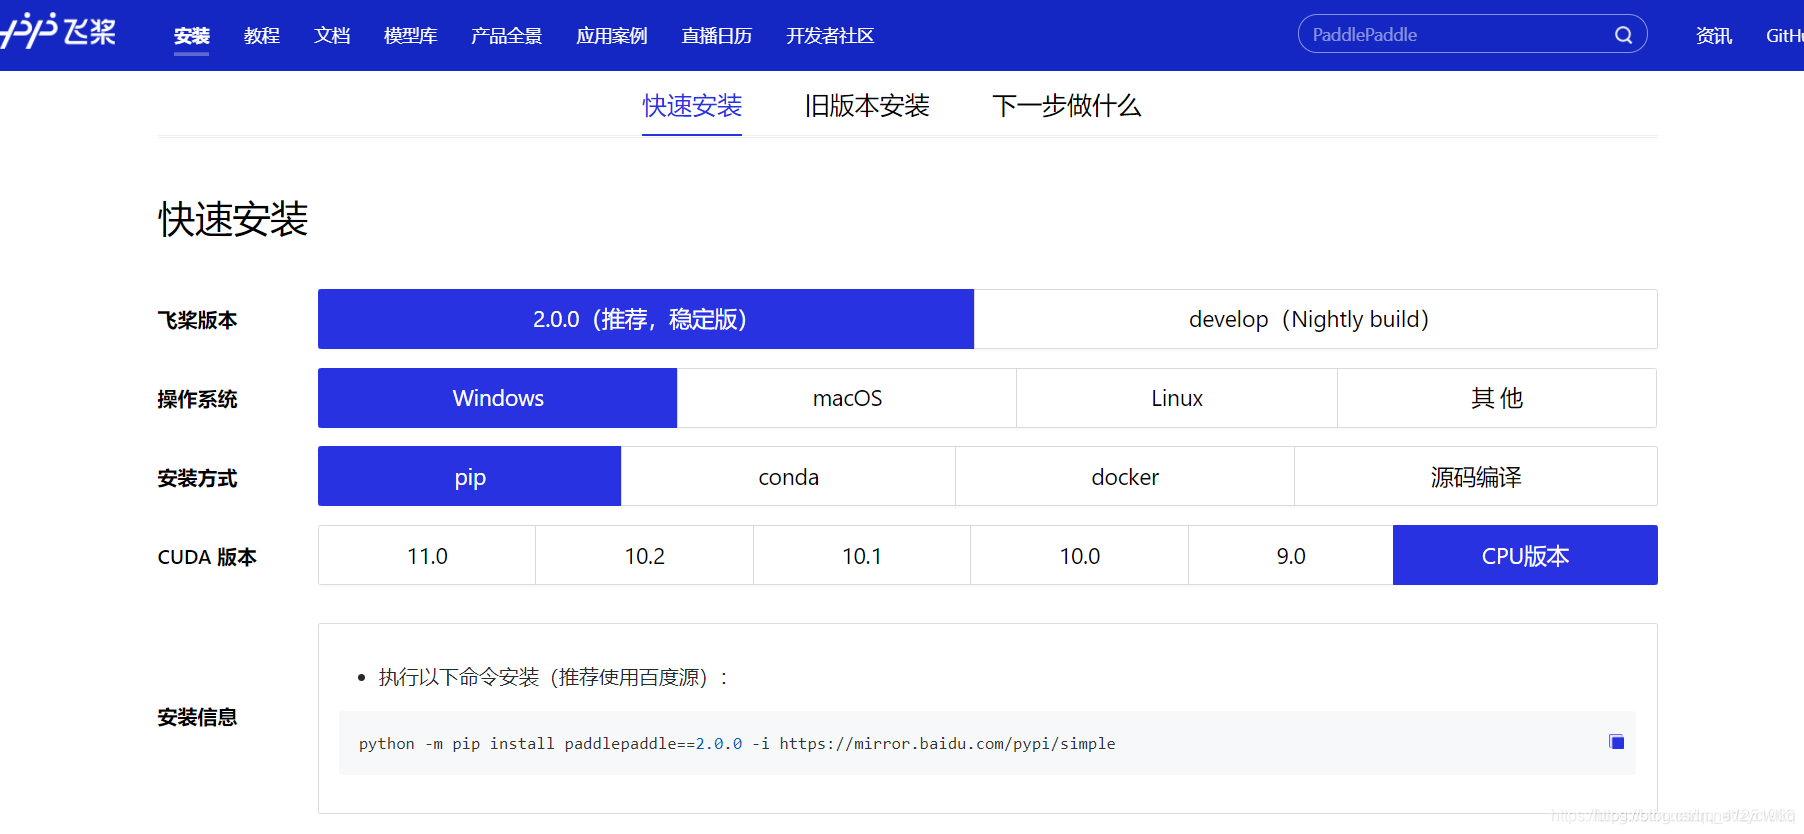
 3、导入人体骨骼关键节点检测模型
发布日期:2021-06-29 11:29:36
浏览次数:2
分类:技术文章
本文共 16180 字,大约阅读时间需要 53 分钟。
背景
领略千年皮影戏魅力,传承正在消失的艺术, 皮影戏的神奇,在于小小皮影在指尖上飞舞,时而刀光剑影、时而策马扬鞭、时而缠绵悱恻,千军万马是他,单打独斗也是他。皮影戏可谓是闻名中外,它是把光影声色做到极致的一门古老艺术。 先辈门通过手艺演绎着皮影戏,同样我们也可以通过AI方式来实现。为了实现皮影戏,可以通过PaddleHub提供的人体骨骼关键点检测库完成将人体姿态检测,同时映射到皮影身上,让皮影动起来。 皮影素材项目实现过程中使用的Python版本为3.7.0,其他依赖库的版本分别为cv2 4.5.1.48、matplotlib 2.2.2、numpy 1.19.3、tensorflow 2.4.1。 本项目具体流程如下:
一、安装依赖库以及模型
1、安装PaddlePaddle
PaddlePaddle官网: python -m pip install paddlepaddle==2.0.0 -i https://mirror.baidu.com/pypi/simple
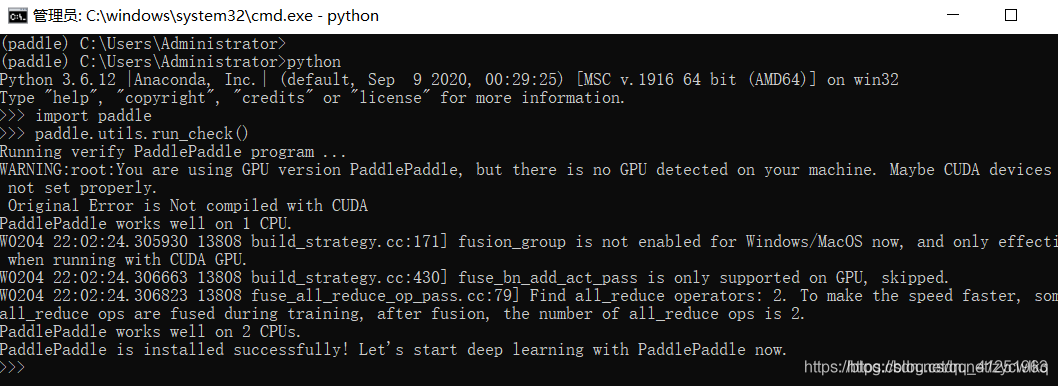
测试安装成功:
2、安装paddlehub:
paddlehub官网:pip install paddlehub -i https://pypi.doubanio.com/simple
 测试安装成功:
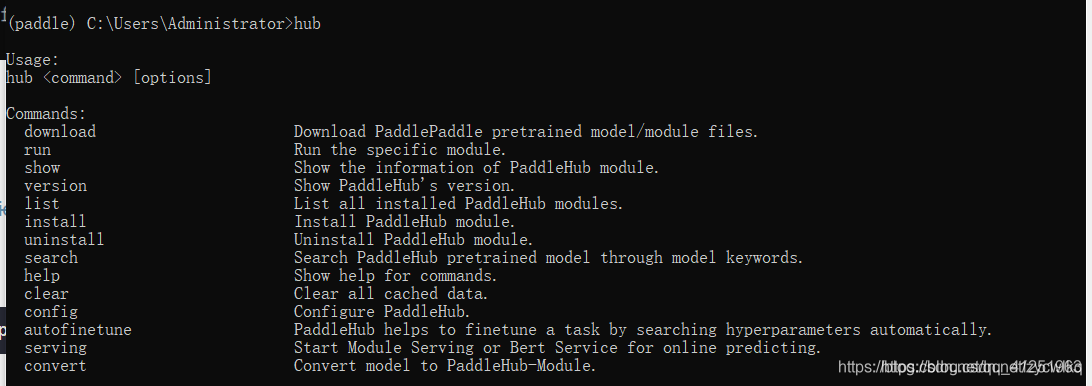
3、导入人体骨骼关键节点检测模型 hub install human_pose_estimation_resnet50_mpii==1.1.1
二、检测是否安装成功
1、检测图片骨骼节点
import osimport cv2import paddlehub as hubimport matplotlib.pyplot as pltfrom matplotlib.image import imreadimport numpy as npdef show_img(img_path, size=8): ''' 文件读取图片显示 ''' im = imread(img_path) plt.figure(figsize=(size, size)) plt.axis("off") plt.imshow(im)def img_show_bgr(image, size=8): ''' cv读取的图片显示 ''' image = cv2.cvtColor(image, cv2.COLOR_BGR2RGB) plt.figure(figsize=(size, size)) plt.imshow(image) plt.axis("off") plt.show()pose_estimation = hub.Module(name="human_pose_estimation_resnet50_mpii")result = pose_estimation.keypoint_detection(paths=['test4.jpg'], visualization=True, output_dir="work/output_pose/")print(result) 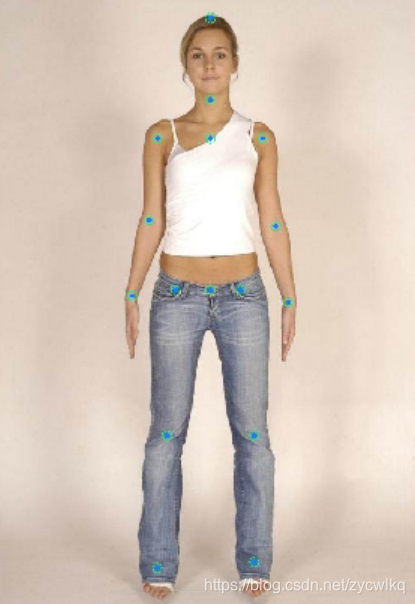
2、拼接皮影素材
import osimport cv2import paddlehub as hubimport matplotlib.pyplot as pltfrom matplotlib.image import imreadimport numpy as npdef show_img(img_path, size=8): ''' 文件读取图片显示 ''' im = imread(img_path) plt.figure(figsize=(size,size)) plt.axis("off") plt.imshow(im)def img_show_bgr(image,size=8): ''' cv读取的图片显示 ''' image=cv2.cvtColor(image,cv2.COLOR_BGR2RGB) plt.figure(figsize=(size,size)) plt.imshow(image) plt.axis("off") plt.show() show_img('work/imgs/body01.jpg')pose_estimation = hub.Module(name="human_pose_estimation_resnet50_mpii")result = pose_estimation.keypoint_detection(paths=['test4.jpg'], visualization=True, output_dir="work/output_pose/")print(result)def get_true_angel(value): ''' 转转得到角度值 ''' return value/np.pi*180def get_angle(x1, y1, x2, y2): ''' 计算旋转角度 ''' dx = abs(x1- x2) dy = abs(y1- y2) result_angele = 0 if x1 == x2: if y1 > y2: result_angele = 180 else: if y1!=y2: the_angle = int(get_true_angel(np.arctan(dx/dy))) if x1 < x2: if y1>y2: result_angele = -(180 - the_angle) elif y1 x2: if y1>y2: result_angele = 180 - the_angle elif y1 r[i][j]>200 and 0<=zero_y+i 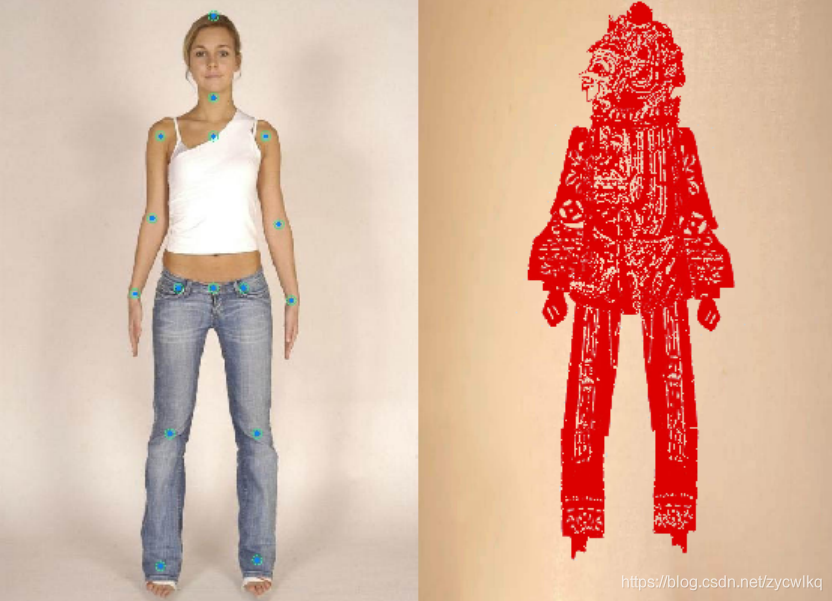
三、让皮影动起来
具体实现步骤如下:
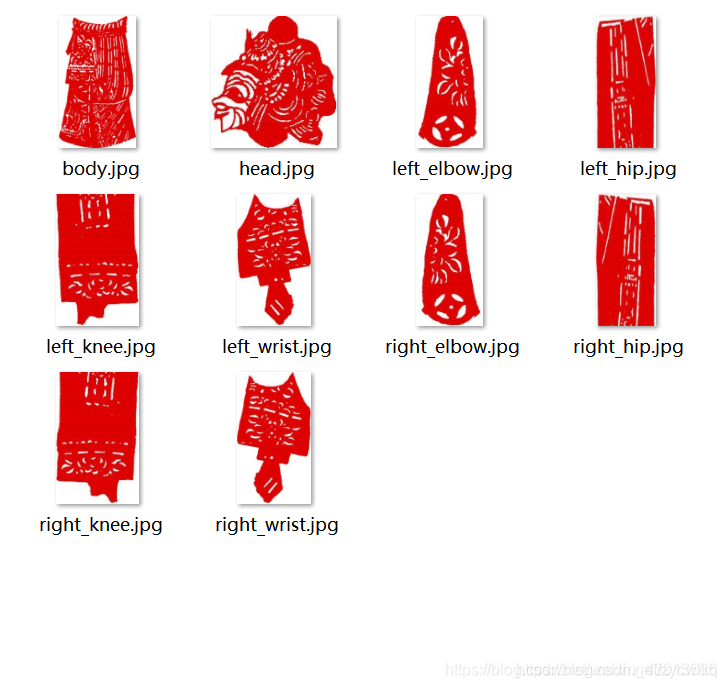
1、 准备素材 2、将视频中每一帧保存成图片 3、分析图片中的人体姿势, 并转换为皮影姿势,输出 结果 4、合并图像到视频,得到最终的结果import osimport cv2import paddlehub as hubimport matplotlib.pyplot as pltfrom matplotlib.image import imreadimport numpy as npdef show_img(img_path, size=8): ''' 文件读取图片显示 ''' im = imread(img_path) plt.figure(figsize=(size, size)) plt.axis("off") plt.imshow(im)def img_show_bgr(image, size=8): ''' cv读取的图片显示 ''' image = cv2.cvtColor(image, cv2.COLOR_BGR2RGB) plt.figure(figsize=(size, size)) plt.imshow(image) plt.axis("off") plt.show()pose_estimation = hub.Module(name="human_pose_estimation_resnet50_mpii")result = pose_estimation.keypoint_detection(paths=['test4.jpg'], visualization=True, output_dir="work/output_pose/")print(result)def get_true_angel(value): ''' 转转得到角度值 ''' return value / np.pi * 180def get_angle(x1, y1, x2, y2): ''' 计算旋转角度 ''' dx = abs(x1 - x2) dy = abs(y1 - y2) result_angele = 0 if x1 == x2: if y1 > y2: result_angele = 180 else: if y1 != y2: the_angle = int(get_true_angel(np.arctan(dx / dy))) if x1 < x2: if y1 > y2: result_angele = -(180 - the_angle) elif y1 < y2: result_angele = -the_angle elif y1 == y2: result_angele = -90 elif x1 > x2: if y1 > y2: result_angele = 180 - the_angle elif y1 < y2: result_angele = the_angle elif y1 == y2: result_angele = 90 if result_angele < 0: result_angele = 360 + result_angele return result_angeledef rotate_bound(image, angle, key_point_y): ''' 旋转图像,并取得关节点偏移量 ''' # 获取图像的尺寸 (h, w) = image.shape[:2] # 旋转中心 (cx, cy) = (w / 2, h / 2) # 关键点必须在中心的y轴上 (kx, ky) = cx, key_point_y d = abs(ky - cy) # 设置旋转矩阵 M = cv2.getRotationMatrix2D((cx, cy), -angle, 1.0) cos = np.abs(M[0, 0]) sin = np.abs(M[0, 1]) # 计算图像旋转后的新边界 nW = int((h * sin) + (w * cos)) nH = int((h * cos) + (w * sin)) # 计算旋转后的相对位移 move_x = nW / 2 + np.sin(angle / 180 * np.pi) * d move_y = nH / 2 - np.cos(angle / 180 * np.pi) * d # 调整旋转矩阵的移动距离(t_{ x}, t_{ y}) M[0, 2] += (nW / 2) - cx M[1, 2] += (nH / 2) - cy return cv2.warpAffine(image, M, (nW, nH)), int(move_x), int(move_y)def get_distences(x1, y1, x2, y2): return ((x1 - x2) ** 2 + (y1 - y2) ** 2) ** 0.5def append_img_by_sk_points(img, append_img_path, key_point_y, first_point, second_point, append_img_reset_width=None, append_img_max_height_rate=1, middle_flip=False, append_img_max_height=None): ''' 将需要添加的肢体图片进行缩放 ''' append_image = cv2.imdecode(np.fromfile(append_img_path, dtype=np.uint8), cv2.IMREAD_UNCHANGED) # 根据长度进行缩放 sk_height = int( get_distences(first_point[0], first_point[1], second_point[0], second_point[1]) * append_img_max_height_rate) # 缩放制约 if append_img_max_height: sk_height = min(sk_height, append_img_max_height) sk_width = int( sk_height / append_image.shape[0] * append_image.shape[1]) if append_img_reset_width is None else int( append_img_reset_width) if sk_width <= 0: sk_width = 1 if sk_height <= 0: sk_height = 1 # 关键点映射 key_point_y_new = int(key_point_y / append_image.shape[0] * append_image.shape[1]) # 缩放图片 append_image = cv2.resize(append_image, (sk_width, sk_height)) img_height, img_width, _ = img.shape # 是否根据骨骼节点位置在 图像中间的左右来控制是否进行 左右翻转图片 # 主要处理头部的翻转, 默认头部是朝左 if middle_flip: middle_x = int(img_width / 2) if first_point[0] < middle_x and second_point[0] < middle_x: append_image = cv2.flip(append_image, 1) # 旋转角度 angle = get_angle(first_point[0], first_point[1], second_point[0], second_point[1]) append_image, move_x, move_y = rotate_bound(append_image, angle=angle, key_point_y=key_point_y_new) app_img_height, app_img_width, _ = append_image.shape zero_x = first_point[0] - move_x zero_y = first_point[1] - move_y (b, g, r) = cv2.split(append_image) for i in range(0, r.shape[0]): for j in range(0, r.shape[1]): if 230 > r[i][j] > 200 and 0 <= zero_y + i < img_height and 0 <= zero_x + j < img_width: img[zero_y + i][zero_x + j] = append_image[i][j] return imgbody_img_path_map = { "right_hip" : "./work/shadow_play_material/right_hip.jpg", "right_knee" : "./work/shadow_play_material/right_knee.jpg", "left_hip" : "./work/shadow_play_material/left_hip.jpg", "left_knee" : "./work/shadow_play_material/left_knee.jpg", "left_elbow" : "./work/shadow_play_material/left_elbow.jpg", "left_wrist" : "./work/shadow_play_material/left_wrist.jpg", "right_elbow" : "./work/shadow_play_material/right_elbow.jpg", "right_wrist" : "./work/shadow_play_material/right_wrist.jpg", "head" : "./work/shadow_play_material/head.jpg", "body" : "./work/shadow_play_material/body.jpg"}def get_combine_img(img_path, pose_estimation=pose_estimation, body_img_path_map=body_img_path_map, backgroup_img_path='background.jpg'): ''' 识别图片中的关节点,并将皮影的肢体进行对应,最后与原图像拼接后输出 ''' result = pose_estimation.keypoint_detection(paths=[img_path]) image = cv2.imread(img_path) # 背景图片 backgroup_image = cv2.imread(backgroup_img_path) image_flag = cv2.resize(backgroup_image, (image.shape[1], image.shape[0])) # 最小宽度 min_width = int(get_distences(result[0]['data']['head_top'][0], result[0]['data']['head_top'][1], result[0]['data']['upper_neck'][0], result[0]['data']['upper_neck'][1]) / 3) # 右大腿 append_img_reset_width = max(int(get_distences(result[0]['data']['pelvis'][0], result[0]['data']['pelvis'][1], result[0]['data']['left_hip'][0], result[0]['data']['right_hip'][1]) * 1.6), min_width) image_flag = append_img_by_sk_points(image_flag, body_img_path_map['right_hip'], key_point_y=10, first_point=result[0]['data']['right_hip'], second_point=result[0]['data']['right_knee'], append_img_reset_width=append_img_reset_width) # 右小腿 append_img_reset_width = max(int(get_distences(result[0]['data']['pelvis'][0], result[0]['data']['pelvis'][1], result[0]['data']['left_hip'][0], result[0]['data']['right_hip'][1]) * 1.5), min_width) image_flag = append_img_by_sk_points(image_flag, body_img_path_map['right_knee'], key_point_y=10, first_point=result[0]['data']['right_knee'], second_point=result[0]['data']['right_ankle'], append_img_reset_width=append_img_reset_width) # 左大腿 append_img_reset_width = max(int(get_distences(result[0]['data']['pelvis'][0], result[0]['data']['pelvis'][1], result[0]['data']['left_hip'][0], result[0]['data']['left_hip'][1]) * 1.6), min_width) image_flag = append_img_by_sk_points(image_flag, body_img_path_map['left_hip'], key_point_y=0, first_point=result[0]['data']['left_hip'], second_point=result[0]['data']['left_knee'], append_img_reset_width=append_img_reset_width) # 左小腿 append_img_reset_width = max(int(get_distences(result[0]['data']['pelvis'][0], result[0]['data']['pelvis'][1], result[0]['data']['left_hip'][0], result[0]['data']['left_hip'][1]) * 1.5), min_width) image_flag = append_img_by_sk_points(image_flag, body_img_path_map['left_knee'], key_point_y=10, first_point=result[0]['data']['left_knee'], second_point=result[0]['data']['left_ankle'], append_img_reset_width=append_img_reset_width) # 右手臂 image_flag = append_img_by_sk_points(image_flag, body_img_path_map['left_elbow'], key_point_y=25, first_point=result[0]['data']['right_shoulder'], second_point=result[0]['data']['right_elbow'], append_img_max_height_rate=1.2) # 右手肘 append_img_max_height = int( get_distences(result[0]['data']['right_shoulder'][0], result[0]['data']['right_shoulder'][1], result[0]['data']['right_elbow'][0], result[0]['data']['right_elbow'][1]) * 1.6) image_flag = append_img_by_sk_points(image_flag, body_img_path_map['left_wrist'], key_point_y=10, first_point=result[0]['data']['right_elbow'], second_point=result[0]['data']['right_wrist'], append_img_max_height_rate=1.5, append_img_max_height=append_img_max_height) # 左手臂 image_flag = append_img_by_sk_points(image_flag, body_img_path_map['right_elbow'], key_point_y=25, first_point=result[0]['data']['left_shoulder'], second_point=result[0]['data']['left_elbow'], append_img_max_height_rate=1.2) # 左手肘 append_img_max_height = int( get_distences(result[0]['data']['left_shoulder'][0], result[0]['data']['left_shoulder'][1], result[0]['data']['left_elbow'][0], result[0]['data']['left_elbow'][1]) * 1.6) image_flag = append_img_by_sk_points(image_flag, body_img_path_map['right_wrist'], key_point_y=10, first_point=result[0]['data']['left_elbow'], second_point=result[0]['data']['left_wrist'], append_img_max_height_rate=1.5, append_img_max_height=append_img_max_height) # 头 image_flag = append_img_by_sk_points(image_flag, body_img_path_map['head'], key_point_y=10, first_point=result[0]['data']['head_top'], second_point=result[0]['data']['upper_neck'], append_img_max_height_rate=1.2, middle_flip=True) # 身体 append_img_reset_width = max( int(get_distences(result[0]['data']['left_shoulder'][0], result[0]['data']['left_shoulder'][1], result[0]['data']['right_shoulder'][0], result[0]['data']['right_shoulder'][1]) * 1.2), min_width * 3) image_flag = append_img_by_sk_points(image_flag, body_img_path_map['body'], key_point_y=20, first_point=result[0]['data']['upper_neck'], second_point=result[0]['data']['pelvis'], append_img_reset_width=append_img_reset_width, append_img_max_height_rate=1.2) result_img = np.concatenate((image, image_flag), axis=1) return result_img##pos_img_path = 'test3.jpg'##result_img = get_combine_img(pos_img_path, pose_estimation, body_img_path_map)##img_show_bgr(result_img, size=10)input_video = 'work/test.mp4'def transform_video_to_image(video_file_path, img_path): ''' 将视频中每一帧保存成图片 ''' video_capture = cv2.VideoCapture(video_file_path) fps = video_capture.get(cv2.CAP_PROP_FPS) count = 0 while(True): ret, frame = video_capture.read() if ret: cv2.imwrite(img_path + '%d.jpg' % count, frame) count += 1 else: break video_capture.release() print('视频图片保存成功, 共有 %d 张' % count) return fpsfps = transform_video_to_image(input_video, 'work/mp4_img/')def analysis_pose(input_frame_path, output_frame_path, is_print=True): ''' 分析图片中的人体姿势, 并转换为皮影姿势,输出结果 ''' file_items = os.listdir(input_frame_path) file_len = len(file_items) for i, file_item in enumerate(file_items): if is_print: print(i+1,'/', file_len, ' ', os.path.join(output_frame_path, file_item)) combine_img = get_combine_img(os.path.join(input_frame_path, file_item)) cv2.imwrite(os.path.join(output_frame_path, file_item), combine_img)analysis_pose('work/mp4_img/', 'work/mp4_img_analysis/', is_print=False)def combine_image_to_video(comb_path, output_file_path, fps=30, is_print=False): ''' 合并图像到视频 ''' fourcc = cv2.VideoWriter_fourcc(*'MP4V') file_items = os.listdir(comb_path) file_len = len(file_items) # print(comb_path, file_items) if file_len > 0: temp_img = cv2.imread(os.path.join(comb_path, file_items[0])) img_height, img_width = temp_img.shape[0], temp_img.shape[1] out = cv2.VideoWriter(output_file_path, fourcc, fps, (img_width, img_height)) for i in range(file_len): pic_name = os.path.join(comb_path, str(i) + ".jpg") if is_print: print(i + 1, '/', file_len, ' ', pic_name) img = cv2.imread(pic_name) out.write(img) out.release()combine_image_to_video('work/mp4_img_analysis/', 'work/mp4_analysis.mp4', fps) 
四、总结
本项目在弘扬传统文化的同时,还能让我学习到AI的知识,体会到 PaddleHub 的强大, 这是一个很有意义的项目。
实现效果视频链接:
转载地址:https://blog.csdn.net/zycwlkq/article/details/116463136 如侵犯您的版权,请留言回复原文章的地址,我们会给您删除此文章,给您带来不便请您谅解!
发表评论
最新留言
能坚持,总会有不一样的收获!
[***.219.124.196]2024年04月04日 19时56分11秒
关于作者

喝酒易醉,品茶养心,人生如梦,品茶悟道,何以解忧?唯有杜康!
-- 愿君每日到此一游!
推荐文章
SQl 数据完整性(随堂博客)
2019-04-29
左连接、右连接、内连接
2019-04-29
MySQL DQL语句基础(随堂博客)
2019-04-29
MySQL基础练习
2019-04-29
利用MySQL进行数据复杂查询(1)
2019-04-29
利用MySQL进行数据复杂查询(2)
2019-04-29
MySQL 表与表之间的关系
2019-04-29
Python数据处理
2019-04-29
Java练习题(面向对象)
2019-04-29
Python 利用os和shutil复制系统文件
2019-04-29
Python 循环输出菱形字符串
2019-04-29
MySQL常见错误总结
2019-04-29
pymysql 的基础应用
2019-04-29
Html+Css实现 启橙装饰网 项目
2019-04-29
JavaScript 实现哥德巴赫猜想
2019-04-29
JavaScript DOM
2019-04-29
Python 管理程序改进——连接MYSQL
2019-04-29
Python 爬虫
2019-04-29
Python 爬虫-百度风云榜的电影top50
2019-04-29
Python 爬虫-豆瓣影星图片下载
2019-04-29
白红宇的个人博客 - 记录点点滴滴的事 - 您是第 309889323 位访客
访问时间: 2024-05-02 04:34:35
访问IP: 3.145.47.253
Copyright © 2020 - 2023 blog.css8.cn 京ICP备2021015314号-1
手机版