MacOS应用开发学习笔记
 此处强调,获取搜索框上的两个按钮及事件处理如下:
发布日期:2021-06-29 11:52:32
浏览次数:2
分类:技术文章
本文共 8005 字,大约阅读时间需要 26 分钟。
系统学习MacOS应用开发,但是细小的知识点容易忘记,因此在此做下笔记,说不定后续有时间回顾下!
第1章 准备工作
- Apple现在要求上架Mac AppStore的应用必须开启沙盒SandBox,该项在项目配置中打开。
- 如果你的应用要上架Mac AppStore且需要访问服务器的API接口,必须打开SandBox中Network下的Outgoing Connections选项, 同时Hardware下的Printing选项也要开启,否则审核不通过。
- 如果使用了第三方的Framework或者自己开发的Framework,Code Signing中的Other Code Signing Flags必须设置为
--deep,否则无法打包发布到App Store。
第2章 窗口对象
2.1 窗口界面组成
- 可以接收输入事件(键盘、鼠标、触控板等)的窗口对象称为keyWindow(注意,全称为keyboard Window);当前的活动窗口称为MainWindow,一个时刻只能有一个keyWindow和一个mainWindow,当mainWindow可以接收输入事件时两者是同一个窗口。
2.2 模态窗口
某些场景需要限制用户必须处理完当前窗口的任务,此时需要 用到模态。模态的方式有两种:
1.Modal Window:霸道,其他窗口无法接受任何系统事件[[NSApplication sharedApplication] runModalForWindow:self.strongWindow];
注意:结束模态窗口时,直接关闭窗口的方式模态一直存在,正确的做法:
[[NSNotificationCenter defaultCenter] addObserver:self selector:@selector(windowWillClose:) name:NSWindowWillCloseNotification object:nil];
- (void)windowWillClose:(NSNotification *)notify { [[NSApplication sharedApplication] stopModal];} - Modal Sessions:上述相比温柔些,允许响应快捷键和系统菜单
NSModalSession sessionCode = [[NSApplication sharedApplication] beginModalSessionForWindow:window];
- (void)windowWillClose:(NSNotification *)notify { if (sessionCode != 0) { [[NSApplication sharedApplication] endModalSession:sessionCode]; }} 总结:
1.任何窗口的关闭要么通过左上角关闭按钮,要么通过执行window的close方法关闭。 2.对于任何一种模态窗口,关闭后还要额外调用结束模态方法结束状态,若不执行,则其他窗口无法正常工作。2.3 窗口编程控制
- 通过懒加载方式创建并显示窗口,如下:
@property(nonatomic, strong) NSWindow *myWindow;
- (NSWindow *)window { if (!_window) { NSRect frame = NSMakeRect(0, 0, 200, 200); NSUInteger style = NSTitledWindowMask | NSClosableWindowMask | NSMiniaturizableWindowMask; _window = [[NSWindow alloc] initWithContentRect:frame styleMask:????style backing:NSBackingStoreBuffered defer:YES]; _window.title = @"New Create Window"; } return _window;} - (void)showWindowAction:(id)sender { [self.window makeKeyAndOrderFront:nil]; [self.window center];} 注意:通过上述代码创建的窗口只能显示和关闭一次,后续会崩溃!后续章节有详细分析。
-
窗口通知
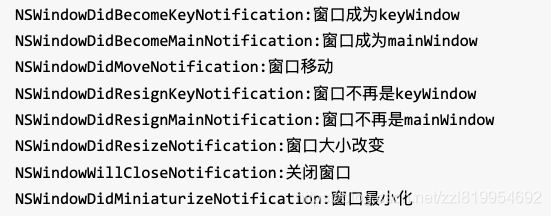 当多窗口切换,两个窗口之间界面修改会影响另一个的数据模型时,通过监听
NSWindowDidBecomeMainNotification和NSWindowDidBecomeKeyNotification重新获取数据刷新界面。 -
如何给NSWindow的contentView添加元素?
- 通过NSView或者NSViewController的View添加
[self.window.contentView addSubview:view];
- macOS10.10以后,创建一个NSViewController子类,直接赋值给NSWindow的contentViewController。
NSViewController *myVc = [[NSViewController alloc] init]; self.window.contentViewController = myVc;
- 设置NSWindow的title和icon
- (void)setWindowTitleAndIcon { [self.window setRepresentedURL:[NSURL URLWithString:@"/Users/zhuzhanlong/Desktop/image.jpeg"]]; [self.window setTitle:@"TestApp"]; [[self.window standardWindowButton:NSWindowDocumentIconButton] setImage:[NSImage imageNamed:@"help"]];} - 设置NSWindow的background Color
[self.window setOpaque:NO]; [self.window setBackgroundColor:[NSColor greenColor]];
- 关闭窗口时终止程序 当关闭最后一个window或者关闭程序的唯一window时,程序退出
- (BOOL)applicationShouldTerminateAfterLastWindowClosed:(NSApplication *)sender { return YES;} 另一种方法是监听NSWindowWillCloseNotification,并判断是mainWindow就关闭程序。
- (void)receiveWindowWillCloseNotification:(NSNotification *)notify { NSWindow *window = notify.object; if (window == self.mainWindow) { [NSApp terminate:self]; }} - 点击Dock栏恢复应用 当未设置上一条中的最后一个窗口关闭时程序退出时,即
applicationShouldTerminateAfterLastWindowClosed方法返回NO或者未重写时,当窗口关闭时,点击Dock栏仍然可以恢复应用。代码如下:
- (BOOL)applicationShouldHandleReopen:(NSApplication *)sender hasVisibleWindows:(BOOL)flag { [self.strongWindow makeKeyAndOrderFront:self]; return YES;} - Window的title区域增加视图 通过获取contentView的父视图,自定义title区域
- (void)addButtonToTitleBar { NSView *titleView = [self.window standardWindowButton:NSWindowCloseButton].superview; NSButton *button = [[NSButton alloc] init]; button.title = @"Register"; float x = self.window.contentView.frame.size.width - 100; button.frame = NSMakeRect(x, 0, 80, 24); button.bezelStyle = NSBezelStyleRounded; [titleView addSubview:button];} - NSWindow的位置控制及居中 由于NSWindow的isRestorable属性会记忆上次位置并自动恢复,因此,如果需要自定义位置或者手动设置位置,先在window的xib或者代码中将isRestorable属性设置为NO。
- (void)windowDidLoad { [super windowDidLoad]; [self.window setRestorable:NO]; //居中 [self.window center]; //或者指定在屏幕的固定位置 NSRect frame = NSMakeRect(0, 0, 100, 100); [self.window setFrame:frame display:YES];} 第3章 视图和滚动条
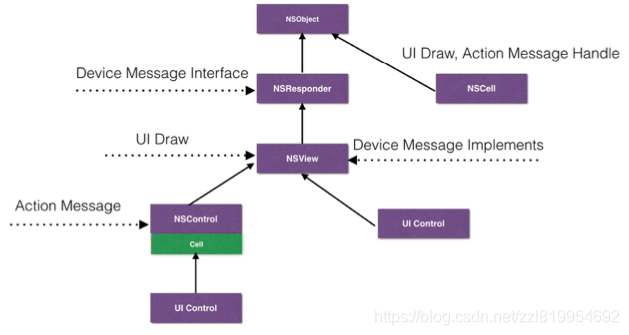
3.1 NSView
-
坐标系统
macOS的坐标原点(0, 0)在XY轴的左下角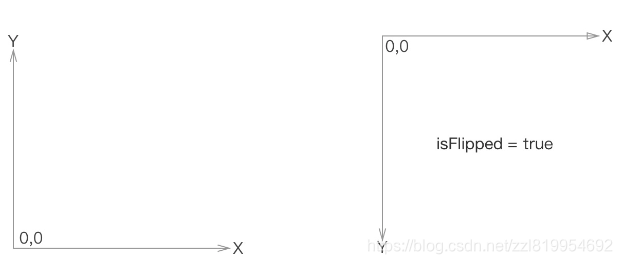 翻转坐标系,重写NSView子类的isFlipped属性,返回YES即可。
 -
Frame和Bounds
老生常谈,Frame表示视图在父视图中的位置。Bounds是本身内部的坐标系统,bounds坐标原点的变化会影响子视图的位置。 理解视图Bounds的变化对子视图的影响是理解NSSCrollView的关键。 -
坐标转换
视图类提供了丰富的坐标转换方法,从视图到视图、视图到窗口、视图到屏幕绘制缓冲区、视图到Layer等。最常用的是鼠标事件处理中。
- (void)mouseDown:(NSEvent *)event { //从窗口坐标转换为视图坐标 NSPoint clickedPoint = [self convertPoint:[event locationInWindow] fromView:nil];} - 视图添加到父视图的回调方法
- (void)viewWillMoveToSuperview:(NSView *)newSuperview { } - (void)viewDidMoveToSuperview { } -
视图查找
可以给视图提供一个Tag值,通过ViewWithTag深度遍历算法查找子视图。 -
视图Layer属性
由于NSView默认没有Layer属性,和UIView稍有不同,如果需要设置背景色、圆角等属性,需要声明Layer。
self.wantsLayer = YES; self.layer.backgroundColor = [[NSColor redColor] CGColor]; self.layer.borderColor = [[NSColor greenColor] CGColor]; self.layer.borderWidth = 2; self.layer.cornerRadius = 20;
- 视图绘制 默认在drawRect:方法中进行绘制。
//延迟绘制 [self.view needsDisplay]; [self.view setNeedsDisplay:YES]; //立即绘制 [self.view display]; [self.view displayRect:self.view.frame];
注意,在drawRect:方法之外绘制时,需要使用:
[self.view lockFocus]; [self.view unlockFocus];
- 视图截图 使用lockFocus锁定后获取到PDF data并转换成NSData写入文件。核心代码如下:
- (void)saveSelfAsImage { [self lockFocus]; NSImage *image = [[NSImage alloc] initWithData:[self dataWithPDFInsideRect:self.frame]]; [self unlockFocus]; NSData *imageData = [image TIFFRepresentation]; //创建文件并保存 NSString *path = [NSSearchPathForDirectoriesInDomains(NSDesktopDirectory, NSUserDomainMask, YES) lastObject]; path = [path stringByAppendingPathComponent:@"test.jpg"]; [[NSFileManager defaultManager] createFileAtPath:path contents:imageData attributes:nil]; //完成后Finder中打开 NSURL *fileUrl = [NSURL fileURLWithPath:path]; [[NSWorkspace sharedWorkspace] activateFileViewerSelectingURLs:@[fileUrl]];} 如果视图比较大,带滚动视图,则通过如下方法获取整个滚动视图的截图:
- (void)saveScrollViewAsImage { [self lockFocus]; NSData *pdfData = [self dataWithPDFInsideRect:self.frame]; [self unlockFocus]; NSPDFImageRep *img = [NSPDFImageRep imageRepWithData:pdfData]; NSInteger count = [img pageCount]; NSString *path = [NSSearchPathForDirectoriesInDomains(NSDesktopDirectory, NSUserDomainMask, YES) lastObject]; path = [path stringByAppendingPathComponent:@"test.png"]; for (int i = 0; i < count; i++) { [img setCurrentPage:i]; NSImage *image = [[NSImage alloc] init]; [image addRepresentation:img]; NSBitmapImageRep *rep = [NSBitmapImageRep imageRepWithData:[image TIFFRepresentation]]; NSData *finalData = [rep representationUsingType:NSBitmapImageFileTypePNG properties:@{ }]; [[NSFileManager defaultManager] createFileAtPath:path contents:finalData attributes:nil]; } //完成后Finder中打开 NSURL *fileUrl = [NSURL fileURLWithPath:path]; [[NSWorkspace sharedWorkspace] activateFileViewerSelectingURLs:@[fileUrl]];} - 禁止NSScrollView在X轴或Y轴方向上的滚动
禁用某一方向的滚动,需要继承NSSCrollView并重写scrollWheel:方法,判断满足一定条件就返回。
@implementation DisableVerticalScrollView- (void)scrollWheel:(NSEvent *)event { float dy = fabs(event.deltaY); if (event.deltaX == 0.0 && dy > 0.01) { return; }else if(event.deltaX == 0.0 && dy == 0.0) { return; }else { [super scrollWheel:event]; }} 第4章 基本控件
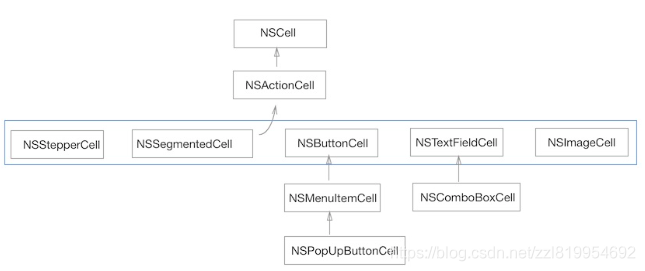
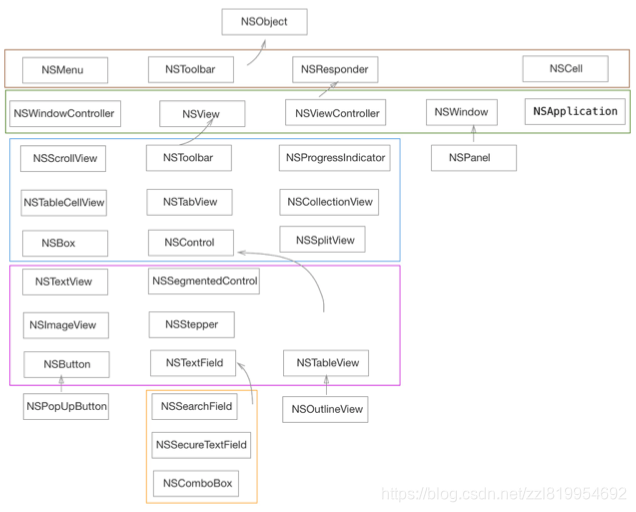
4.1 控件家族图谱
4.2 NSSearchField
绑定事件用IBAction,当用户在搜索框内实时输入时会执行事件,这样可做实时搜索。
此处强调,获取搜索框上的两个按钮及事件处理如下: - (void)registerSearchActionButton { NSActionCell *searchCell = [[self.searchField cell] searchButtonCell]; NSActionCell *cancelCell = [[self.searchField cell] cancelButtonCell]; searchCell.target = self; searchCell.action = @selector(searchBtnClicked:); cancelCell.target = self; cancelCell.action = @selector(cancelBtnClicked:)} 转载地址:https://blog.csdn.net/zzl819954692/article/details/102528116 如侵犯您的版权,请留言回复原文章的地址,我们会给您删除此文章,给您带来不便请您谅解!
发表评论
最新留言
很好
[***.229.124.182]2024年04月28日 01时19分28秒
关于作者

喝酒易醉,品茶养心,人生如梦,品茶悟道,何以解忧?唯有杜康!
-- 愿君每日到此一游!
推荐文章
蓝牙BR/EDR和Bluetooth Smart的十大重要区别
2019-04-29
树莓派WIFI设置
2019-04-29
树莓派摄像头及视频
2019-04-29
阿里云ECS使用
2019-04-29
VC6 C/CPP操作ORACLE数据库 clilib方案
2019-04-29
single修改版
2019-04-29
IIS 多站点HTTPS加密及自动http跳转到https
2019-04-29
NGINX重启HTTPS站点要Enter PEM pass phrase输入密码
2019-04-29
树莓派GPIO
2019-04-29
Android 热敏打印机打印二维码
2019-04-29
用vcgencmd获取树莓派硬件状态数据
2019-04-29
IIS 多域名多张证书配置
2019-04-29
树莓派LINUX 截屏
2019-04-29
树莓派Raspberry Pi的嵌入式QT平台
2019-04-29
apache https
2019-04-29
Debian Jessie安装支持HTML5音视频的Chromium浏览器听百度音乐
2019-04-29
nanopi2 启动信息
2019-04-29
POS打印机驱动大全
2019-04-29
phpstudy https
2019-04-29
centos apache 最新版HTTPS配置
2019-04-29
白红宇的个人博客 - 记录点点滴滴的事 - 您是第 309773706 位访客
访问时间: 2024-05-01 22:12:16
访问IP: 3.145.59.187
Copyright © 2020 - 2023 blog.css8.cn 京ICP备2021015314号-1
手机版