本文共 24810 字,大约阅读时间需要 82 分钟。
【高通SDM660平台 Android 10.0】22 --- Flashlight 及 Kernel Flashlight 代码分析
原创文章列表:
《》
《》 《 》 《 》 《》 《》 《》 《》 《》 《》 《》 《》 《》 《》 《》 《》一、[硬件] 闪光灯硬件原理图
本文以 mm-camera/mm-camera2/media-controller/modules/sensors/configs/sdm660_camera.xml 中的flash 为例,
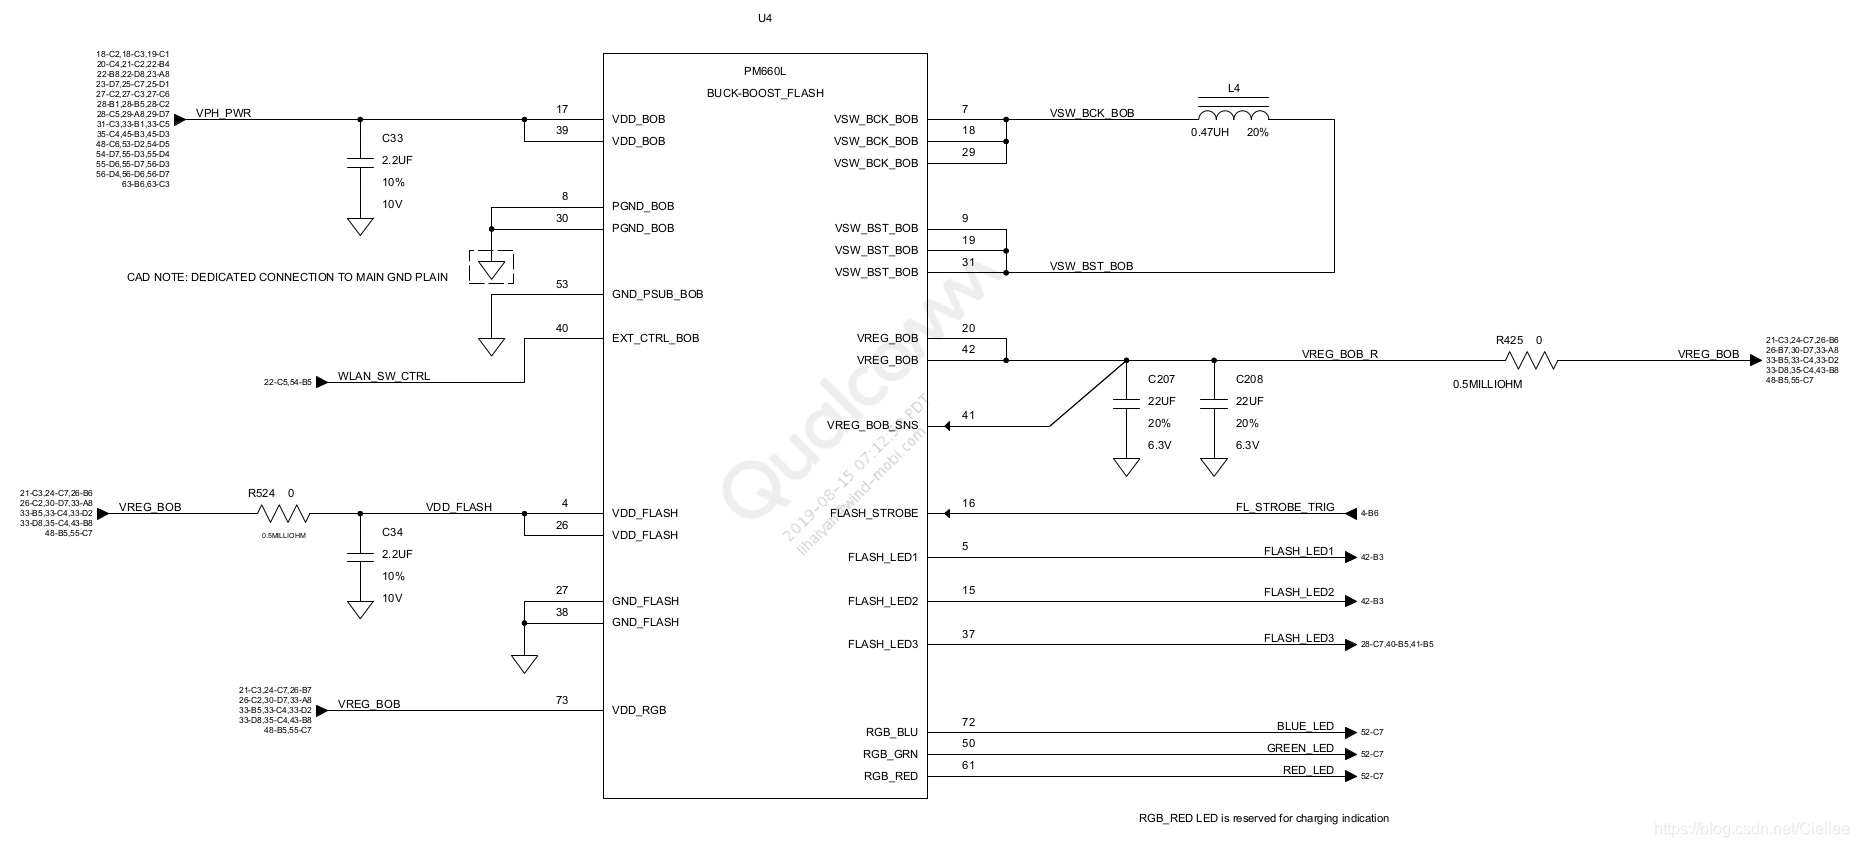
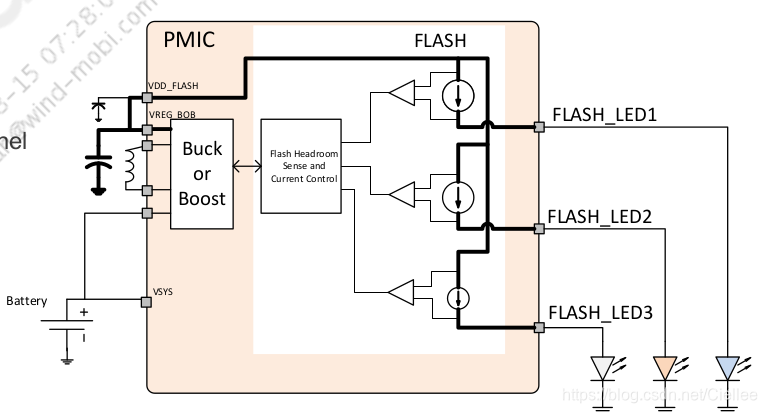
从原理图中可以看出,闪光灯的电 VDD_FLASH 及 开关控制引脚 FLASH_STROBE、FLASH_LED1、FLASH_LED2、FLASH_LED3 都是由 PM660L 来控制的。
其中 :- VDD_FLASH : 是主供电
- FLASH_STROBE : 手电筒模式时的PWM输出脚
- FLASH_LED1、FLASH_LED2、FLASH_LED3 : 闪光灯模式时的PWM输出脚,可以包含单闪、双闪需求
这个是一个方框图,由电池供电,经过升压,接着通过脉宽引脚的高电平来控制LED 的亮暗程度。。
所以整个原理是比较清晰的,代码方面要需对上述引脚做如下控制
- 闪光灯的上下电
- 手电筒模式还是闪光灯模式
- 根据亮度来控制PWM 输出的高电平脉宽占比
二、[vendor] 库文件 lib
从sdm660_camera.xml 中可以看出,<FlashName>pmic</FlashName>,
mm-camera/mm-camera2/media-controller/modules/sensors/flash/libs/pmic/pmic_flash.h,最终编译生成 libflash_pmic.so 库 在其头文件中:
# mm-camera/mm-camera2/media-controller/modules/sensors/flash/libs/pmic/pmic_flash.h#include "flash_lib.h"/* * if flash_driver_type is set to FLASH_DRIVER_DEFAULT * flash specifications are taken from kernel and the flash is driven by kernel. * For other value FLASH_DRIVER_PMIC / FLASH_DRIVER_GPIO * FLASH_DRIVER_I2C all the information like max current * max duration and num of flashes must be provided in this driver. */static flash_lib_t flash_lib_ptr = { .flash_name = "pmic", .flash_driver_type = FLASH_DRIVER_TYPE_DEFAULT, .main_flash_on_frame_skip = 3, .main_flash_off_frame_skip = 3, .torch_on_frame_skip = 2, .torch_off_frame_skip = 2,}; 头文件中主要是定义了在闪光灯打开时,摄像头需要跳过的帧数,及在手机筒打开时需要跳过的帧数。
还是一个比较重要的就是flash_driver_type, - 当
.flash_driver_type = FLASH_DRIVER_TYPE_DEFAULT,时,闪光灯的相关配置是由kernel 来定义的。 - 当
.flash_driver_type = FLASH_DRIVER_PMIC,和其他值时,闪光灯的相关配置需要由本lib 库来定义。
三、[vendor] 通用代码 flash.c 初始化
在前在 《》 中,我们分析过了,
flash open动作是在module_sensor_offload_open()中调用打开 闪光灯节点的。 flash 初始化是由 module_sensor_offload_init_config() 中来调用的。 void module_sensor_offload_init_config( void* param1, void* param2, void* param3 __attribute__((unused)), void* param4 __attribute__((unused))){ // 初始化闪光灯 ,调用 flash_init(),打开闪光灯 lib 库 SLOW("flash subdev id = %d", status = module_sensor_flash_init(s_bundle); // 获取使用闪光灯时,跳过的帧数,如果没设置,默认过滤 2 帧 /* Get led frame skip timing parameters */ SENSOR_SUB_MODULE_PROCESS_EVENT(s_bundle, SUB_MODULE_LED_FLASH, LED_FLASH_GET_FRAME_SKIP_TIME_PARAMS, s_bundle, rc); if (rc < 0) { SERR("failed to get led off frame skip time"); s_bundle->main_flash_on_frame_skip = 2; s_bundle->main_flash_off_frame_skip = 2; s_bundle->torch_on_frame_skip = 2; s_bundle->torch_off_frame_skip = 2; }} 3.1 module_sensor_flash_init()
# mm-camera/mm-camera2/media-controller/modules/sensors/module/module_sensor.cboolean module_sensor_flash_init(module_sensor_bundle_info_t *s_bundle){ /* Get flash name from camera config read from daemon init */ a_name = s_bundle->sensor_common_info.camera_config.flash_name; SENSOR_SUB_MODULE_PROCESS_EVENT(s_bundle, SUB_MODULE_LED_FLASH, LED_FLASH_INIT, a_name, rc); return TRUE;} 可以看出,在 module_sensor_flash_init() 中主要是调用 flash_init() 来做初始化的。
case LED_FLASH_INIT: rc = flash_init(flash_ctrl, data); goto flash_process_Exit;
我们来看下 flash_init() 的内容。
- 根据传递的name ,拼凑lib 库的字符串,此处为
libflash_pmic.so,同步将 pmic_flash.h中的结构体内容保存在flash_ptr->driver_lib_data中。 - 解析 pmic 参数信息,及
flash_driver_type信息。 - 配置 I2C 地址信息
- 解析上下电信息,准备下发到 Kernel 中
- 下发
CFG_FLASH_INIT命令到 Kernel 中,相关信息保存在.flash_init_info中
static int32_t flash_init(void *ptr, void *data){ sensor_flash_data_t *flash_ctrl = (sensor_flash_data_t*)ptr; struct msm_flash_init_info_t flash_init_info; struct msm_flash_cfg_data_t flash_cfg; struct msm_camera_i2c_reg_setting_array *flash_init_settings = NULL; struct msm_sensor_power_setting_array *power_setting_array = NULL; SDBG("Enter"); /* memset flash init info */ memset(&flash_init_info, 0, sizeof(flash_init_info)); // 1. 根据传递的name ,拼凑lib 库的字符串,此处为 libflash_pmic.so,同步将 pmic_flash.h中的结构体内容保存在 flash_ptr->driver_lib_data 中 /* Load flash library */ rc = flash_load_lib(ptr, name); // 2. 解析 pmic 参数信息。 flash_update_settings_size(flash_ctrl->driver_lib_data); // 3. 解析 flash_driver_type 信息 switch (flash_ctrl->driver_lib_data->flash_driver_type) { case FLASH_DRIVER_TYPE_PMIC: flash_init_info.flash_driver_type = FLASH_DRIVER_PMIC; break; case FLASH_DRIVER_TYPE_I2C: flash_init_info.flash_driver_type = FLASH_DRIVER_I2C; break; case FLASH_DRIVER_TYPE_GPIO: flash_init_info.flash_driver_type = FLASH_DRIVER_GPIO; break; case FLASH_DRIVER_TYPE_DEFAULT: flash_init_info.flash_driver_type = FLASH_DRIVER_DEFAULT; break; } // 4. 配置I2C 地址 flash_init_info.slave_addr = flash_ctrl->driver_lib_data->i2c_flash_info.slave_addr; flash_init_info.i2c_freq_mode = sensor_sdk_util_get_i2c_freq_mode( flash_ctrl->driver_lib_data->i2c_flash_info.i2c_freq_mode); // 5. 解析上下电信息,准备下发到 Kernel 中 /* Translate power settings from uspace structure to kernel struct */ power_setting_array = (struct msm_sensor_power_setting_array *)malloc(sizeof(*power_setting_array)); translate_camera_power_setting(power_setting_array,&(flash_ctrl->driver_lib_data->power_setting_array)); /* Translate reg array settings from uspace structure to kernel struct */ flash_init_settings = (struct msm_camera_i2c_reg_setting_array *)malloc(sizeof(*flash_init_settings)); translate_sensor_reg_setting_array(flash_init_settings, &(flash_ctrl->driver_lib_data->i2c_flash_info.flash_init_settings)); flash_init_info.power_setting_array = power_setting_array; flash_init_info.settings = flash_init_settings; for (i = 0; i < MAX_LED_TRIGGERS; i++) { flash_cfg.flash_current[i] = flash_ctrl->driver_lib_data->max_flash_current[i]; flash_cfg.flash_duration[i] = flash_ctrl->driver_lib_data->max_flash_duration[i]; SLOW("i = %d flash_current = %d flash_duration = %d", i, flash_cfg.flash_current[i], flash_cfg.flash_duration[i]); } // 6. 下发 CFG_FLASH_INIT 命令到 Kernel 中,相关信息保存在 .flash_init_info 中 flash_cfg.cfg_type = CFG_FLASH_INIT; flash_cfg.cfg.flash_init_info = &flash_init_info; rc = ioctl(flash_ctrl->fd, VIDIOC_MSM_FLASH_CFG, &flash_cfg); for (i = 0; i < MAX_LED_TRIGGERS; i++) { flash_ctrl->flash_max_current[i] = flash_cfg.flash_current[i]; flash_ctrl->flash_max_duration[i] = flash_cfg.flash_duration[i]; SLOW("i = %d flash_max_current = %d flash_max_duration = %d", i, flash_ctrl->flash_max_current[i], flash_ctrl->flash_max_duration[i]); } SDBG("Exit"); free(power_setting_array); free(flash_init_settings); return SENSOR_SUCCESS;} 3.2 flash_process()
flash_process() 是 flashlight 的核心函数
# mm-camera/mm-camera2/media-controller/modules/sensors/flash/module/flash.cstatic int32_t flash_process(void *ctrl, sensor_submodule_event_type_t event, void *data){ flash_ctrl = (sensor_flash_data_t *)ctrl; rer = flash_ctrl->rer; dual_led_setting = &flash_ctrl->dual_led_setting; /* Initilize to invalid value * Kernel uses default values if not updated */ cfg.flash_current[0] = default_current; cfg.flash_current[1] = default_current; /* Translate reg array settings from uspace structure to kernel struct */ flash_settings = (struct msm_camera_i2c_reg_setting_array *)malloc( sizeof(*flash_settings)); SLOW("event %d", event); switch (event) { case LED_FLASH_GET_MAX_CURRENT: { // 1. 获得闪光灯的最大电流 int32_t ** flash_current = (int32_t **)data; *flash_current = &(flash_ctrl->flash_max_current[0]); goto flash_process_Exit; } case LED_FLASH_GET_MAX_DURATION: { // 2. 获得双闪的最大电流 uint32_t* flash_duration = (uint32_t*)data; *flash_duration = flash_ctrl->flash_max_duration[0]; goto flash_process_Exit; } case LED_FLASH_SET_CURRENT: { // 3. 设置闪光灯的最大电流 /* Get currents for dual LED */ rc = flash_set_current(data, dual_led_setting); goto flash_process_Exit; } case LED_FLASH_INIT: // 4. 闪光灯初始化 rc = flash_init(flash_ctrl, data); goto flash_process_Exit; case LED_FLASH_SET_RER_CHROMATIX: { // 5. 设置 红眼 chromatix 参数 rer_chromatix = (red_eye_reduction_type *)data; /* Get (RER) data from chromatix */ rc = flash_rer_set_chromatix(rer, rer_chromatix); goto flash_process_Exit; } case LED_FLASH_GET_RER_PARAMS: { // 6. 获取 红眼 参数 *(int32_t *) data = rer->cfg->red_eye_reduction_led_flash_enable; goto flash_process_Exit; } case LED_FLASH_SET_RER_PARAMS: { // 7. 设置 红眼 参数 mode = (int32_t *)data; rc = flash_rer_set_parm(rer, *mode); goto flash_process_Exit; } case LED_FLASH_SET_FIRING_POWER:{ // 8. 设置电流 flashPower = *(uint8_t *)data; goto flash_process_Exit; } case LED_FLASH_SET_RER_PROCESS: { // 9. 配置红眼处理函数 led_module_params = (module_sensor_params_t *)data; rc = flash_rer_sequence_process(rer, led_module_params); goto flash_process_Exit; } case LED_FLASH_SET_OFF: // 10. 关闭闪光灯 SHIGH("Turning off flash"); translate_sensor_reg_setting_array(flash_settings, &(flash_ctrl->driver_lib_data->i2c_flash_info.flash_off_settings)); cfg.cfg_type = CFG_FLASH_OFF; cfg.cfg.settings = flash_settings; break; case LED_FLASH_SET_TORCH: case LED_FLASH_SET_PRE_FLASH: { // 11. 开启 手电筒 或 开启预闪,下发参数 CFG_FLASH_LOW SHIGH("Turning on torch/pre flash"); /* Pre flash mode */ translate_sensor_reg_setting_array(flash_settings, &(flash_ctrl->driver_lib_data->i2c_flash_info.flash_low_settings)); cfg.cfg_type = CFG_FLASH_LOW; cfg.cfg.settings = flash_settings; if (dual_led_setting->low_setting[0] == 0 && dual_led_setting->low_setting[1] == 0) { cfg.flash_current[0] = data ? *(int32_t *)data : default_current; cfg.flash_current[1] = data ? *(int32_t *)data : default_current; } else { cfg.flash_current[0] = dual_led_setting->low_setting[0]; cfg.flash_current[1] = dual_led_setting->low_setting[1]; } break; } case LED_FLASH_SET_RER_PULSE_FLASH: { // 12. 设置红眼 脉冲 电平 /* RER flash pulses */ translate_sensor_reg_setting_array(flash_settings, &(flash_ctrl->driver_lib_data->i2c_flash_info.flash_high_settings)); cfg.cfg_type = CFG_FLASH_HIGH; /* Use chromatix current if exist (set in RER_PROCESS)*/ cfg.flash_current[0] = data ? *(int32_t *)data : default_current; cfg.flash_current[1] = data ? *(int32_t *)data : default_current; cfg.cfg.settings = flash_settings; temp = (dual_led_setting->high_setting[0] + dual_led_setting->high_setting[1]); if (temp > 0) { /* Update with Dual LED current */ cfg.flash_current[0] = (cfg.flash_current[0] * dual_led_setting->high_setting[0]) / temp; cfg.flash_current[1] = (cfg.flash_current[1] * dual_led_setting->high_setting[1]) / temp; } break; } case LED_FLASH_SET_MAIN_FLASH: { // 13. 开启主闪 SHIGH("Turning on main flash"); /* Main flash mode */ translate_sensor_reg_setting_array(flash_settings, &(flash_ctrl->driver_lib_data->i2c_flash_info.flash_high_settings)); cfg.cfg_type = CFG_FLASH_HIGH; cfg.cfg.settings = flash_settings; if (dual_led_setting->high_setting[0] == 0 && dual_led_setting->high_setting[1] == 0) { cfg.flash_current[0] = data ? *(int32_t *)data : default_current; cfg.flash_current[1] = data ? *(int32_t *)data : default_current; } else { cfg.flash_current[0] = dual_led_setting->high_setting[0]; cfg.flash_current[1] = dual_led_setting->high_setting[1]; } rc = flash_rer_wait_pupil_contract(rer, led_module_params); break; } case LED_FLASH_GET_FRAME_SKIP_TIME_PARAMS: // 14. 获取 帧数过滤 参数 { module_sensor_bundle_info_t* s_bundle = (module_sensor_bundle_info_t*)data; rc = flash_get_frame_skip_timing_params(s_bundle,flash_ctrl); goto flash_process_Exit; } } rc = ioctl(flash_ctrl->fd, VIDIOC_MSM_FLASH_CFG, &cfg);flash_process_Exit: free(flash_settings); return rc;} 可以看出,操作闪光灯,都是操作 flash_process() 函数,最终都是通过 ioctl 来下发指令和参数的,还是比较好理解的。
四、[Kernel] flashlight 驱动
4.1 Kernel probe 初始化 msm_flash_platform_probe()
# msm-4.14/arch/arm64/boot/dts/qcom/sdm660-camera-sensor-mtp.dtsi&soc { led_flash0: qcom,camera-flash@0 { cell-index = <0>; compatible = "qcom,camera-flash"; qcom,flash-source = <&pm660l_flash0 &pm660l_flash1>; qcom,torch-source = <&pm660l_torch0 &pm660l_torch1>; qcom,switch-source = <&pm660l_switch0>; status = "ok"; }; led_flash1: qcom,camera-flash@1 { cell-index = <1>; compatible = "qcom,camera-flash"; qcom,flash-source = <&pm660l_flash2>; qcom,torch-source = <&pm660l_torch2>; qcom,switch-source = <&pm660l_switch1>; status = "ok"; }; 对应的c 代码位于: msm-4.14/drivers/media/platform/msm/camera_v2/sensor/flash/msm_flash.c
static const struct of_device_id msm_flash_dt_match[] = { { .compatible = "qcom,camera-flash", .data = NULL}, { }};MODULE_DEVICE_TABLE(of, msm_flash_dt_match);static struct platform_driver msm_flash_platform_driver = { .probe = msm_flash_platform_probe, .driver = { .name = "qcom,camera-flash", .owner = THIS_MODULE, .of_match_table = msm_flash_dt_match, },}; 主要工作流程:
- 解析dts 信息,包括
cell-index、qcom,cci-master、qcom,switch-source、qcom,flash-source、qcom,max-current、qcom,duration等。 - 初始化
V4L2 subdev,节点名为/dev/v4l-subdevX - 如果
type = FLASH_DRIVER_PMIC, 会对每一个touch_source注册为 led 设备,创建一个sys 节点,qcom,led-name = "led:torch_0";
static int32_t msm_flash_platform_probe(struct platform_device *pdev){ struct msm_flash_ctrl_t *flash_ctrl = NULL; struct msm_camera_cci_client *cci_client = NULL; flash_ctrl = kzalloc(sizeof(struct msm_flash_ctrl_t), GFP_KERNEL); memset(flash_ctrl, 0, sizeof(struct msm_flash_ctrl_t)); flash_ctrl->pdev = pdev; // 1. 解析dts 信息,包括 cell-index、qcom,cci-master、 // qcom,switch-source、qcom,flash-source、qcom,max-current、qcom,duration // qcom,torch-source、qcom,gpio-vana、qcom,gpio-vio、qcom,gpio-vaf、qcom,gpio-vdig、qcom,gpio-reset // qcom,gpio-standby、qcom,gpio-af-pwdm、qcom,gpio-flash-en、qcom,gpio-flash-reset rc = msm_flash_get_dt_data(pdev->dev.of_node, flash_ctrl); // 2. 初始化 V4L2 subdev,节点名为 /dev/v4l-subdevX flash_ctrl->flash_state = MSM_CAMERA_FLASH_RELEASE; flash_ctrl->power_info.dev = &flash_ctrl->pdev->dev; flash_ctrl->flash_device_type = MSM_CAMERA_PLATFORM_DEVICE; flash_ctrl->flash_mutex = &msm_flash_mutex; flash_ctrl->flash_i2c_client.i2c_func_tbl = &msm_sensor_cci_func_tbl; flash_ctrl->flash_i2c_client.cci_client = kzalloc( sizeof(struct msm_camera_cci_client), GFP_KERNEL); cci_client = flash_ctrl->flash_i2c_client.cci_client; cci_client->cci_subdev = msm_cci_get_subdev(); cci_client->cci_i2c_master = flash_ctrl->cci_i2c_master; /* Initialize sub device */ v4l2_subdev_init(&flash_ctrl->msm_sd.sd, &msm_flash_subdev_ops); v4l2_set_subdevdata(&flash_ctrl->msm_sd.sd, flash_ctrl); flash_ctrl->msm_sd.sd.internal_ops = &msm_flash_internal_ops; flash_ctrl->msm_sd.sd.flags |= V4L2_SUBDEV_FL_HAS_DEVNODE; snprintf(flash_ctrl->msm_sd.sd.name, ARRAY_SIZE(flash_ctrl->msm_sd.sd.name),"msm_camera_flash"); media_entity_pads_init(&flash_ctrl->msm_sd.sd.entity, 0, NULL); flash_ctrl->msm_sd.sd.entity.function = MSM_CAMERA_SUBDEV_FLASH; flash_ctrl->msm_sd.close_seq = MSM_SD_CLOSE_2ND_CATEGORY | 0x1; msm_sd_register(&flash_ctrl->msm_sd); CDBG("%s:%d flash sd name = %s", __func__, __LINE__, flash_ctrl->msm_sd.sd.entity.name); msm_cam_copy_v4l2_subdev_fops(&msm_flash_v4l2_subdev_fops);#ifdef CONFIG_COMPAT msm_flash_v4l2_subdev_fops.compat_ioctl32 = msm_flash_subdev_fops_ioctl;#endif flash_ctrl->msm_sd.sd.devnode->fops = &msm_flash_v4l2_subdev_fops; // 3. 如果 type = FLASH_DRIVER_PMIC, // 会对每一个 touch_source 注册为 led 设备,创建一个sys 节点, qcom,led-name = "led:torch_0"; if (flash_ctrl->flash_driver_type == FLASH_DRIVER_PMIC) rc = msm_torch_create_classdev(pdev, flash_ctrl); =========> for (i = 0; i < fctrl->torch_num_sources; i++) { if (fctrl->torch_trigger[i]) { led_classdev_register(&pdev->dev, &msm_torch_led[i]); -----> ret = led_add_brightness_hw_changed(led_cdev); led_update_brightness(led_cdev); led_init_core(led_cdev); led_trigger_set_default(led_cdev); } <========= CDBG("probe success\n"); return rc;} 好了,probe 流程,到这就完了,很常规的解析节点,注册V4L2,注册LED 设备,没啥好说的。
接下来,我们来看下上层操作闪光灯时,下发的一些指令是怎么跑的。4.2 CFG_FLASH_INIT 初始化闪光灯
在闪光灯代码中,主要包括如下五种 ioctrl 指令:
enum msm_flash_cfg_type_t { CFG_FLASH_INIT, // 初始化 CFG_FLASH_RELEASE, // 释放 CFG_FLASH_OFF, // 关闭 CFG_FLASH_LOW, // 手电筒 或 预闪 CFG_FLASH_HIGH, // 主闪}; 接下来,看下 init 做了什么事:
static int32_t msm_flash_config(struct msm_flash_ctrl_t *flash_ctrl, void *argp){ switch (flash_data->cfg_type) { case CFG_FLASH_INIT: rc = msm_flash_init_prepare(flash_ctrl, flash_data); break; } rc = msm_flash_prepare(flash_ctrl);} 在 msm_flash_init_prepare() 中主要是,保存闪光灯电流参数,及保存上层下发的所有参数
static int32_t msm_flash_init_prepare(struct msm_flash_ctrl_t *flash_ctrl, struct msm_flash_cfg_data_t *flash_data){ struct msm_flash_cfg_data_t flash_data_k; struct msm_flash_init_info_t flash_init_info; int32_t i = 0; flash_data_k.cfg_type = flash_data->cfg_type; for (i = 0; i < MAX_LED_TRIGGERS; i++) { flash_data_k.flash_current[i] = flash_data->flash_current[i]; flash_data_k.flash_duration[i] = flash_data->flash_duration[i]; } flash_data_k.cfg.flash_init_info = &flash_init_info; if (copy_from_user(&flash_init_info,(void __user *)(flash_data->cfg.flash_init_info), sizeof(struct msm_flash_init_info_t))) { pr_err("%s copy_from_user failed %d\n",__func__, __LINE__); return -EFAULT; } return msm_flash_init(flash_ctrl, &flash_data_k);} 接着调用 msm_flash_init(),
通过 camera_flash_init() 函数来下发参数, 初始化 flash_state = MSM_CAMERA_FLASH_INIT。 # msm-4.14/drivers/media/platform/msm/camera_v2/sensor/flash/msm_flash.cstatic int32_t msm_flash_init(struct msm_flash_ctrl_t *flash_ctrl,struct msm_flash_cfg_data_t *flash_data){ uint32_t i = 0; int32_t rc = -EFAULT; enum msm_flash_driver_type flash_driver_type = FLASH_DRIVER_DEFAULT; CDBG("Enter"); if (flash_data->cfg.flash_init_info->flash_driver_type == FLASH_DRIVER_DEFAULT) { flash_driver_type = flash_ctrl->flash_driver_type; for (i = 0; i < MAX_LED_TRIGGERS; i++) { flash_data->flash_current[i] = flash_ctrl->flash_max_current[i]; flash_data->flash_duration[i] = flash_ctrl->flash_max_duration[i]; } } else if (flash_data->cfg.flash_init_info->flash_driver_type == flash_ctrl->flash_driver_type) { flash_driver_type = flash_ctrl->flash_driver_type; for (i = 0; i < MAX_LED_TRIGGERS; i++) { flash_ctrl->flash_max_current[i] = flash_data->flash_current[i]; flash_ctrl->flash_max_duration[i] = flash_data->flash_duration[i]; } } for (i = 0; i < ARRAY_SIZE(flash_table); i++) { if (flash_driver_type == flash_table[i]->flash_driver_type) { flash_ctrl->func_tbl = &flash_table[i]->func_tbl; rc = 0; } } if (flash_ctrl->func_tbl->camera_flash_init) { rc = flash_ctrl->func_tbl->camera_flash_init(flash_ctrl, flash_data); } flash_ctrl->flash_state = MSM_CAMERA_FLASH_INIT; CDBG("Exit"); return 0;} camera_flash_init定义如下:
camera_flash_init() 的,函数 为空。 如果走的是 gpio ,就会开始关闭所有的gpio,详细可以自行分析 msm_flash_gpio_init()。 如果 i2c ,则会初始化上电,然后通过 i2c 定义闪光灯相关的配置。 #msm-4.14/drivers/media/platform/msm/camera_v2/sensor/flash/msm_flash.c static struct msm_flash_table msm_pmic_flash_table = { .flash_driver_type = FLASH_DRIVER_PMIC, .func_tbl = { .camera_flash_init = NULL, .camera_flash_release = msm_flash_release, .camera_flash_off = msm_flash_off, .camera_flash_low = msm_flash_low, .camera_flash_high = msm_flash_high, .camera_flash_query_current = msm_flash_query_current, },};static struct msm_flash_table msm_gpio_flash_table = { .flash_driver_type = FLASH_DRIVER_GPIO, .func_tbl = { .camera_flash_init = msm_flash_gpio_init, .camera_flash_release = msm_flash_release, .camera_flash_off = msm_flash_off, .camera_flash_low = msm_flash_low, .camera_flash_high = msm_flash_high, .camera_flash_query_current = NULL, },};static struct msm_flash_table msm_i2c_flash_table = { .flash_driver_type = FLASH_DRIVER_I2C, .func_tbl = { .camera_flash_init = msm_flash_i2c_init, .camera_flash_release = msm_flash_i2c_release, .camera_flash_off = msm_flash_i2c_write_setting_array, .camera_flash_low = msm_flash_i2c_write_setting_array, .camera_flash_high = msm_flash_i2c_write_setting_array, .camera_flash_query_current = NULL, },}; 最终,还会调用 rc = msm_flash_prepare(flash_ctrl);
switch_trigger 对应的就是 dts 中的 qcom,switch-source = <&pm660l_switch0>; 其内容如下: pm660l_switch0: qcom,led_switch_0 { label = "switch"; qcom,led-name = "led:switch_0"; qcom,led-mask = <3>; qcom,default-led-trigger = "switch0_trigger"; }; 我们来看下 msm_flash_prepare 的代码,在代码中,就是 通过 switch 进行上电。
static int32_t msm_flash_prepare(struct msm_flash_ctrl_t *flash_ctrl){ if (flash_ctrl->switch_trigger == NULL) { pr_err("%s:%d Invalid argument\n",__func__, __LINE__); return -EINVAL; } // 1. 上电 if (flash_ctrl->flash_state == MSM_CAMERA_FLASH_INIT && flash_ctrl->is_regulator_enabled == 0) { ret = qpnp_flash_led_prepare(flash_ctrl->switch_trigger, ENABLE_REGULATOR, NULL); flash_ctrl->is_regulator_enabled = 1; } else if (flash_ctrl->flash_state == MSM_CAMERA_FLASH_RELEASE && flash_ctrl->is_regulator_enabled) { ret = qpnp_flash_led_prepare(flash_ctrl->switch_trigger,DISABLE_REGULATOR, NULL); flash_ctrl->is_regulator_enabled = 0; } CDBG("%s:%d:Exit\n", __func__, __LINE__); return ret;} 看下 qpnp_flash_led_prepare() 代码:
msm-4.14/drivers/leds/leds-qpnp-flash-v2.c,有机会我们后面分析, 今天主要分析闪光灯的流程,点到为止,不然篇幅会太长了。 int qpnp_flash_led_prepare(struct led_trigger *trig, int options,int *max_current){ // 通过 led:switch_0 名字,找到 led dev设备 led_cdev = trigger_to_lcdev(trig); // 上电 rc = qpnp_flash_led_regulator_control(led_cdev, options, max_current); return rc;} 4.3 CFG_FLASH_LOW 开启手电筒或开启预闪
static int32_t msm_flash_config(struct msm_flash_ctrl_t *flash_ctrl, void *argp){ case CFG_FLASH_LOW: if ((flash_ctrl->flash_state == MSM_CAMERA_FLASH_OFF) || (flash_ctrl->flash_state == MSM_CAMERA_FLASH_INIT)) { rc = flash_ctrl->func_tbl->camera_flash_low(flash_ctrl, flash_data); } break;} 接下来,我们进入 msm_flash_low() 函数看下,
static int32_t msm_flash_low(struct msm_flash_ctrl_t *flash_ctrl,struct msm_flash_cfg_data_t *flash_data){ CDBG("Enter\n"); /* Turn off flash triggers */ for (i = 0; i < flash_ctrl->flash_num_sources; i++) if (flash_ctrl->flash_trigger[i]) led_trigger_event(flash_ctrl->flash_trigger[i], 0); /* Turn on flash triggers */ for (i = 0; i < flash_ctrl->torch_num_sources; i++) { if (flash_ctrl->torch_trigger[i]) { max_current = flash_ctrl->torch_max_current[i]; if (flash_data->flash_current[i] >= 0 && flash_data->flash_current[i] < max_current) { curr = flash_data->flash_current[i]; } else { curr = flash_ctrl->torch_op_current[i]; pr_debug("LED current clamped to %d\n", curr); } CDBG("low_flash_current[%d] = %d", i, curr); led_trigger_event(flash_ctrl->torch_trigger[i], curr); } } if (flash_ctrl->switch_trigger) led_trigger_event(flash_ctrl->switch_trigger, 1); CDBG("Exit\n"); return 0;} 4.4 CFG_FLASH_OFF 关闭闪光灯
case CFG_FLASH_OFF: rc = flash_ctrl->func_tbl->camera_flash_off(flash_ctrl, flash_data);
很好理解,通过 led_trigger_event() 来触发 关闭
static int32_t msm_flash_off(struct msm_flash_ctrl_t *flash_ctrl,struct msm_flash_cfg_data_t *flash_data){ int32_t i = 0; CDBG("Enter\n"); for (i = 0; i < flash_ctrl->flash_num_sources; i++) if (flash_ctrl->flash_trigger[i]) led_trigger_event(flash_ctrl->flash_trigger[i], 0); for (i = 0; i < flash_ctrl->torch_num_sources; i++) if (flash_ctrl->torch_trigger[i]) led_trigger_event(flash_ctrl->torch_trigger[i], 0); if (flash_ctrl->switch_trigger) led_trigger_event(flash_ctrl->switch_trigger, 0); CDBG("Exit\n"); return 0;} 4.5 CFG_FLASH_HIGH 开启主闪
case CFG_FLASH_HIGH: rc = flash_ctrl->func_tbl->camera_flash_high(flash_ctrl, flash_data);
static int32_t msm_flash_high( struct msm_flash_ctrl_t *flash_ctrl, struct msm_flash_cfg_data_t *flash_data){ /* Turn off torch triggers */ for (i = 0; i < flash_ctrl->torch_num_sources; i++) if (flash_ctrl->torch_trigger[i]) led_trigger_event(flash_ctrl->torch_trigger[i], 0); /* Turn on flash triggers */ for (i = 0; i < flash_ctrl->flash_num_sources; i++) { if (flash_ctrl->flash_trigger[i]) { max_current = flash_ctrl->flash_max_current[i]; if (flash_data->flash_current[i] >= 0 && flash_data->flash_current[i] < max_current) { curr = flash_data->flash_current[i]; } else { curr = flash_ctrl->flash_op_current[i]; pr_debug("LED flash_current[%d] clamped %d\n", i, curr); } CDBG("high_flash_current[%d] = %d", i, curr); led_trigger_event(flash_ctrl->flash_trigger[i], curr); } } if (flash_ctrl->switch_trigger) led_trigger_event(flash_ctrl->switch_trigger, 1); return 0;} 好啦,闪光灯代码,就先看到这里,前面逻辑还是比较好理解的,
后面到了kernel 层,主要就是led 子系统的工作了,由它来实现点亮和关闭灯。后面有时间,我们再来单独分析下,LED 子系统。
转载地址:https://ciellee.blog.csdn.net/article/details/106895686 如侵犯您的版权,请留言回复原文章的地址,我们会给您删除此文章,给您带来不便请您谅解!
发表评论
最新留言
关于作者
