【Android 视频硬件编码】在Native层实现MediaCodec H264 编码 Demon
发布日期:2021-06-29 14:55:09
浏览次数:3
分类:技术文章
本文共 10226 字,大约阅读时间需要 34 分钟。
【Android 视频硬件编码】在Native层实现MediaCodec H264 编码实例
在前文《》,
我们学习分析了screenrecord 中视频编码相关的流程,本文我们参考它来实现一个 MediaCodec H264 编码实例。好,废话不多说,我们直接进入主题吧!
本文链接:《 》
本文对应的源文件,图片素材,编译后的可执行程序均已打包上传,链接:
《》
一、完整代码
流程比较简单,没啥好说,需要注意:
- 具体的硬件设备支持的format 格式也不同,我调试的机器 MediaCodec 底层不支持YUV420P图片,因此需要转成 YUV420SP格式。
- 部分底层设备配置 宽、高有特殊的要求
因此配置format 时要注意结合具体的硬件。
代码中含详细注释,其他的就不多说了,开心看代码吧^_^
现在时间 2020/11/2,前天在家写的代码有点小bug,会编译不过,更正下。
17:34 第二次更新,去除不必要的头文件
# frameworks\av\cmds\libdmsdpcamerahandler\video\H264_Encoder.cpp//// Android Hardware MediaCoec - H264 Encoder// By: ciellee // Date: 2020/10/31//#include#include #include #include #include #include #include #include #include #include #include #include #include //#include "../include/dmsdp_camera_data_type.h"#ifdef LOG_TAG#undef LOG_TAG#endif#define LOG_TAG "H264_Encoder"using namespace android;// H264 Encodersp encoder;sp looper;sp self;uint8_t * g_buffer;// H264 video Format uint32_t g_VideoWidth = 1280; // 宽uint32_t g_VideoHeight = 720; // 高uint32_t g_VideoFps = 25; // 帧率uint32_t g_VideoBitRate = 10000000; // 码率static const char* kMimeTypeAvc = "video/avc";static enum { FORMAT_MP4=0, FORMAT_H264, FORMAT_FRAMES, FORMAT_RAW_FRAMES } gOutputFormat = FORMAT_H264; // 配置输出格式uint32_t g_debugNumFrames = 0;#define _SAVE_H264_FILE_ 1 // 保存编码后的内容到 /sdcard/video/output_test.h264 #define _YUV_LOCAL_TEST_ 1 // 使用本地 /sdcard/video/test_0.yuv 测试编码#ifdef _YUV_LOCAL_TEST_// 源文件名:/sdcard/video/test_0.yuvstatic const char* g_pic_Folder = "/sdcard/video/test_";static const char* g_pic_Folder_nv12 = "/sdcard/yuv420sp_video/test_";static const char* g_pic_Format = "yuv";static FILE* g_pic_file = NULL;static char g_pic_file_name[50] = "";static uint16_t g_pic_index = 0;#endif#ifdef _SAVE_H264_FILE_// 本地调试文件输出FILE *g_h264_file;static const char * g_h264_fileName = "/sdcard/video/output_test.h264";#endif///// YUV420P: YYYY UU VV// YUV420SP: YYYY UV UV ///static void YUV420P_to_YUV420SP(uint8_t *yuv420p, uint8_t *yuv420sp, int width, int height){ if(yuv420p == NULL || yuv420sp==NULL || width==0 || height==0) return; int framesize = width * height; memcpy(yuv420sp, yuv420p, framesize); //拷贝 Y 的数据 for(int i = 0; i format = new AMessage; format->setInt32("width", g_VideoWidth); // 宽 format->setInt32("height", g_VideoHeight); // 高 format->setString("mime", kMimeTypeAvc); // 编码名 format->setInt32("color-format", OMX_COLOR_FormatYUV420SemiPlanar); // 编码格式 format->setInt32("bitrate", g_VideoBitRate); // 码率 format->setFloat("frame-rate", g_VideoFps); // 帧率 format->setInt32("i-frame-interval", 20); // I 帧 // 2. 创建编码器 looper = new ALooper; looper->setName("H264_Encoder_looper"); looper->start(); encoder = MediaCodec::CreateByType(looper, kMimeTypeAvc, true); if(encoder == NULL){ ALOGE("[native_camera][%s](%d) Create %s codec Failed !!!\n", __FUNCTION__, __LINE__, kMimeTypeAvc); return -1; } // 3. 配置编码器 err = encoder->configure(format, NULL, NULL, MediaCodec::CONFIGURE_FLAG_ENCODE); if (err != NO_ERROR) { ALOGE("[native_camera][%s](%d) configure %s codec at %dx%d (err=%d) Failed !!!\n", __FUNCTION__, __LINE__, kMimeTypeAvc, g_VideoWidth, g_VideoHeight, err); encoder->release(); encoder = NULL; return err; } // 4. 启动编码器 err = encoder->start(); if (err != NO_ERROR) { ALOGE("[native_camera][%s](%d) Start %s codec (err=%d) Failed !!!\n", __FUNCTION__, __LINE__, kMimeTypeAvc, err); encoder->release(); encoder = NULL; return err; } self = ProcessState::self(); self->startThreadPool(); AString name; encoder->getName(&name); ALOGI("[native_camera][%s](%d) Start %s Success ^_^\n", __FUNCTION__, __LINE__, name.c_str()); // 5. 打开要输出的文件#ifdef _SAVE_H264_FILE_ g_h264_file = fopen(g_h264_fileName, "wb+");#endif g_buffer = (uint8_t *)malloc(sizeof(uint8_t) * g_VideoWidth * g_VideoHeight * 3 / 2); memset(g_buffer, 0, sizeof(uint8_t) * g_VideoWidth * g_VideoHeight * 3 / 2); } return 0;}///int main(int argc, char *argv[]){ status_t err; // 1. 配置 和 初始化 Codec H264_encoder_init(); // 2. 获得输入、输出 buffer数组地址 Vector > h264_input_buffers; Vector > h264_output_buffers; err = encoder->getInputBuffers(&h264_input_buffers); if (err != NO_ERROR) { ALOGI("[native_camera][%s](%d) getInputBuffers Failed (err=%d)\n", __FUNCTION__, __LINE__, err); if(encoder != NULL) encoder->release(); if(looper != NULL) looper->stop(); return -1; } err = encoder->getOutputBuffers(&h264_output_buffers); if (err != NO_ERROR) { ALOGI("[native_camera][%s](%d) getOutputBuffers Failed (err=%d)\n", __FUNCTION__, __LINE__, err); if(encoder != NULL) encoder->release(); if(looper != NULL) looper->stop(); return -1; } int flag = 0; // 3. 开始循环 申请输入buffer、填充数据、不等待查询输出buff,取出解码数据 while( flag == 0 ){ size_t i_index,i_size=0, o_index, o_offset, o_size; int64_t o_ptsUsec; uint32_t o_flags; // 3.1 申请一个可用的buffer index err = encoder->dequeueInputBuffer(&i_index, 500ll); if(err != 0){ ALOGI("[native_camera][%s](%d) dequeueInputBuffer Failed (err=%d), skip current\n", __FUNCTION__, __LINE__, err); usleep(10000); // 10ms continue; } // 3.2 填充数据到 buffer 中 ALOGI("[native_camera][%s](%d) get i_index (%d)\n", __FUNCTION__, __LINE__, i_index); uint8_t * p_input = h264_input_buffers[i_index]->data();#ifdef _YUV_LOCAL_TEST_ { // 3.3 拼凑文件名,读取文件内容 memset(g_pic_file_name, '\0', 50); sprintf(g_pic_file_name, "%s%d.%s", g_pic_Folder, g_pic_index++, g_pic_Format); g_pic_file = fopen(g_pic_file_name, "rb+"); i_size = fread(g_buffer, 1, g_VideoWidth * g_VideoHeight * 3 / 2, g_pic_file); ALOGI("[native_camera][%s](%d) read (%s), size (%d)\n", __FUNCTION__, __LINE__, g_pic_file_name, i_size); fclose(g_pic_file); g_pic_file = NULL; if(g_pic_index >= 100) flag = 1; }#endif // 3.4 将YUV420P 数据转 YUV420SP YUV420P_to_YUV420SP(g_buffer, h264_input_buffers[i_index]->data(), g_VideoWidth, g_VideoHeight);#ifdef _YUV_LOCAL_TEST_ { memset(g_pic_file_name, '\0', 50); sprintf(g_pic_file_name, "%s%d.%s", g_pic_Folder_nv12, g_pic_index, g_pic_Format); g_pic_file = fopen(g_pic_file_name, "wb+"); err = fwrite(h264_input_buffers[i_index]->data(), 1, i_size, g_pic_file); fclose(g_pic_file); g_pic_file = NULL; ALOGI("[native_camera][%s](%d) write (%s), size (%d)\n", __FUNCTION__, __LINE__, g_pic_file_name, err); }#endif ALOGI("[native_camera][%s](%d) queueInputBuffer size (%d)\n", __FUNCTION__, __LINE__, h264_input_buffers[i_index]->size()); // 3.5 将输入buffer 入队列,等待编码 AString err_str; err = encoder->queueInputBuffer(i_index, 0, h264_input_buffers[i_index]->size(), g_pic_index, 0, &err_str); if(err != NO_ERROR){ ALOGI("[native_camera][%s](%d) queueInputBuffer failed (%d) (%s)\n", __FUNCTION__, __LINE__, err, err_str.c_str()); } // 3.6 查询是否有编码后的数据,超时时间 500us err = encoder->dequeueOutputBuffer(&o_index, &o_offset, &o_size, &o_ptsUsec, &o_flags, 500ll); while(err == NO_ERROR){ // got a buffer uint8_t * p_output = h264_output_buffers[o_index]->data(); if (o_size != 0) { ALOGI("[native_camera][%s](%d) Got data in buffer %zu, size=%zu, pts=%, debugNumFrames=%d", __FUNCTION__, __LINE__, o_index, o_size, o_ptsUsec, g_debugNumFrames);#ifdef _SAVE_H264_FILE_ // 将buffers 中的数据写入文件中 fwrite(p_output, 1, o_size, g_h264_file); if ((o_flags & MediaCodec::BUFFER_FLAG_CODECCONFIG) == 0) { fflush(g_h264_file); }#endif g_debugNumFrames++; } // 释放该索引对应的buffer err = encoder->releaseOutputBuffer(o_index); // 获取下一个编码完毕的数据 err = encoder->dequeueOutputBuffer(&o_index, &o_offset, &o_size, &o_ptsUsec, &o_flags, 500ll); } if(err == -EAGAIN){ ALOGI("[native_camera][%s](%d) dequeueOutputBuffer not ready (%d)\n", __FUNCTION__, __LINE__, err); }else if(err == INVALID_OPERATION){ ALOGI("[native_camera][%s](%d) dequeueOutputBuffer INVALID_OPERATION (%d), break\n", __FUNCTION__, __LINE__, err); flag = 1; } usleep(100000); // 5ms } ALOGI("[native_camera][%s](%d) H264 Encoder Complete\n", __FUNCTION__, __LINE__); #ifdef _SAVE_H264_FILE_ if(g_h264_file != NULL) fflush(g_h264_file); fclose(g_h264_file);#endif if(encoder != NULL) encoder->release(); if(looper != NULL) looper->stop(); return 0;}
待调试:
周六在家把这份代码完尚了下,还需调试,等周一到公司调试下。二、Android.mk
# frameworks\av\cmds\libdmsdpcamerahandler\Android.mkLOCAL_PATH:= $(call my-dir)include $(CLEAR_VARS)LOCAL_SRC_FILES := \ ./video/H264_Encoder.cppLOCAL_SHARED_LIBRARIES := \ libstagefright libmedia libmedia_omx libutils libbinder libstagefright_foundation \ libjpeg libui libgui libcutils liblog libEGL libGLESv2LOCAL_C_INCLUDES := \ ./include \ ./video \ frameworks/av/media/libstagefright \ frameworks/av/media/libstagefright/include \ frameworks/native/include/media/openmax \ external/jpegLOCAL_CFLAGS := -Werror -WallLOCAL_CFLAGS += -Wno-multichar -Wno-unused-parameter -Wno-sign-compare -Wno-unused-variable -Wno-unused-function -Wno-format#LOCAL_CFLAGS += -UNDEBUGLOCAL_MODULE_TAGS := optionalLOCAL_MODULE:= H264_Encoderinclude $(BUILD_EXECUTABLE)
三、代码调试
在网上下载四张1280x720 格式图片,使用FFMPEG 转成 YUV420P 格式的 RAWDATA。
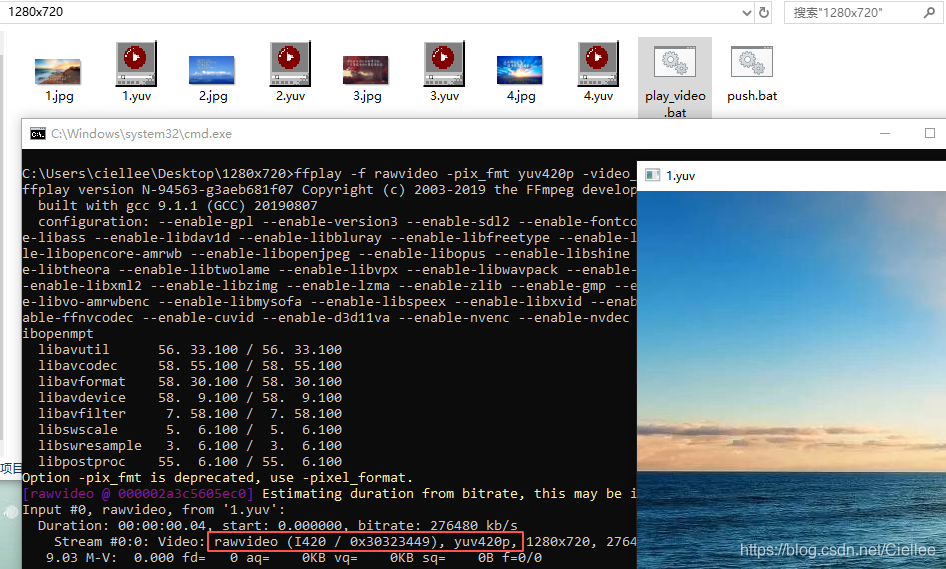
JPEG 转 YUV420P 图片的命令为:ffmpeg -i 2.jpg -s 1280x720 -pix_fmt yuv420p 2.yuv 查看YUV420P 图片的命令为: ffplay -f rawvideo -pix_fmt yuv420p -video_size 1280x720 1.yuv 如下图:
将图片PUSH 到车机中,按 1,2,3,4,循环push 100 张图片。(100张图,25帧fps,总共4s )
push 脚本如下:
adb push 1.yuv /sdcard/video/test_0.yuvadb push 2.yuv /sdcard/video/test_1.yuvadb push 3.yuv /sdcard/video/test_2.yuvadb push 4.yuv /sdcard/video/test_3.yuvadb push 1.yuv /sdcard/video/test_4.yuvadb push 2.yuv /sdcard/video/test_5.yuvadb push 3.yuv /sdcard/video/test_6.yuvadb push 4.yuv /sdcard/video/test_7.yuvadb push 1.yuv /sdcard/video/test_8.yuvadb push 2.yuv /sdcard/video/test_9.yuvadb push 3.yuv /sdcard/video/test_10.yuvadb push 4.yuv /sdcard/video/test_11.yuvadb push 1.yuv /sdcard/video/test_12.yuv。。。。。。 省略adb push 3.yuv /sdcard/video/test_94.yuvadb push 4.yuv /sdcard/video/test_95.yuvadb push 1.yuv /sdcard/video/test_96.yuvadb push 2.yuv /sdcard/video/test_97.yuvadb push 3.yuv /sdcard/video/test_98.yuvadb push 4.yuv /sdcard/video/test_99.yuvadb push 1.yuv /sdcard/video/test_100.yuvadb push 2.yuv /sdcard/video/test_101.yuv
将生成的可执行程序 H264_Encoder push 到车机中,执行。
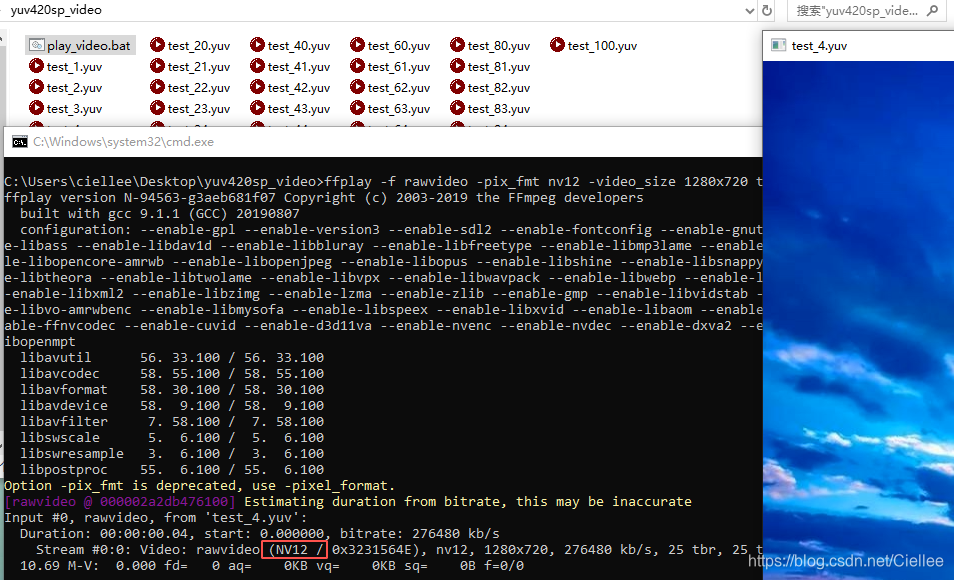
导出转换成 NV12(YUV420SP)格式的图片数据, adb pull /sdcard/yuv420sp_video/ .
ffplay -f rawvideo -pix_fmt nv12 -video_size 1280x720 test_4.yuv 可以看出,从YUV420P 转成 YUV420SP 成功。 导出编码生成的H264 视频文件:adb pull /sdcard/video/output_test.h264 .
ffplay output_test.h264 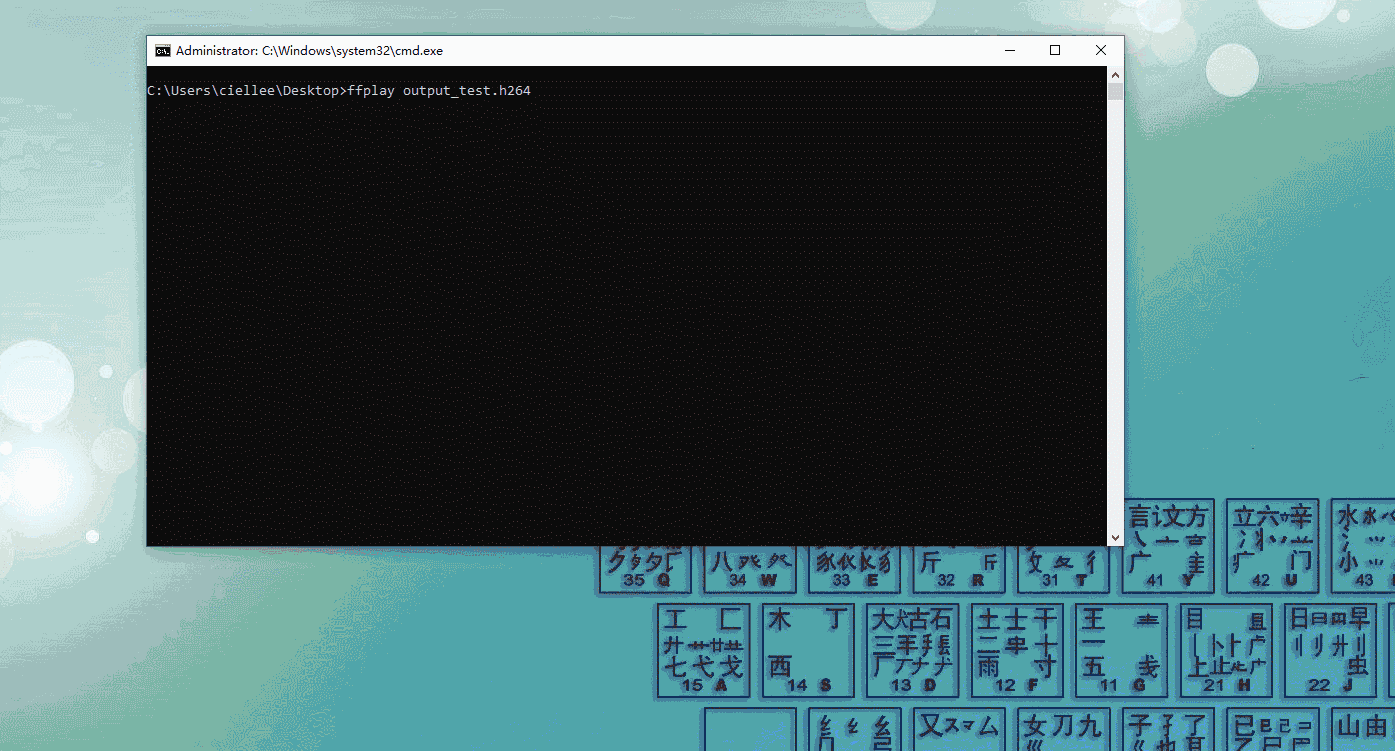
转载地址:https://ciellee.blog.csdn.net/article/details/109400381 如侵犯您的版权,请留言回复原文章的地址,我们会给您删除此文章,给您带来不便请您谅解!
发表评论
最新留言
表示我来过!
[***.240.166.169]2024年04月08日 06时50分40秒
关于作者

喝酒易醉,品茶养心,人生如梦,品茶悟道,何以解忧?唯有杜康!
-- 愿君每日到此一游!
推荐文章
找工作,要工资高的,还是要自己喜欢的?
2019-04-29
电气毕业生在国家电网都干啥工作?
2019-04-29
为什么LED灯会越用越暗?
2019-04-29
为什么说卷积神经网络,是深度学习算法应用最成功的领域之一?
2019-04-29
在电网工作,有多高大上?
2019-04-29
「2020年大学生电子设计竞赛分享」电源题,省一等奖!
2019-04-29
又一国产开源微内核操作系统上线!源代码已开放下载
2019-04-29
10年老兵!从大学毕业生到嵌入式系统工程师的修炼之道……
2019-04-29
如何才能学好单片机?
2019-04-29
一根网线有这么多“花样”,你知道吗?
2019-04-29
雷军1994年写的诗一样的代码,我把它运行起来了!
2019-04-29
2020年大学生电子设计竞赛,B题,单相在线式不间断电源,详细技术方案!
2019-04-29
大佬终于把鸿蒙OS讲明白了,收藏了!
2019-04-29
C语言指针,这可能是史上最干最全的讲解啦(附代码)!!!
2019-04-29
国内大陆有哪些芯片公司处于世界前10?一起看看!
2019-04-29
单精度、双精度、多精度和混合精度计算的区别是什么?
2019-04-29
中国35位“大国工匠”榜单出炉!西工大、西电合计占半壁江山!清华仅1人!...
2019-04-29
知乎热议:嵌入式开发中C++好用吗?
2019-04-29
2020,Python 已死?
2019-04-29
漫画:程序员相亲?哈哈哈哈哈哈
2019-04-29
白红宇的个人博客 - 记录点点滴滴的事 - 您是第 309951186 位访客
访问时间: 2024-05-02 08:17:04
访问IP: 3.22.100.180
Copyright © 2020 - 2023 blog.css8.cn 京ICP备2021015314号-1
手机版