本文共 25140 字,大约阅读时间需要 83 分钟。
JUC的学习笔记
这篇博文是通过学习B站尚硅谷李老师的JUC课程总结的笔记,在此非常感谢!
JUC:即java.util.concurrent包里的相关知识;文章目录
内存不可见性与内存可见性的概念
先来可一个测试结果不可思议的例子,如下代码:
package edu.hebeu.volatile_stu;/** * @author 13651 */public class Demo1 { public static void main(String[] args) { MyRunnable myRunnable = new MyRunnable(); new Thread(myRunnable).start(); // 启动线程 while(true) { if(myRunnable.isFlag()) { System.out.println("收到flag为" + myRunnable.isFlag() + ";准备结束循环"); break; } // System.out.println("flag为:" + myRunnable.isFlag() + ";继续循环..."); // 不要加任何输出语句,否则会影响while的执行效率,导致本例演示不成功 } }}class MyRunnable implements Runnable { private boolean flag = false; @Override public void run() { try { Thread.sleep(200); } catch (InterruptedException e) { // TODO Auto-generated catch block e.printStackTrace(); } flag = true; System.out.println("通知:flag已经变成:" + isFlag()); } public boolean isFlag() { return flag; } public void setFlag(boolean flag) { this.flag = flag; } } 我们运行测试一下,发现会出现如下问题:
 可以发现程序此时仿佛死锁一样,不在向下执行了,但是造成该现象的并非是死锁,而是因为:
 - JVM为了提高效率,会在每个线程中开辟独立的缓存区域,将读取到的数据放到此,当修改该数据时,会先将缓存区域的数据修改,再将该数据更新至主存;但是main线程由于在while(true)中没有其他的操作因而执行非常快,导致没有延迟的时间去主存中重新读取新的数据(主存内的数据是true,而main线程缓存的却是false),因此就会出现上面的情况;
如果还有疑惑看看如下的图解:
对于如下的一个main线程和线程1,如下图解并引出内存不可见性的概念: 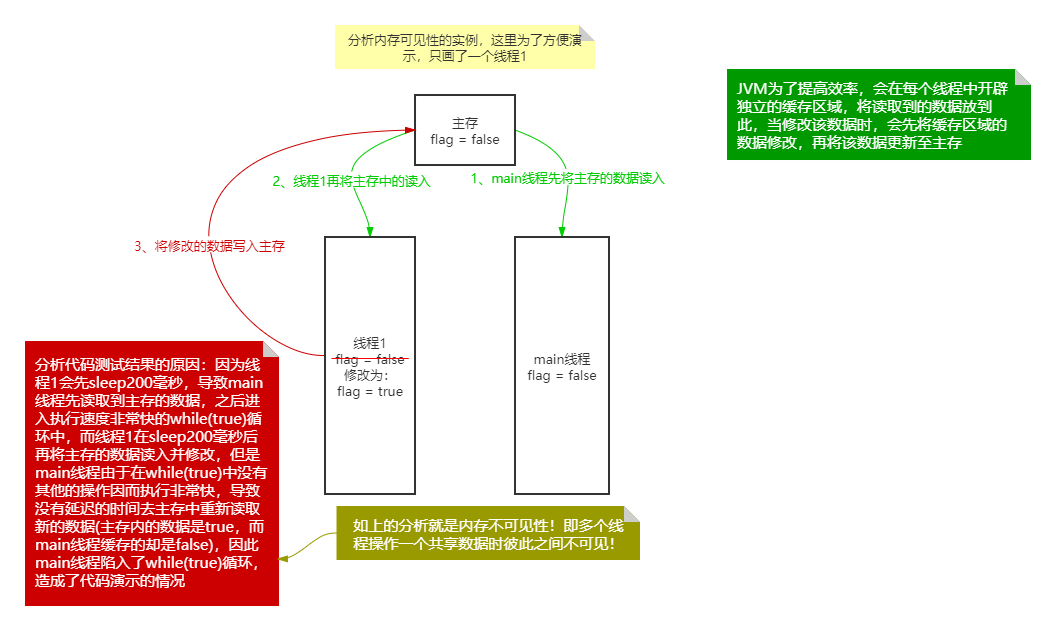 如何解决上述的问题?
 - 方式一:在 if(myRunnable.isFlag()) 外用synchronized(td)包裹,使同步化,就能解决,但是只有牵扯到锁,就会导致程序的效率非常低!代码如下所示:
synchronized(myRunnable) { // 方式一的解决办法 if(myRunnable.isFlag()) { System.out.println("收到flag为" + myRunnable.isFlag() + ";准备结束循环"); break; } } - 方式二:在共享的数据上添加volatile关键字,如下所示:
private volatile boolean flag = false; // 使用方式二的解决办法
Volatile关键字
volatile关键字的作用:
- 当多个线程操作共享数据时,保证内存可见性!
- 该关键字底层调用的是计算机底层代码,“内存栅栏”,以实时的刷新数据;
- 使用volatile关键字JVM就不能对被其修饰的变量重排序,因此效率会变低!
- 但是相较于方式一synchronized锁,效率高!
volatile关键字的注意:
- 相较于synchronized不具有"互斥性";
- 不能保证变量的"原子性";
原子性的概念
先来看一个面试题,如下代码,问输出的结果为多少?
int j = 20;j = j++;System.out.println("j = " +j); 答案:j输出20,因为i++的底层实际是:
int tmp = j;j = j + 1;j = tmp;
所以产生了如上的结果,是因为 i++就是"读->改->写",没有原子性;
再来分析下面的例子,代码如下:
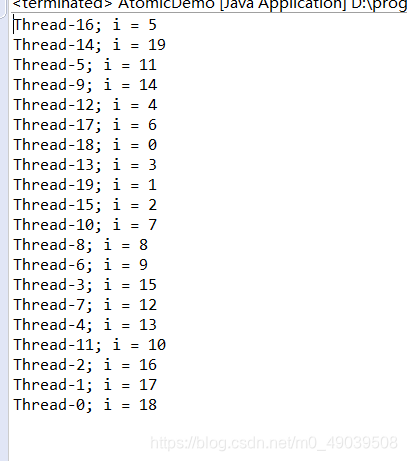
package edu.hebeu.volatile_stu;import java.util.concurrent.atomic.AtomicInteger;/** * @author 13651 * */public class AtomicDemo { public static void main(String[] args) { MyRunnable2 myRunnable2 = new MyRunnable2(); for (int i = 0; i < 20; i++) { new Thread(myRunnable2).start(); // 启动20个线程会发现出现问题,有可能产生重复数据!!! } }}class MyRunnable2 implements Runnable { private int i = 0; @Override public void run() { try { Thread.sleep(200); } catch (InterruptedException e) { // TODO Auto-generated catch block e.printStackTrace(); } System.out.println(Thread.currentThread().getName() + "; i = " + getAdd()); } public int getAdd() { return i++; }} 测试:
 产生上面的原因(一个值输出了多次,如0、1)就是因为i++操作不是一步的而是多步的(读->改->写),此时就算使用了volatile关键字保证内存可见,仍会出现上述的问题! 如何解决? 使用原子变量代替原先的变量和计算,就不会出现上面的问题了;原子变量:jdk1.5之后
java.util.concurrent.atomic包下提供的常用原子变量: - 1、该包下的所有类,类似于包装类,如对Integer的、String的、甚至数组的、…;这些类内部的变量都使用了volatile关键字来保证内存的可见性;
- 底层使用CAS(Compare-And-Swap)算法保证数据的原子性;
对进行改写,如下代码:
class MyRunnable2 implements Runnable { private AtomicInteger i = new AtomicInteger(); // 使用该对象代替原先的变量 @Override public void run() { try { Thread.sleep(200); } catch (InterruptedException e) { // TODO Auto-generated catch block e.printStackTrace(); } System.out.println(Thread.currentThread().getName() + "; i = " + getAdd()); } public int getAdd() { return i.getAndIncrement(); // 使用内部的实例方法代替原先的++操作,同样的也有其他的数学计算操作,具体查看API可知 }} 测试
 发现已经没有重复数据了;
 CAS算法
上述的原子性介绍中引出了CAS算法,它具体是什么?
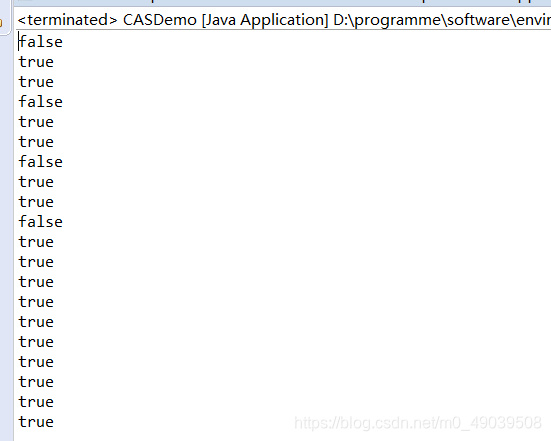
CAS算法是硬件对于并发操作共享数据的支持;CAS算法包括了三个操作数:有:内存值 V、预估值 A、更新值 B;当且仅当 V == A时,V = B,否则将不做任何操作; 我们通过一段代码来模拟CAS算法,如下所示:package edu.hebeu.volatile_stu;/** * @author 13651 * */public class CASDemo { public static void main(String[] args) { final CompareAndSwap compareAndSwap = new CompareAndSwap(); for(int i = 0; i < 20; i++) { new Thread(new Runnable() { @Override public void run() { int expectedValue = compareAndSwap.get(); // 通过内存值赋给当前的预估值 boolean isTrue = compareAndSwap.compareAndSet(expectedValue, (int) (Math.random() * 100)); System.out.println(isTrue); } }).start(); } }}class CompareAndSwap { private int value; /** * 获取内存值 * @return */ public synchronized int get() { return value; } /** * 比较旧值与预估值 * @param expectedValue * @param newValue * @return */ public synchronized int compareAndSwap(int expectedValue, int newValue) { int oldValue = value; // 如果旧值等于预估值 if(oldValue == expectedValue) { this.value = newValue; } return oldValue; } /** * 比较并设置 * @param expectedValue * @param newValue * @return */ public synchronized boolean compareAndSet(int expectedValue, int newValue) { return expectedValue == compareAndSwap(expectedValue, newValue); } } 测试结果:
线程池
线程池:提供一个线程队列,队列中保存着所有等待状态的线程,避免了创建/销毁线程的一些额外开销,提高了响应的速度;
线程池的体系结构:- java.util.concurrent.Executor:负责线程使用与调度的根接口
- ExecutorService:子接口,负责线程主要接口
- ThreadPoolExecutor:线程池的实现类
- ScheduledExecutorService:子接口,负责线程的调度
- ScheduleThreadPoolExecutor:实现类,继承了ThreadPoolExecutor,又实现了ScheduleExecutorService
- ExecutorService:子接口,负责线程主要接口
*线程池的工具类Executors*的常用方法:
- ExecutorService newFixedThreadPool(int nThreads); // 创建固定容量大小的线程池
- ExecutorService newCachedThreadPool(); // 创建缓存线程池,容量不固定,可以根据需求自动的更改数量
- ExecutorService newSingleThreadExecutor(); // 创建容量为单个的线程池,即线程池中只有一个线程
- ScheduledExecutorService new ScheduledThreadPool(); // 创建固定容量的线程池,可以延迟或定时的执行任务
使用如下代码对上述的类和方法进行测试:
package edu.hebeu.thread_pool;import java.util.ArrayList;import java.util.List;import java.util.Random;import java.util.concurrent.Callable;import java.util.concurrent.ExecutionException;import java.util.concurrent.ExecutorService;import java.util.concurrent.Executors;import java.util.concurrent.Future;import java.util.concurrent.ScheduledExecutorService;import java.util.concurrent.TimeUnit;/** * @author 13651 */public class ThreadPoolStu { public static void main(String[] args) { // runnableType(); // 调用Runnable方式// callableType(); // 调用Callable方式 newScheduledThreadPoolMethod(); // 使用newScheduledThreadPool()创建的线程池来学习线程调度 } /** * Runnable的方式 */ private static void runnableType() { MyRunnable myRunnable = new MyRunnable(); // 1、创建线程池对象 ExecutorService pool = Executors.newFixedThreadPool(5); // 创建容量为5的线程池对象,即最多5个线程 // 2、为线程池中的线程分配任务 for(int i = 0; i < 10; i++) { // 分配10个任务 pool.submit(myRunnable); } // 3、关闭线程池,注意:shutdown()是比较平和的关闭线程池对象;shutdownNow()是立即关闭线程池对象 pool.shutdown(); } /** * Callable的方式 */ private static void callableType() { MyCallable callable = new MyCallable(); List > futureList = new ArrayList<>(); // 1、创建线程池对象 ExecutorService pool = Executors.newFixedThreadPool(3); // 创建容量为3的线程池对象,即最多3个线程 // 2、为线程池中的线程分配任务 for(int i = 0; i < 10; i++) { // 分配10个任务 Future future = pool.submit(callable); futureList.add(future); } // 3、关闭线程池 pool.shutdown(); for(Future f : futureList) { try { System.out.println(f.get()); } catch (InterruptedException e) { // TODO Auto-generated catch block e.printStackTrace(); } catch (ExecutionException e) { // TODO Auto-generated catch block e.printStackTrace(); } } } /** * 使用newScheduledThreadPool()方法创建线程池对象 */ private static void newScheduledThreadPoolMethod() { // 1、创建线程池对象 ScheduledExecutorService pool = Executors.newScheduledThreadPool(3); // 2、分配任务 for(int i = 0; i <= 5; i++) { // 分配5个任务 Future res = pool.schedule(new Callable () { @Override public Integer call() throws Exception { int i = new Random().nextInt(100); System.out.println(Thread.currentThread().getName() + ": " + i); return i; } }, 3, TimeUnit.SECONDS); // 该任务会在3秒之后执行 try { System.out.println(res.get()); // 输出线程执行的结果 } catch (InterruptedException e) { // TODO Auto-generated catch block e.printStackTrace(); } catch (ExecutionException e) { // TODO Auto-generated catch block e.printStackTrace(); } } // 3、关闭线程池 pool.shutdown(); }}class MyRunnable implements Runnable { private int i = 0; @Override public void run() { while(i <= 100) { System.out.println(Thread.currentThread().getName() + " : " + ++i); } }}class MyCallable implements Callable { @Override public Integer call() throws Exception { int sum = 0; for(int i = 0; i <= 100; i++) { sum += i; } return sum; }} 测试
只对上述的非注释代码测试,注释的代码读者可以自己尝试测试一下: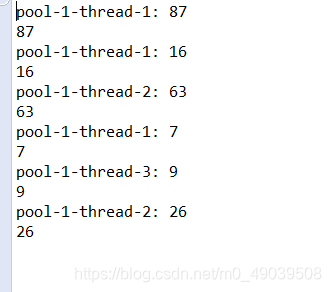
Lock类
我们之前为了解决线程安全问题使用的方法:使用synchronized关键字:解决,该关键字主要有两种作用:
- 同步代码块
- 同步方法
但是可以发现,以上的都是使用JVM提供的锁,是隐式的锁!自JDK1.5后,可以使用Lock类解决线程安全问题,该锁是显示的锁,需要通过lock()方法上锁,且最后必须通过unlock()方法释放锁!先来通过如下的代码看下Lock类的简单使用方法:
package edu.hebeu.lock;import java.util.concurrent.locks.Lock;import java.util.concurrent.locks.ReentrantLock;/** * @author 13651 * */public class LockStu { public static void main(String[] args) { Ticket ticket = new Ticket(); new Thread(ticket, "1号窗口").start(); new Thread(ticket, "2号窗口").start(); new Thread(ticket, "3号窗口").start(); }}class Ticket implements Runnable { private int tickCount = 30; // 30张票 private Lock myLock = new ReentrantLock(); // 创建Lock对象实例 @Override public void run() { while(true) { try { Thread.sleep(200); // 睡200ms } catch (InterruptedException e) { // TODO Auto-generated catch block e.printStackTrace(); } myLock.lock(); // 锁住 try { if(tickCount == 0) { System.out.println("票已售空"); break; } System.out.println(Thread.currentThread().getName() + ":已售出票,剩余票数:" + --tickCount); } finally { myLock.unlock(); // 在最后释放锁 } } }} 测试:
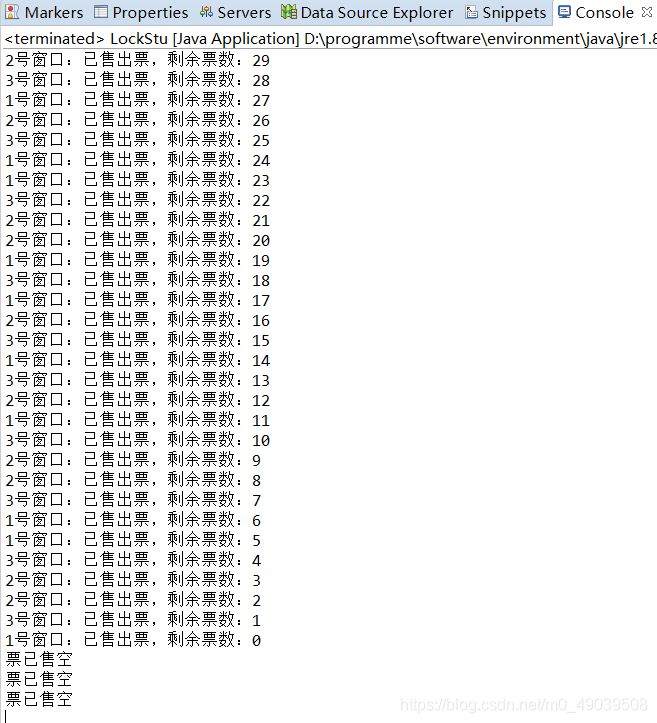 可以发现实现了线程的安全执行,没有出现线程安全问题;
 线程交替执行
我们通过如下的一个题目引出线程交替执行是如何实现的:
编写一个程序,开启3个线程,这三个线程的名字分别是A、B、C,每个线程将自己的名字在控制台打印10遍,要求输出的结果必须按顺序显示为:AAABBBCCCAAABBBCCCAAABBBCCC…六次(即六次AAABBBCCC轮询)package edu.hebeu.lock;import java.util.concurrent.locks.Condition;import java.util.concurrent.locks.Lock;import java.util.concurrent.locks.ReentrantLock;/** * @author 13651 */public class ThreadAlternate { public static void main(String[] args) { MyAlternate alternate = new MyAlternate(); new Thread(() -> { for(int i = 0; i < 6; i++) { // 打印六次A,即轮询6次 alternate.loopA(); } }, "A").start(); // 启动A线程,执行loopA()方法打印A new Thread(() -> { for(int i = 0; i < 6; i++) { // 打印六次C,即轮询6次 alternate.loopB(); } }, "B").start(); // 启动B线程,执行loopB()方法打印B new Thread(() -> { for(int i = 0; i < 6; i++) { // 打印六次C,即轮询6次 alternate.loopC(); } }, "C").start(); // 启动C线程,执行loopC()方法打印C }}class MyAlternate { private int number = 1; // 用来表示当前执行的线程,1就是A、2就是B,3就是C private Lock lock = new ReentrantLock(); private Condition conditionA = lock.newCondition(); // A的通信对象 private Condition conditionB = lock.newCondition(); // B的通信对象 private Condition conditionC = lock.newCondition(); // C的通信对象 public void loopA() { lock.lock(); // 上锁 try { /*判断*/ if(number != 1) { // 如果标记不是1,即不是A线程 try { conditionA.await(); // 导致当前线程等到发信号或 interrupted } catch (InterruptedException e) { // TODO Auto-generated catch block e.printStackTrace(); } } /*程序执行到此,说明是A线程,则打印*/ for(int i = 0; i < 3; i++) { System.out.print(Thread.currentThread().getName()); } /*唤醒B线程*/ number = 2; // 修改标记为2 conditionB.signal(); // 唤醒一个等待线程 } finally { lock.unlock(); // 释放锁 } } public void loopB() { lock.lock(); // 上锁 try { /*判断*/ if(number != 2) { // 如果标记不是2,即不是B线程 try { conditionB.await(); // 导致当前线程等到发信号或 interrupted } catch (InterruptedException e) { // TODO Auto-generated catch block e.printStackTrace(); } } /*程序执行到此,说明是B线程,则打印*/ for(int i = 0; i < 3; i++) { System.out.print(Thread.currentThread().getName()); } /*唤醒C线程*/ number = 3; // 修改标记为3 conditionC.signal(); // 唤醒一个等待线程 } finally { lock.unlock(); // 释放锁 } } public void loopC() { lock.lock(); // 上锁 try { /*判断*/ if(number != 3) { // 如果标记不是3,即不是C线程 try { conditionC.await(); // 导致当前线程等到发信号或 interrupted } catch (InterruptedException e) { // TODO Auto-generated catch block e.printStackTrace(); } } /*程序执行到此,说明是C线程,则打印*/ for(int i = 0; i < 3; i++) { System.out.print(Thread.currentThread().getName()); } /*唤醒A线程*/ number = 1; // 修改标记为1 conditionA.signal(); // 唤醒一个等待线程 } finally { lock.unlock(); // 释放锁 } }} 测试

读写锁
通过一个例子来认识读写锁,举例:如果有多个线程操作一个共享数据,如下情况:
- 读和写操作:此时为了保证数据的安全,需要互斥(读和写不能同时进行)
- 写和写操作:此时为了保证数据的安全,也需要互斥(写和写之间不能同时进行)
- 读和读操作:此时数据没有安全性的问题,不需要互斥(读和读之间可以同时进行)
通过如下的例子来实现读写锁:
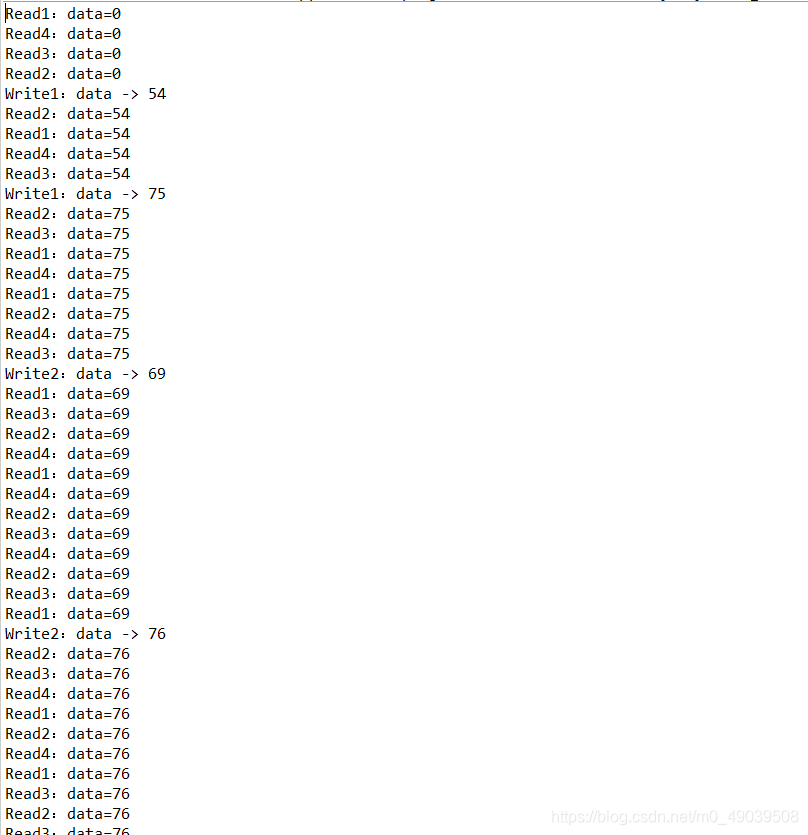
package edu.hebeu.lock;import java.util.concurrent.locks.ReadWriteLock;import java.util.concurrent.locks.ReentrantReadWriteLock;/** * @author 13651 * */public class ReadWriteLockStu { public static void main(String[] args) { ReadWrite readWrite = new ReadWrite(); /*读的线程*/ for(int i = 1; i <= 4; i++) { // 4个读线程 new Thread(() -> { while(true) { // 一直读 readWrite.read(); try { Thread.sleep(50); // 睡50ms } catch (InterruptedException e) { // TODO Auto-generated catch block e.printStackTrace(); } } }, "Read" + i).start(); } /*一个写的线程*/ new Thread(() -> { for(int i = 0; i < 2; i++) { // 两次写操作 int writeData = (int) (Math.random() * 101); readWrite.write(writeData); try { Thread.sleep(100); } catch (InterruptedException e) { // TODO Auto-generated catch block e.printStackTrace(); } } }, "Write1").start(); /*一个写的线程*/ new Thread(() -> { for(int i = 0; i < 2; i++) { // 两次写操作 try { Thread.sleep(200); } catch (InterruptedException e) { // TODO Auto-generated catch block e.printStackTrace(); } int writeData = (int) (Math.random() * 101); readWrite.write(writeData); } }, "Write2").start(); }}class ReadWrite { private int data; // 操作的共享数据 private ReadWriteLock readWriteLock = new ReentrantReadWriteLock(); // 读写锁对象 /** * 读操作,只有读操作时可以被多个线程并发的读,不需要考虑线程安全问题 */ public void read() { readWriteLock.readLock().lock(); // 读上锁 try { System.out.println(Thread.currentThread().getName() + ":data=" + data); } finally { readWriteLock.readLock().unlock(); // 读释放锁 } } /** * 写操作,有写操作时就需要保证数据的安全,需要考虑线程安全问题 * @param writeData 写入的数据 */ public void write(int writeData) { readWriteLock.writeLock().lock(); // 写上锁 try { data = writeData; System.out.println(Thread.currentThread().getName() + ":data -> " + data); } finally { readWriteLock.writeLock().unlock(); // 写释放锁 } } } 测试
线程八锁
线程八锁,通过如下的一个题目来引出,先看代码:
package edu.hebeu.lock;/** * @author 13651 * */public class ThreadLockEight { public static void main(String[] args) { ThreadLockEight eight = new ThreadLockEight(); // eight.lock1(); // 第一种锁// eight.lock2(); // 第二种锁// eight.lock3(); // 第三种锁// eight.lock4(); // 第四种锁// eight.lock5(); // 第五种锁// eight.lock6(); // 第六种锁// eight.lock7(); // 第七种锁 eight.lock8(); // 第八种锁 } /** * 第一种锁 */ private void lock1() { Myprint myprint = new Myprint(); new Thread(() -> { myprint.loopONE(); }).start(); new Thread(() -> { myprint.loopTWO(); }).start(); } private void lock2() { Myprint myprint = new Myprint(); new Thread(() -> { myprint.loopONESL(); }).start(); new Thread(() -> { myprint.loopTWO(); }).start(); } private void lock3() { Myprint myprint = new Myprint(); new Thread(() -> { myprint.loopONESL(); }).start(); new Thread(() -> { myprint.loopTWO(); }).start(); new Thread(() -> { myprint.loop_three(); }).start(); } private void lock4() { Myprint myprint1 = new Myprint(); Myprint myprint2= new Myprint(); new Thread(() -> { myprint1.loopONESL(); }).start(); new Thread(() -> { myprint2.loopTWO(); }).start(); } private void lock5() { Myprint myprint1 = new Myprint(); Myprint myprint2= new Myprint(); new Thread(() -> { myprint1.loopONESS(); }).start(); new Thread(() -> { myprint2.loopTWO(); }).start(); } private void lock6() { Myprint myprint = new Myprint(); new Thread(() -> { myprint.loopONESS(); }).start(); new Thread(() -> { myprint.loopTWOS(); }).start(); } private void lock7() { Myprint myprint1 = new Myprint(); Myprint myprint2 = new Myprint(); new Thread(() -> { myprint1.loopONESS(); }).start(); new Thread(() -> { myprint2.loopTWO(); }).start(); } private void lock8() { Myprint myprint1 = new Myprint(); Myprint myprint2 = new Myprint(); new Thread(() -> { myprint1.loopONESS(); }).start(); new Thread(() -> { myprint2.loopTWOS(); }).start(); }}class Myprint { public static synchronized void loopONES() { System.out.println("one"); } public static synchronized void loopTWOS() { System.out.println("two"); } public static synchronized void loopThreeS() { System.out.println("three"); } public static synchronized void loopONESS() { try { Thread.sleep(3000); } catch (InterruptedException e) { // TODO Auto-generated catch block e.printStackTrace(); } System.out.println("one"); } public static synchronized void loopTWOSS() { try { Thread.sleep(3000); } catch (InterruptedException e) { // TODO Auto-generated catch block e.printStackTrace(); } System.out.println("two"); } public static synchronized void loopThreeSS() { try { Thread.sleep(3000); } catch (InterruptedException e) { // TODO Auto-generated catch block e.printStackTrace(); } System.out.println("three"); } public synchronized void loopONE() { System.out.println("one"); } public synchronized void loopTWO() { System.out.println("two"); } public synchronized void loopThree() { System.out.println("three"); } public synchronized void loopONESL() { try { Thread.sleep(3000); } catch (InterruptedException e) { // TODO Auto-generated catch block e.printStackTrace(); } System.out.println("one"); } public synchronized void loopTWOSL() { try { Thread.sleep(3000); } catch (InterruptedException e) { // TODO Auto-generated catch block e.printStackTrace(); } System.out.println("two"); } public synchronized void loopThreeSL() { try { Thread.sleep(3000); } catch (InterruptedException e) { // TODO Auto-generated catch block e.printStackTrace(); } System.out.println("three"); } public void loop_one() { System.out.println("one"); } public void loop_two() { System.out.println("two"); } public void loop_three() { System.out.println("three"); }} 对上述的代码中main()方法内的8个方法(每个方法对应着一种锁,线程八锁),依次打开注释并允许测试,结果如下:
- 第一锁:创建一个Myprint对象,调用loopONE()、调用loopTwo(),打印结果为:one、two
- 第二锁:创建一个Myprint对象,调用loopONESL()、调用loopTWO(),打印结果为:(延迟3秒) one two
- 第三锁:创建一个Myprint对象,调用loopONESL()、调用loopTWO()、调用loop_three(),打印结果:three (延迟3秒) one two
- 第四锁:创建两个Myprint对象,分别这两个一个调用loopONESL()、一个调用loopTWO(),打印结果:two (延迟3秒) one
- 第五锁:创建两个Myprint对象,分别这两个一个调用loopONESS()、一个调用loopTWO(),打印结果:two (延迟3秒) one
- 第六锁:创建一个Myprint对象,调用loopONESS()、调用loopTWOS(),打印结果:(延迟3秒) one two第七锁:创建两个Myprint对象,分别这两个一个调用loopONESS()、一个调用loopTWO(),打印结果:two (延迟3秒) one
- 第八锁:创建两个MyPrint对象,分别这两个一个调用loopONESS()、一个调用loopTWOS(),打印结果为:(延迟3秒) one two
使用传统方式和使用Lock方式实现生产者消费者案例
代码演示:
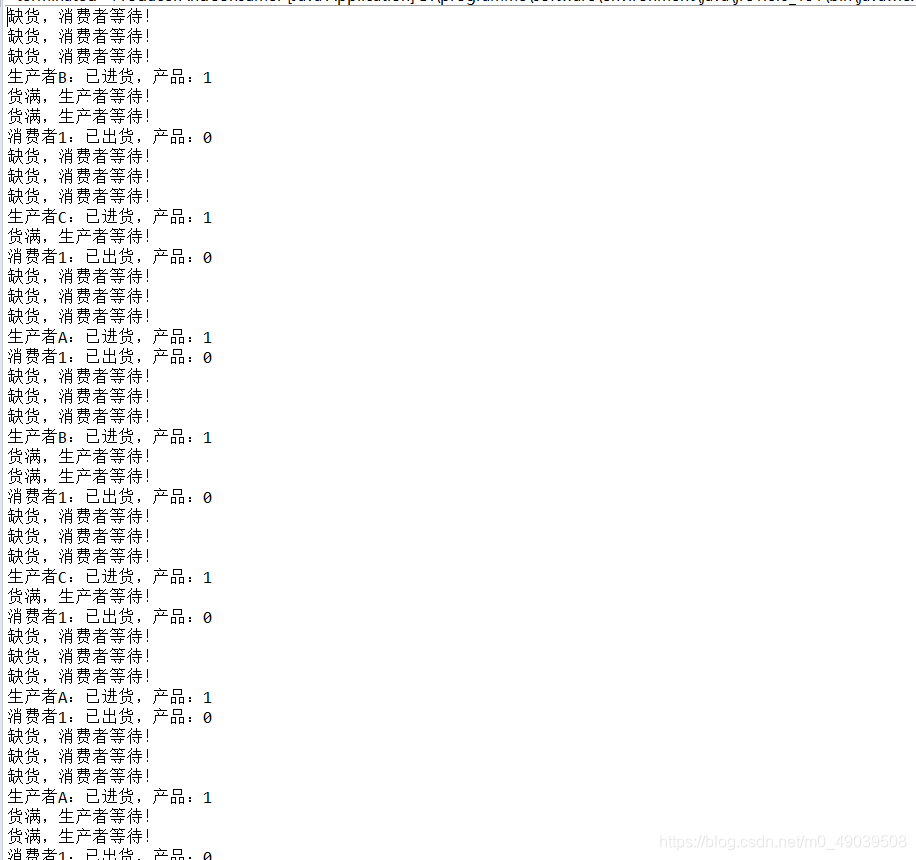
package edu.hebeu.lock;import java.util.concurrent.locks.Condition;import java.util.concurrent.locks.Lock;import java.util.concurrent.locks.ReentrantLock;/** * 这个例子展示传统的生产者消费者案例 * @author 13651 * */public class ProducerAndConsumer { public static void main(String[] args) { // Store store1 = new Store(); // 传统方式控制 Store2 store2 = new Store2(); // Lock方式控制 // Producer producer = new Producer(store1);// Consumer consumer = new Consumer(store1); Producer producer = new Producer(store2); Consumer consumer = new Consumer(store2); new Thread(producer, "生产者A").start(); new Thread(producer, "生产者B").start(); new Thread(producer, "生产者C").start(); new Thread(consumer, "消费者1").start(); new Thread(consumer, "消费者2").start(); new Thread(consumer, "消费者3").start(); }}/** * 仓库 * 使用传统的方式实现 * @author 13651 * */class Store { private int productCount = 0; // 仓库的产品数量 /** * 进货 */ public synchronized void put() { // 如果产品的数量大于等于10,即货满;注意要使用while包裹wait()方法,否则当有多个生产者和消费者线程启动时会出现虚假等待! while(productCount >= 1) { System.out.println("货满,生产者等待!"); try { this.wait(); } catch (InterruptedException e) { // TODO Auto-generated catch block e.printStackTrace(); } } /* * 这里建议不使用else,如果加上else,可以分析在最后某个线程是没有停止的, * 因为有else语句,此时另一个线程如果如果是最后一次执行,导致其在执行if的语句后,else的语句无 * 法执行(else内的notfiyAll()无法执行,则其他的wait进程无法唤醒,且该线程此时已经执行完了), * 当某个线程在if内的wait()就无法被另一个线程唤醒,该线程会陷入一直wait()的状态,导致程序无法 * 终止! */ System.out.println(Thread.currentThread().getName() + ":已进货,产品:" + ++productCount); this.notifyAll(); } /** * 出货 */ public synchronized void out() { // 如果产品的数量小于等于0,即缺货;注意要使用while包裹wait()方法,否则当有多个生产者和消费者线程启动时会出现虚假等待! while(productCount <= 0) { System.out.println("缺货,消费者等待!"); try { this.wait(); } catch (InterruptedException e) { // TODO Auto-generated catch block e.printStackTrace(); } } /* * 这里建议不使用else,如果加上else,可以分析在最后某个线程是没有停止的, * 因为有else语句,此时另一个线程如果如果是最后一次执行,导致其在执行if的语句后,else的语句无 * 法执行(else内的notfiyAll()无法执行,则其他的wait进程无法唤醒,且该线程此时已经执行完了), * 当某个线程在if内的wait()就无法被另一个线程唤醒,该线程会陷入一直wait()的状态,导致程序无法 * 终止! */ System.out.println(Thread.currentThread().getName() + ":已出货,产品:" + --productCount); this.notifyAll(); } }/** * 仓库 * 使用Lock的方式实现 * @author 13651 * */class Store2 { private int productCount = 0; // 仓库的产品数量 private Lock lock = new ReentrantLock(); // 锁 private Condition condition = lock.newCondition(); // 通过锁对象获取这个对象,该对象用来实现类似于wait、notify的操作 /** * 进货 */ public void put() { lock.lock(); // 上锁 try { // 如果产品的数量大于等于10,即货满;注意要使用while包裹wait()方法,否则当有多个生产者和消费者线程启动时会出现虚假等待! while(productCount >= 1) { System.out.println("货满,生产者等待!"); try { condition.await(); // 相当于wait } catch (InterruptedException e) { // TODO Auto-generated catch block e.printStackTrace(); } } System.out.println(Thread.currentThread().getName() + ":已进货,产品:" + ++productCount); condition.signalAll(); // 相当于notifyAll } finally { lock.unlock(); // 释放锁 } } /** * 出货 */ public void out() { lock.lock(); // 上锁 try { // 如果产品的数量小于等于0,即缺货;注意要使用while包裹wait()方法,否则当有多个生产者和消费者线程启动时会出现虚假等待! while(productCount <= 0) { System.out.println("缺货,消费者等待!"); try { condition.await(); // 相当于wait } catch (InterruptedException e) { // TODO Auto-generated catch block e.printStackTrace(); } } System.out.println(Thread.currentThread().getName() + ":已出货,产品:" + --productCount); condition.signalAll(); // 相当于notifyAll } finally { lock.unlock(); // 释放锁 } }}/** * 生产者 * @author 13651 * */class Producer implements Runnable { private Store store; private Store2 store2; public Producer(Store store) { this.store = store; } public Producer(Store2 store2) { this.store2 = store2; } @Override public void run() { for(int i = 0; i < 30; i++) { // 生产30次 try { Thread.sleep(200); // 模拟延迟200ms } catch (InterruptedException e) { // TODO Auto-generated catch block e.printStackTrace(); }// store.put(); // 进货,进行生产 store2.put(); // 进货,进行生产 } }}/** * 消费者 * @author 13651 * */class Consumer implements Runnable { private Store store; private Store2 store2; public Consumer(Store store) { this.store = store; } public Consumer(Store2 store2) { this.store2 = store2; } @Override public void run() { for(int i = 0; i < 30; i++) { // 消费30次// store.out(); // 出货,进行消费 store2.out(); // 进货,进行生产 } }} 测试
CountDownLatch类
闭锁(CountDownLatch):指在完成某些运算时,只有其他所有线程的运算全部完成,当前运算才继续执行;
通过如下的需求和代码实现展示CountDownLatch类的使用,需求:计算所有线程全部执行完所需的时间,代码如下:package edu.hebeu.count_down_latch;import java.util.concurrent.CountDownLatch;/** * 这个例子展示CountDownLatch类的使用 * * 闭锁(CountDownLatch):指在完成某些运算时,只有其他所有线程的运算全部完成,当前运算才继续执行; * * 如本类的计算所有线程全部执行完所需的时间 * * @author 13651 * */public class CountDownLatchStu { public static void main(String[] args) { final CountDownLatch cdLatch = new CountDownLatch(10); // 表示有10个线程使用这个闭锁对象 MyRunnable myRunnable = new MyRunnable(cdLatch); long start = System.currentTimeMillis(); for(int i = 0; i < 10; i++) { // 启动10个线程 new Thread(myRunnable).start(); } try { cdLatch.await(); // 中断 } catch (InterruptedException e) { // TODO Auto-generated catch block e.printStackTrace(); } long end = System.currentTimeMillis(); System.out.println("所有线程执行完的耗费时长:" + (end - start) + "ms"); }}class MyRunnable implements Runnable { private CountDownLatch cdLatch; public MyRunnable(CountDownLatch cdLatch) { this.cdLatch = cdLatch; } @Override public void run() { synchronized (this) { try { for(int i = 0; i <= 5000000; i++) { if(i %2 == 0) { System.out.println("ThreadName = " + Thread.currentThread().getName() +"---" + i); } } } finally { cdLatch.countDown(); // 在线程执行完的最后一步,将该闭锁对象的count-- } } }} 测试
这里执行了10个线程,每个线程计算了5000000次判断计算和打印,所以就不把运行结果截完了,直接看最终结果:
转载地址:https://blog.csdn.net/m0_49039508/article/details/116691460 如侵犯您的版权,请留言回复原文章的地址,我们会给您删除此文章,给您带来不便请您谅解!
发表评论
最新留言
关于作者
