【数据库】Navicat Premium12远程连接MySQL数据库
发布日期:2021-06-29 20:59:11
浏览次数:2
分类:技术文章
本文共 1630 字,大约阅读时间需要 5 分钟。
00. 目录
文章目录
01. 环境介绍
Navicat版本: Navicat Premium12
数据库版本: MySQL5.7和Oracle 11g
02. Navicat安装
请参考详细安装教程:
03. MySQL开启远程登录权限
方法一:
step1: 登录MySQL数据库
[root@localhost ~]# mysql -uroot -pEnter password: Welcome to the MySQL monitor. Commands end with ; or \g.Your MySQL connection id is 78Server version: 5.7.23 MySQL Community Server (GPL)Copyright (c) 2000, 2018, Oracle and/or its affiliates. All rights reserved.Oracle is a registered trademark of Oracle Corporation and/or itsaffiliates. Other names may be trademarks of their respectiveowners.Type 'help;' or '\h' for help. Type '\c' to clear the current input statement.mysql>
step2: 修改权限
第一个root是用户名,后面一个root是数据库密钥, %表示所有主机都可以访问。
mysql> GRANT ALL PRIVILEGES ON *.* TO 'root'@'%' IDENTIFIED BY 'root' WITH GRANT OPTION;
step3: 刷新权限
mysql> flush privileges;Query OK, 0 rows affected (0.22 sec)mysql>
step4: 查看权限
mysql> use mysqlReading table information for completion of table and column namesYou can turn off this feature to get a quicker startup with -AsDatabase changedmysql> select user, host from user;+---------------+-----------+| user | host |+---------------+-----------+| root | % || mysql.session | localhost || mysql.sys | localhost || root | localhost |+---------------+-----------+4 rows in set (0.09 sec)mysql>
方法二:
step1: 修改表user
mysql> use mysql; mysql> update user set host = ‘%’ where user = ‘root’;
step2: 刷新权限
mysql> flush privileges;Query OK, 0 rows affected (0.22 sec)mysql>
到此远程权限开启成功。
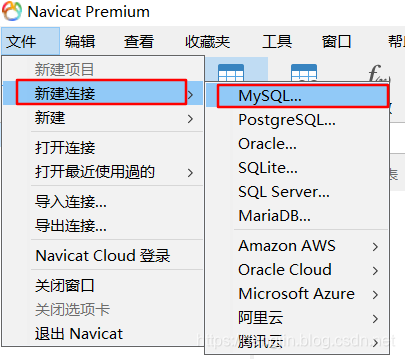
04. Navicat连接MySQL
step1: 新建连接,选择MySQL
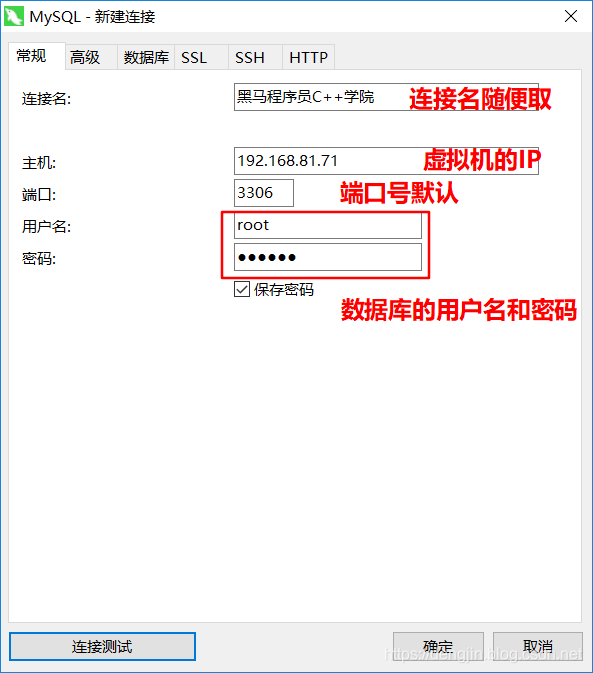
step2: 填写连接信息
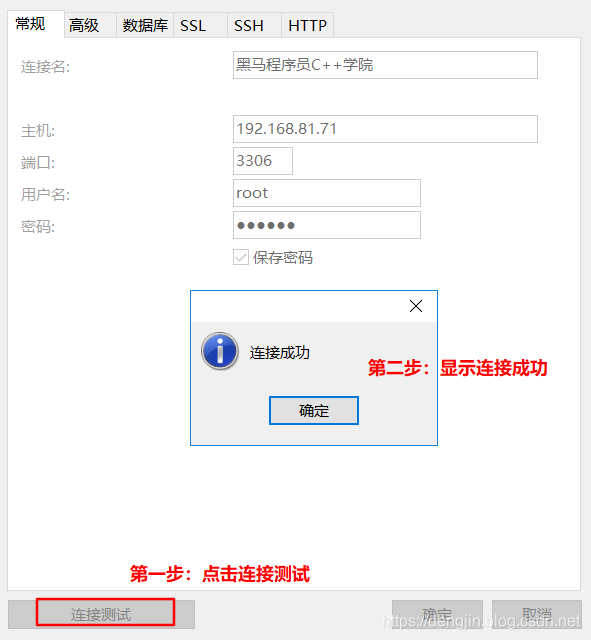
step3: 测试
step4: 连接结果
到这一步我们基本上连接好了MySQL数据库
软件和破解文件下载:
链接: 提取码:3b4p下载方式二:
转载地址:https://dengjin.blog.csdn.net/article/details/95091506 如侵犯您的版权,请留言回复原文章的地址,我们会给您删除此文章,给您带来不便请您谅解!
发表评论
最新留言
很好
[***.229.124.182]2024年04月11日 01时40分41秒
关于作者

喝酒易醉,品茶养心,人生如梦,品茶悟道,何以解忧?唯有杜康!
-- 愿君每日到此一游!
推荐文章
unit test & mock
2019-04-30
exception
2019-04-30
GIL & coroutine & performance
2019-04-30
parameter passing
2019-04-30
sort & search algorithm
2019-04-30
design pattern
2019-04-30
算法-动态规划2
2019-04-30
算法-动态规划3
2019-04-30
算法-计算1的个数及python sort函数的多层排序
2019-04-30
regular expression examples
2019-04-30
subsets : zero left padding : leetcode 78
2019-04-30
python 模块导入注意事项
2019-04-30
quick sort
2019-04-30
自动为 Gatsby网站中的 Markdown 页面添加 sidebar
2019-04-30
leetcode 463. Island Perimeter
2019-04-30
白红宇的个人博客 - 记录点点滴滴的事 - 您是第 310355004 位访客
访问时间: 2024-05-03 15:50:18
访问IP: 3.21.162.87
Copyright © 2020 - 2023 blog.css8.cn 京ICP备2021015314号-1
手机版