kafka安装教程

 解压
解压 


发布日期:2021-06-30 11:07:58
浏览次数:2
分类:技术文章
本文共 3388 字,大约阅读时间需要 11 分钟。
本文记录在linux环境下,安装kafka,并做简单测试,如果zookeeper没有安装,可参考:
1.下载安装包
地址: 注意不要下载成source了。
2.上传至服务器
rz命令上传至服务器
解压 [root@localhost local]# tar -zxvf kafka_2.11-2.1.1.tgz

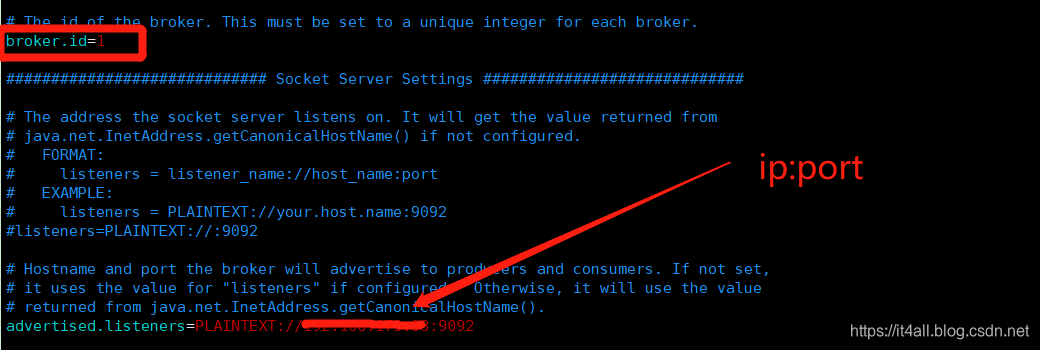
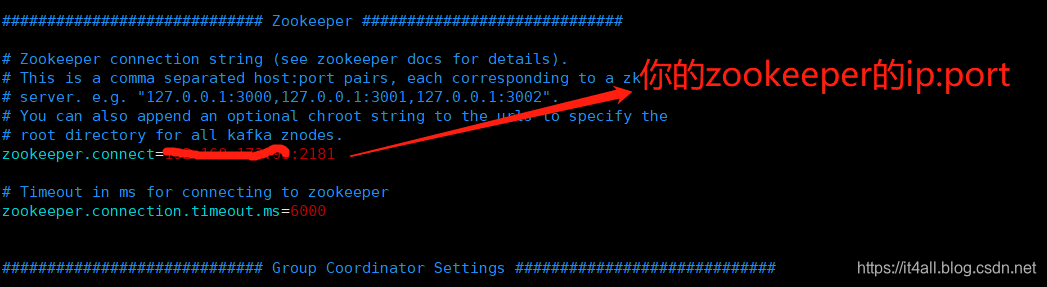
3.修改配置文件
这里这列举几个重要的配置,其他配置如果只是单机的自己做测试不需要修改:
4.启动
[root@localhost bin]# ./kafka-server-start.sh ../config/server.properties &
这个&是后台启动,但是需要exit去退出。
(还有一种是:sh …/config/server.properties 1>/dev/null 2>&1 &其中1>/dev/null 2>&1 是将命令产生的输入和错误都输入到空设备,也就是不输出的意思。
/dev/null代表空设备。)
启动后会刷一波日志然后看到如下信息:
[2019-02-28 10:49:13,727] INFO [ExpirationReaper-1-Rebalance]: Starting (kafka.server.DelayedOperationPurgatory$ExpiredOperationReaper)[2019-02-28 10:49:14,551] INFO [GroupCoordinator 1]: Starting up. (kafka.coordinator.group.GroupCoordinator)[2019-02-28 10:49:14,600] INFO [GroupCoordinator 1]: Startup complete. (kafka.coordinator.group.GroupCoordinator)[2019-02-28 10:49:14,866] INFO [GroupMetadataManager brokerId=1] Removed 0 expired offsets in 228 milliseconds. (kafka.coordinator.group.GroupMetadataManager)[2019-02-28 10:49:15,019] INFO [ProducerId Manager 1]: Acquired new producerId block (brokerId:1,blockStartProducerId:0,blockEndProducerId:999) by writing to Zk with path version 1 (kafka.coordinator.transaction.ProducerIdManager)[2019-02-28 10:49:15,143] INFO [TransactionCoordinator id=1] Starting up. (kafka.coordinator.transaction.TransactionCoordinator)[2019-02-28 10:49:15,279] INFO [TransactionCoordinator id=1] Startup complete. (kafka.coordinator.transaction.TransactionCoordinator)[2019-02-28 10:49:15,317] INFO [Transaction Marker Channel Manager 1]: Starting (kafka.coordinator.transaction.TransactionMarkerChannelManager)[2019-02-28 10:49:18,420] INFO [/config/changes-event-process-thread]: Starting (kafka.common.ZkNodeChangeNotificationListener$ChangeEventProcessThread)[2019-02-28 10:49:18,631] INFO [SocketServer brokerId=1] Started processors for 1 acceptors (kafka.network.SocketServer)[2019-02-28 10:49:18,690] INFO Kafka version : 2.1.1 (org.apache.kafka.common.utils.AppInfoParser)[2019-02-28 10:49:18,709] INFO Kafka commitId : 21234bee31165527 (org.apache.kafka.common.utils.AppInfoParser)[2019-02-28 10:49:18,713] INFO [KafkaServer id=1] started (kafka.server.KafkaServer)[2019-02-28 10:59:14,552] INFO [GroupMetadataManager brokerId=1] Removed 0 expired off
也可以用命令验证一下:
[root@localhost kafka_2.11-2.1.1]# netstat -tunlp|egrep "(2181|9092)"tcp6 0 0 :::9092 :::* LISTEN 14019/java tcp6 0 0 :::2181 :::* LISTEN 11938/java [root@localhost kafka_2.11-2.1.1]#
5.创建一个topic
创建一个名为“wangtest”的Topic,只有一个分区和一个备份:
[root@localhost bin]# ./kafka-topics.sh --create --zookeeper xx.xx.xx.xx:2181 --replication-factor 1 --partitions 1 --topic wangtestCreated topic "wangtest".[root@localhost bin]#
查询一下topic
[root@localhost bin]# ./kafka-topics.sh --list --zookeeper xx.xx.xx.xx:2181wangtest[root@localhost bin]#
6.发送消息
我们发一下消息测试一下:
[root@localhost bin]# ./kafka-console-producer.sh --broker-list xx.x.xx.xx:9092 --topic wangtest>this is a test message from wangwang>from itqunqi^H^H^H^H^H^[[3~>Ties^H^H^H^H>this test from itu^H>this test from ityunqing>
7.消费消息
在另一个终端,可以消费刚才写入的消息
[root@localhost bin]# ./kafka-console-consumer.sh --bootstrap-server xx.xx.xx.xx:9092 --topic wangtest --from-beginningthis is a test message from wangwangfrom itqunqiTiesthis test from ituthis test from ityunqing
资料:
转载地址:https://it4all.blog.csdn.net/article/details/88019150 如侵犯您的版权,请留言回复原文章的地址,我们会给您删除此文章,给您带来不便请您谅解!
发表评论
最新留言
表示我来过!
[***.240.166.169]2024年04月12日 02时05分18秒
关于作者

喝酒易醉,品茶养心,人生如梦,品茶悟道,何以解忧?唯有杜康!
-- 愿君每日到此一游!
推荐文章
122.实现随机分页的通用分页存储过程
2019-04-30
123.根据分类实现的分页存储过程
2019-04-30
124.树形数据层次显示处理-案例
2019-04-30
125.树形数据分级汇总
2019-04-30
126.宝塔形数据得出处理
2019-04-30
127.树形数据生成XML
2019-04-30
128.XMl菜单
2019-04-30
129.宝塔形数据的处理-案例
2019-04-30
130.最短乘车路线查询-案例
2019-04-30
131.树形数据编号重排-案例
2019-04-30
132.树形数据深度排序处理-案例
2019-04-30
133.树形数据编号重排的通用存储过程
2019-04-30
135.查找指定节点的所有子节点的案例函数
2019-04-30
136.生成编码规则调整处理(T-SQL语句【函数】)
2019-04-30
137.查找指定节点的所有父节点的案例函数
2019-04-30
138.实现编码规则调整处理的通用存储过程
2019-04-30
139.删除节点处理的通用存储过程
2019-04-30
140.移动节点处理的通用存储过程
2019-04-30
151.数据存储为xml
2019-04-30
152.BCP 实现数据导入/导出的存储过程
2019-04-30
白红宇的个人博客 - 记录点点滴滴的事 - 您是第 310463073 位访客
访问时间: 2024-05-04 00:24:30
访问IP: 3.14.6.194
Copyright © 2020 - 2023 blog.css8.cn 京ICP备2021015314号-1
手机版