RabbitMQ 最常用的 3 大模式!


发布日期:2021-06-30 12:52:38
浏览次数:2
分类:技术文章
本文共 9089 字,大约阅读时间需要 30 分钟。
Java技术栈
www.javastack.cn
关注阅读更多优质文章
作者:海向
出处:www.cnblogs.com/haixiang/p/10864339.html
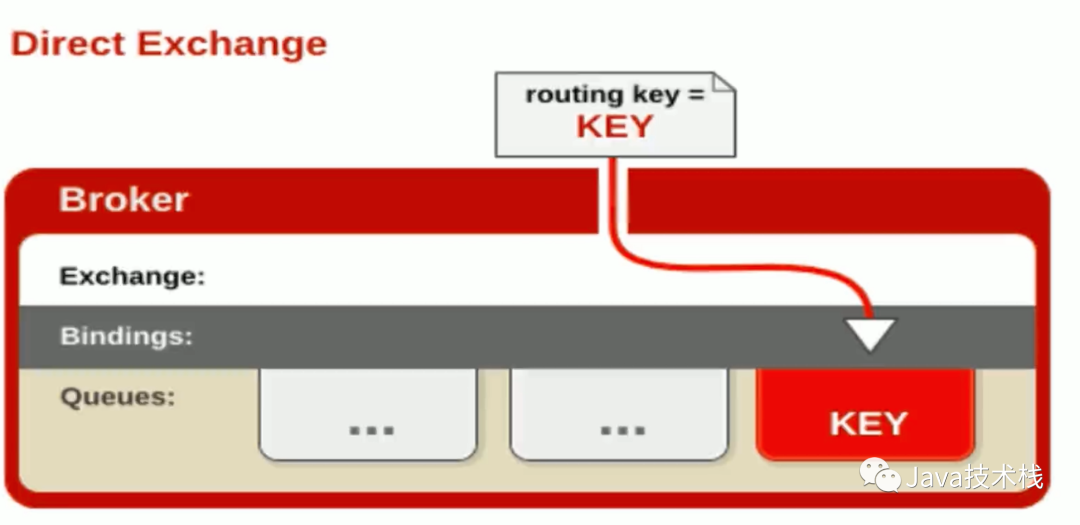
Direct 模式
所有发送到 Direct Exchange 的消息被转发到 RouteKey 中指定的 Queue。
Direct 模式可以使用 自带的 Exchange: default Exchange,所以不需要将 Exchange 进行任何绑定(binding)操作。
消息传递时,RouteKey 必须完全匹配才会被队列接收,否则该消息会被抛弃,
import com.rabbitmq.client.Channel;import com.rabbitmq.client.Connection;import com.rabbitmq.client.ConnectionFactory;public class DirectProducer { public static void main(String[] args) throws Exception { //1. 创建一个 ConnectionFactory 并进行设置 ConnectionFactory factory = new ConnectionFactory(); factory.setHost("localhost"); factory.setVirtualHost("/"); factory.setUsername("guest"); factory.setPassword("guest"); //2. 通过连接工厂来创建连接 Connection connection = factory.newConnection(); //3. 通过 Connection 来创建 Channel Channel channel = connection.createChannel(); //4. 声明 String exchangeName = "test_direct_exchange"; String routingKey = "item.direct"; //5. 发送 String msg = "this is direct msg"; channel.basicPublish(exchangeName, routingKey, null, msg.getBytes()); System.out.println("Send message : " + msg); //6. 关闭连接 channel.close(); connection.close(); }} import com.rabbitmq.client.*;import java.io.IOException;public class DirectConsumer { public static void main(String[] args) throws Exception { //1. 创建一个 ConnectionFactory 并进行设置 ConnectionFactory factory = new ConnectionFactory(); factory.setHost("localhost"); factory.setVirtualHost("/"); factory.setUsername("guest"); factory.setPassword("guest"); factory.setAutomaticRecoveryEnabled(true); factory.setNetworkRecoveryInterval(3000); //2. 通过连接工厂来创建连接 Connection connection = factory.newConnection(); //3. 通过 Connection 来创建 Channel Channel channel = connection.createChannel(); //4. 声明 String exchangeName = "test_direct_exchange"; String queueName = "test_direct_queue"; String routingKey = "item.direct"; channel.exchangeDeclare(exchangeName, "direct", true, false, null); channel.queueDeclare(queueName, false, false, false, null); //一般不用代码绑定,在管理界面手动绑定 channel.queueBind(queueName, exchangeName, routingKey); //5. 创建消费者并接收消息 Consumer consumer = new DefaultConsumer(channel) { @Override public void handleDelivery(String consumerTag, Envelope envelope, AMQP.BasicProperties properties, byte[] body) throws IOException { String message = new String(body, "UTF-8"); System.out.println(" [x] Received '" + message + "'"); } }; //6. 设置 Channel 消费者绑定队列 channel.basicConsume(queueName, true, consumer); }} Send message : this is direct msg [x] Received 'this is direct msg'
Topic 模式
可以使用通配符进行模糊匹配
符号'#" 匹配一个或多个词
符号"*”匹配不多不少一个词
例如:
'log.#"能够匹配到'log.info.oa"
"log.*"只会匹配到"log.erro“
import com.rabbitmq.client.Channel;import com.rabbitmq.client.Connection;import com.rabbitmq.client.ConnectionFactory;public class TopicProducer { public static void main(String[] args) throws Exception { //1. 创建一个 ConnectionFactory 并进行设置 ConnectionFactory factory = new ConnectionFactory(); factory.setHost("localhost"); factory.setVirtualHost("/"); factory.setUsername("guest"); factory.setPassword("guest"); //2. 通过连接工厂来创建连接 Connection connection = factory.newConnection(); //3. 通过 Connection 来创建 Channel Channel channel = connection.createChannel(); //4. 声明 String exchangeName = "test_topic_exchange"; String routingKey1 = "item.update"; String routingKey2 = "item.delete"; String routingKey3 = "user.add"; //5. 发送 String msg = "this is topic msg"; channel.basicPublish(exchangeName, routingKey1, null, msg.getBytes()); channel.basicPublish(exchangeName, routingKey2, null, msg.getBytes()); channel.basicPublish(exchangeName, routingKey3, null, msg.getBytes()); System.out.println("Send message : " + msg); //6. 关闭连接 channel.close(); connection.close(); }} import com.rabbitmq.client.*;import java.io.IOException;public class TopicConsumer { public static void main(String[] args) throws Exception { //1. 创建一个 ConnectionFactory 并进行设置 ConnectionFactory factory = new ConnectionFactory(); factory.setHost("localhost"); factory.setVirtualHost("/"); factory.setUsername("guest"); factory.setPassword("guest"); factory.setAutomaticRecoveryEnabled(true); factory.setNetworkRecoveryInterval(3000); //2. 通过连接工厂来创建连接 Connection connection = factory.newConnection(); //3. 通过 Connection 来创建 Channel Channel channel = connection.createChannel(); //4. 声明 String exchangeName = "test_topic_exchange"; String queueName = "test_topic_queue"; String routingKey = "item.#"; channel.exchangeDeclare(exchangeName, "topic", true, false, null); channel.queueDeclare(queueName, false, false, false, null); //一般不用代码绑定,在管理界面手动绑定 channel.queueBind(queueName, exchangeName, routingKey); //5. 创建消费者并接收消息 Consumer consumer = new DefaultConsumer(channel) { @Override public void handleDelivery(String consumerTag, Envelope envelope, AMQP.BasicProperties properties, byte[] body) throws IOException { String message = new String(body, "UTF-8"); System.out.println(" [x] Received '" + message + "'"); } }; //6. 设置 Channel 消费者绑定队列 channel.basicConsume(queueName, true, consumer); }} Send message : this is topc msg[x] Received 'this is topc msg'[x] Received 'this is topc msg'
Fanout 模式
不处理路由键,只需要简单的将队列绑定到交换机上发送到交换机的消息都会被转发到与该交换机绑定的所有队列上。系列RabbitMQ教程请关注公众号Java技术栈获取阅读。
Fanout交换机转发消息是最快的。
import com.rabbitmq.client.*;import java.io.IOException;public class FanoutConsumer { public static void main(String[] args) throws Exception { //1. 创建一个 ConnectionFactory 并进行设置 ConnectionFactory factory = new ConnectionFactory(); factory.setHost("localhost"); factory.setVirtualHost("/"); factory.setUsername("guest"); factory.setPassword("guest"); factory.setAutomaticRecoveryEnabled(true); factory.setNetworkRecoveryInterval(3000); //2. 通过连接工厂来创建连接 Connection connection = factory.newConnection(); //3. 通过 Connection 来创建 Channel Channel channel = connection.createChannel(); //4. 声明 String exchangeName = "test_fanout_exchange"; String queueName = "test_fanout_queue"; String routingKey = "item.#"; channel.exchangeDeclare(exchangeName, "fanout", true, false, null); channel.queueDeclare(queueName, false, false, false, null); //一般不用代码绑定,在管理界面手动绑定 channel.queueBind(queueName, exchangeName, routingKey); //5. 创建消费者并接收消息 Consumer consumer = new DefaultConsumer(channel) { @Override public void handleDelivery(String consumerTag, Envelope envelope, AMQP.BasicProperties properties, byte[] body) throws IOException { String message = new String(body, "UTF-8"); System.out.println(" [x] Received '" + message + "'"); } }; //6. 设置 Channel 消费者绑定队列 channel.basicConsume(queueName, true, consumer); }} import com.rabbitmq.client.Channel;import com.rabbitmq.client.Connection;import com.rabbitmq.client.ConnectionFactory;public class FanoutProducer { public static void main(String[] args) throws Exception { //1. 创建一个 ConnectionFactory 并进行设置 ConnectionFactory factory = new ConnectionFactory(); factory.setHost("localhost"); factory.setVirtualHost("/"); factory.setUsername("guest"); factory.setPassword("guest"); //2. 通过连接工厂来创建连接 Connection connection = factory.newConnection(); //3. 通过 Connection 来创建 Channel Channel channel = connection.createChannel(); //4. 声明 String exchangeName = "test_fanout_exchange"; String routingKey1 = "item.update"; String routingKey2 = ""; String routingKey3 = "ookjkjjkhjhk";//任意routingkey //5. 发送 String msg = "this is fanout msg"; channel.basicPublish(exchangeName, routingKey1, null, msg.getBytes()); channel.basicPublish(exchangeName, routingKey2, null, msg.getBytes()); channel.basicPublish(exchangeName, routingKey3, null, msg.getBytes()); System.out.println("Send message : " + msg); //6. 关闭连接 channel.close(); connection.close(); }} Send message : this is fanout msg[x] Received 'this is fanout msg'[x] Received 'this is fanout msg'[x] Received 'this is fanout msg'
关注Java技术栈看更多干货
戳原文,获取更多福利!
转载地址:https://javastack.blog.csdn.net/article/details/108675284 如侵犯您的版权,请留言回复原文章的地址,我们会给您删除此文章,给您带来不便请您谅解!
发表评论
最新留言
关注你微信了!
[***.104.42.241]2024年04月19日 07时39分03秒
关于作者

喝酒易醉,品茶养心,人生如梦,品茶悟道,何以解忧?唯有杜康!
-- 愿君每日到此一游!
推荐文章
SQL命令分类(DDL、DML、DCL、TCL以及事务)
2019-05-01
nested exception is org.springframework.beans.BeanInstantiationException: Failed to instantiate 报错
2019-05-01
最后一台,i7+6核电脑
2019-05-01
redis五种基本数据类型
2019-05-01
以不同业务,redis分库概念
2019-05-01
使用redis实现订阅功能
2019-05-01
Redis哨兵机制
2019-05-01
哨兵机制服务器环境准备
2019-05-01
SpringBoot整合Redis事务
2019-05-01
项目整合一级缓存和二级缓存
2019-05-01
自定义注解和aop抽取重复代码
2019-05-01
互联网API开放平台安全设计-基于OAuth2.0协议方式
2019-05-01
URL特殊字符转码
2019-05-01
对称加密整个过程
2019-05-01
java内存模型
2019-05-01
volatile关键字
2019-05-01
web服务器软件_概述
2019-05-01
tomcat_启动问题分析
2019-05-01
tomcat_关闭
2019-05-01
tomcat_部署项目的方式
2019-05-01
白红宇的个人博客 - 记录点点滴滴的事 - 您是第 311329563 位访客
访问时间: 2024-05-06 09:19:51
访问IP: 3.17.5.68
Copyright © 2020 - 2023 blog.css8.cn 京ICP备2021015314号-1
手机版