Java网络编程-Socket编程初涉四(NIO模型的简易多人聊天室)

发布日期:2021-06-30 16:02:23
浏览次数:2
分类:技术文章
本文共 10616 字,大约阅读时间需要 35 分钟。
推荐:
Java网络编程-Socket编程初涉四(NIO模型的简易多人聊天室)
什么是NIO模型呢?
之前版本
服务器
这里使用Channel、Selector、Buffer来实现一个NIO模型的服务器,服务器的主要逻辑如下:
- 首先创建
ServerSocketChannel(服务器管道),拿到关于该ServerSocketChannel的ServerSocket,并且将ServerSocket绑定端口(源码中也间接实现了监听端口,之前的版本有说过,这里就不再赘述了),再创建Selector,将创建的ServerSocketChannel的ACCEPT事件注册到Selector上(也就是当有客户端连接服务器时触发事件)。 - 当有客户端连接后(即
Selector监听到ServerSocketChannel的ACCEPT事件触发了),就获取该客户端的SocketChannel,并将SocketChannel的READ事件注册到Selector上(当有客户端发送消息给服务器时触发)。 - 当有客户端发送消息给服务器时,服务器将该消息转发给其他用户,因为在线用户的
SocketChannel都在Selector上注册了READ事件,所以服务器可以很方便的拿到用户的SocketChannel(所有在线用户的管道),所以服务器转发消息就变得十分简单了;最后还要判断用户输入的消息是否是要准备退出,如果用户要退出,就移除该用户SocketChannel的READ事件,并且提醒Selector。
像BIO模型和伪异步I/O模型实现的服务器,当有客户端连接服务器后,服务器需要创建一个线程来与用户进行通信,当客户端连接请求并发数很大时,服务器需要创建的线程就非常多了,这样带来的上下文切换、内存开销都非常大,并且创建的线程还是阻塞式的,性能较差。而NIO模型,客户端与服务器通信是通过Channel、Buffer(BIO模型和伪异步I/O模型是使用Stream),并且当客户端连接服务器时,NIO模型不需要创建线程,只需要将用户管道的READ事件注册到Selector即可,用户发送消息给服务器就会触发该事件,而不需要创建线程去一直阻塞式的监听用户发送过来消息,有了Selector,实现非阻塞通信就变得很简单了。
代码中注释还是比较详细的,相信大家都能看懂。如果对ByteBuffer的读、写模式不太懂,可以看下面这篇博客的相关部分。
package nio.chatroom.server;import java.io.*;import java.net.InetSocketAddress;import java.nio.ByteBuffer;import java.nio.channels.*;import java.nio.charset.Charset;import java.util.Set;public class ChatServer { // 默认端口 private static final int DEFAULT_PORT = 8888; private static final String QUIT = "quit"; // 缓冲区大小 private static final int BUFFER = 1024; private ServerSocketChannel server; private Selector selector; // 读取 buffer private ByteBuffer rBuffer = ByteBuffer.allocate(BUFFER); // 写入 buffer private ByteBuffer wBuffer = ByteBuffer.allocate(BUFFER); private Charset charset = Charset.forName("UTF-8"); // 自定义端口 private int port; public ChatServer(){ this(DEFAULT_PORT); } public ChatServer(int port){ this.port = port; } public void start(){ try { // 打开一个ServerSocket 的 Channel server = ServerSocketChannel.open(); // 设置非阻塞 server.configureBlocking(false); // 得到一个关于该ServerSocketChannel的ServerSocket、并且绑定端口 server.socket().bind(new InetSocketAddress(port)); // 打开Selector selector = Selector.open(); // 把ServerSocketChannel注册到Selector , 设置监听事件为ACCEPT server.register(selector , SelectionKey.OP_ACCEPT); System.out.println("启动服务器,监听端口:"+ port +"..."); while(true){ // 本身是阻塞式调用 selector.select(); // 触发事件集 Set selectionKeys = selector.selectedKeys(); for(SelectionKey key : selectionKeys){ // 处理被触发的事件 handles(key); } // 处理完成后,手动清空 selectionKeys.clear(); } } catch (IOException e) { e.printStackTrace(); } finally{ close(selector); } } private boolean readyToQuit(String msg){ return QUIT.equalsIgnoreCase(msg); } private synchronized void close(Closeable closeable){ if(closeable != null){ try { closeable.close(); } catch (IOException e) { e.printStackTrace(); } } } private String receive(SocketChannel client) throws IOException { // 写模式 rBuffer.clear(); while((client.read(rBuffer)) > 0); // 读模式 rBuffer.flip(); return String.valueOf(charset.decode(rBuffer)); } private void forwardMessage(SocketChannel client , String fwdMsg) throws IOException { for(SelectionKey key : selector.keys()){ Channel connectedClient = key.channel(); if(connectedClient instanceof ServerSocketChannel){ continue; } if(key.isValid() && !client.equals(connectedClient)){ // 写模式 wBuffer.clear(); wBuffer.put(charset.encode(getClientName(client) +":"+fwdMsg)); // 读模式 wBuffer.flip(); while(wBuffer.hasRemaining()){ ((SocketChannel) connectedClient).write(wBuffer); } } } } private String getClientName(SocketChannel client){ return "客户端["+client.socket().getPort()+"]"; } private void handles(SelectionKey key) throws IOException { // ACCEPT事件 - 和客户端建立了连接 if(key.isAcceptable()){ ServerSocketChannel server = (ServerSocketChannel) key.channel(); SocketChannel client = server.accept(); // 设置成非阻塞 client.configureBlocking(false); client.register(selector , SelectionKey.OP_READ); System.out.println(getClientName(client)+"已连接"); } // READ事件 - 客户端发送了消息 else if(key.isReadable()){ SocketChannel client = (SocketChannel) key.channel(); String fwdMsg = receive(client); if(fwdMsg.isEmpty()){ // 客户端异常 , 不再监听这个事件 key.cancel(); // 更新监听事件状态 selector.wakeup(); } else{ forwardMessage(client , fwdMsg); // 检查用户是否准备退出 if(readyToQuit(fwdMsg)){ key.cancel(); selector.wakeup(); System.out.println(getClientName(client)+"已断开"); } } } } public static void main(String[] args) { ChatServer server = new ChatServer(); server.start(); }} 客户端
如果看懂了服务器端的代码逻辑,客户端代码逻辑应该很容易看懂。
- 获取一个
SocketChannel,并且设置成非阻塞(需要手动设置,默认为阻塞),再获取一个Selector,并将SocketChannel的CONNECT事件注册到Selector上(客户端连接服务器时触发)。 - 当有
SocketChannel的CONNECT事件触发后,也就意味着有客户端连接上了服务器,所以需要创建一个线程来监听用户的输入(这个实现不需要变),并且还需要将SocketChannel的READ事件注册到Selector上(当服务器转发其他用户的消息时触发,触发后,客户端直接打印服务器转发的消息即可)。
package nio.chatroom.client;import java.io.*;import java.net.InetSocketAddress;import java.nio.ByteBuffer;import java.nio.channels.ClosedSelectorException;import java.nio.channels.SelectionKey;import java.nio.channels.Selector;import java.nio.channels.SocketChannel;import java.nio.charset.Charset;import java.util.Set;public class ChatClient { private static final String DEFAULT_SERVER_HOST = "127.0.0.1"; private static final int DEFAULT_SERVER_PORT = 8888; private static final int BUFFER = 1024; private static final String QUIT = "quit"; private String host; private int port; private SocketChannel client; private ByteBuffer rBuffer = ByteBuffer.allocate(BUFFER); private ByteBuffer wBuffer = ByteBuffer.allocate(BUFFER); private Selector selector; private Charset charset = Charset.forName("UTF-8"); public ChatClient(){ this(DEFAULT_SERVER_HOST , DEFAULT_SERVER_PORT); } public ChatClient(String host , int port){ this.host = host; this.port = port; } // 检查用户是否准备退出 public boolean readyToQuit(String msg){ return QUIT.equalsIgnoreCase(msg); } public void close(Closeable closeable){ if(closeable != null){ try { closeable.close(); } catch (IOException e) { e.printStackTrace(); } } } public void start(){ try { client = SocketChannel.open(); // 设置非阻塞 client.configureBlocking(false); selector = Selector.open(); client.register(selector , SelectionKey.OP_CONNECT); client.connect(new InetSocketAddress(host , port)); while(true){ selector.select(); Set selectionKeys = selector.selectedKeys(); for(SelectionKey key : selectionKeys){ handles(key); } } } catch (IOException e) { e.printStackTrace(); } catch (ClosedSelectorException e){ // 用户正常退出,产生的异常 } finally { close(selector); } } private void handles(SelectionKey key) throws IOException { // CONNECT事件 - 连接就绪事件 if(key.isConnectable()){ SocketChannel client = (SocketChannel) key.channel(); if(client.isConnectionPending()){ client.finishConnect(); // 处理用户的输入 new Thread(new UserInputHandler(this)).start(); } client.register(selector , SelectionKey.OP_READ); } // READ事件 - 服务器转发消息 else if(key.isReadable()){ SocketChannel client = (SocketChannel) key.channel(); String msg = receive(client); if(msg.isEmpty()){ // 服务器异常 close(selector); } else{ System.out.println(msg); } } } private String receive(SocketChannel client) throws IOException { // 写模式 rBuffer.clear(); while(client.read(rBuffer) > 0); // 写模式 rBuffer.flip(); return String.valueOf(charset.decode(rBuffer)); } public void send(String msg) throws IOException { if(msg.isEmpty()){ return ; } // 写模式 wBuffer.clear(); wBuffer.put(charset.encode(msg)); wBuffer.flip(); while(wBuffer.hasRemaining()){ client.write(wBuffer); } // 检查用户是否准备退出 if(readyToQuit(msg)){ close(selector); } } public static void main(String[] args) { ChatClient client = new ChatClient(); client.start(); }} 这个类没有改动,就不说了。
package nio.chatroom.client;import java.io.BufferedReader;import java.io.IOException;import java.io.InputStreamReader;public class UserInputHandler implements Runnable{ private ChatClient client; public UserInputHandler(ChatClient client){ this.client = client; } @Override public void run() { try { // 等待用户输入消息 BufferedReader consoleReader = new BufferedReader( new InputStreamReader(System.in) ); while(true){ String input = consoleReader.readLine(); // 向服务器发送消息 client.send(input); //检查用户是否准备退出 if(client.readyToQuit(input)){ break; } } } catch (IOException e){ e.printStackTrace(); } }} 这里我们便实现了一个NIO模型的简易多人聊天室,大家可以动手试一试。
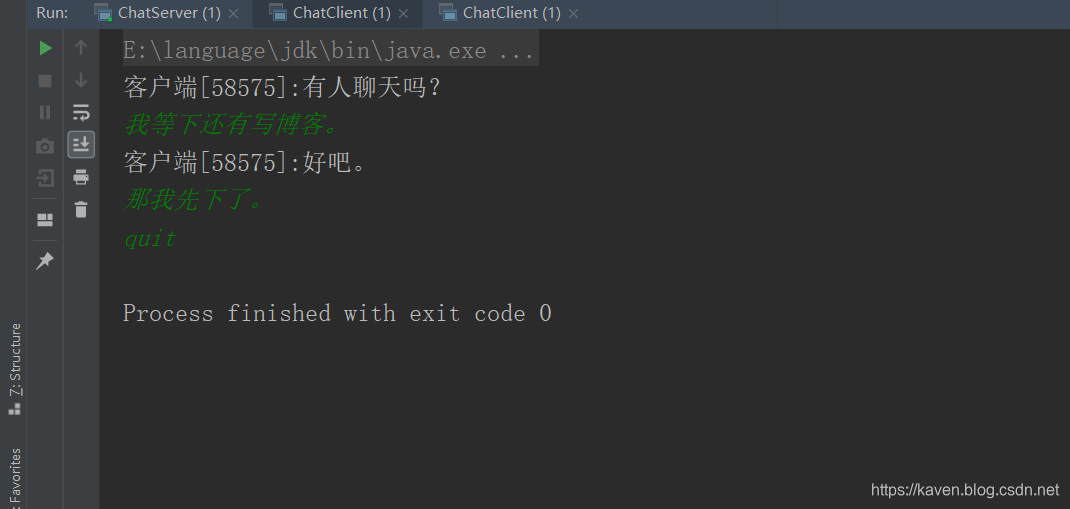
测试
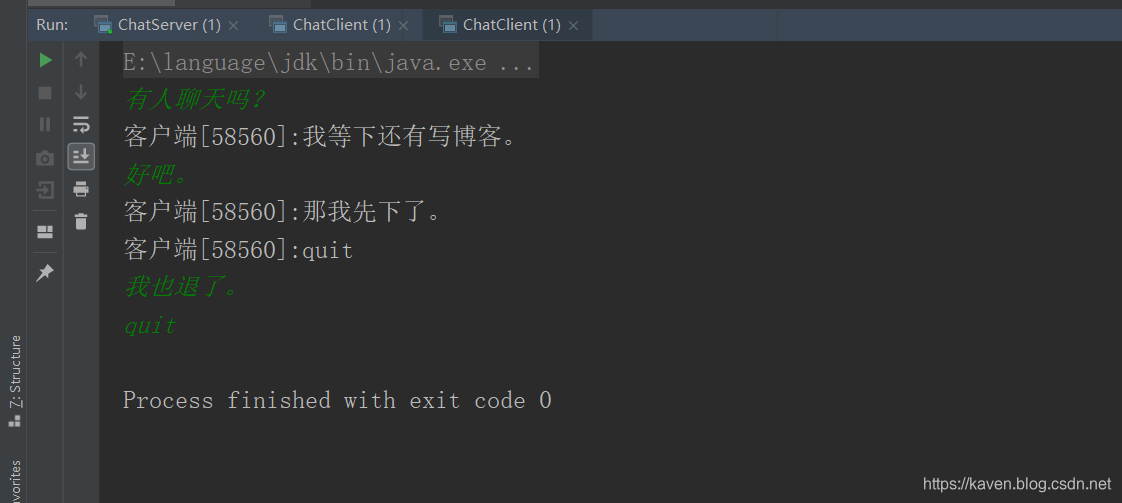
测试没什么问题。
如果有说错的地方,请大家不吝赐教(记得留言哦~~~~)。
转载地址:https://kaven.blog.csdn.net/article/details/104175503 如侵犯您的版权,请留言回复原文章的地址,我们会给您删除此文章,给您带来不便请您谅解!
发表评论
最新留言
关注你微信了!
[***.104.42.241]2024年04月26日 10时41分33秒
关于作者

喝酒易醉,品茶养心,人生如梦,品茶悟道,何以解忧?唯有杜康!
-- 愿君每日到此一游!
推荐文章
以太坊技术怎么提供安全性
2019-05-01
如何验证以太坊技术安全性
2019-05-01
数字货币的投资正确之路
2019-05-01
委员会怎么验证比特币真伪
2019-05-01
迅雷陷入窘迫,但是无可替代
2019-05-01
PHP之 使用PHPMailer插件实现邮件发送功能
2019-05-01
《增长黑客》(肖恩·艾利斯)学习笔记——第二部分 实战
2019-05-01
python使用HTMLTestRunner查看运行函数
2019-05-01
python的ImportError
2019-05-01
linux下安装jenkins+git+python
2019-05-01
windows10家庭版开启组策略
2019-05-01
解决uiautomatorviewer中添加xpath的方法
2019-05-01
性能测试的必要性评估以及评估方法
2019-05-01
Spark学习——利用Mleap部署spark pipeline模型
2019-05-01
Oracle创建表,修改表(添加列、修改列、删除列、修改表的名称以及修改列名)
2019-05-01
使用redis实现订阅功能
2019-05-01
URL特殊字符转码
2019-05-01
对称加密整个过程
2019-05-01
白红宇的个人博客 - 记录点点滴滴的事 - 您是第 311459358 位访客
访问时间: 2024-05-06 18:22:21
访问IP: 18.221.165.246
Copyright © 2020 - 2023 blog.css8.cn 京ICP备2021015314号-1
手机版