本文共 23507 字,大约阅读时间需要 78 分钟。
分布式篇 - 搭建FastDFS分布式文件系统 & 结合Nginx实现访问服务
环境准备
两台CentOS7.x虚拟机:
192.168.1.102作为FastDFS的tracker。192.168.1.106作为FastDFS的storage。
如何创建虚拟机:
使用Xshell连接虚拟机:
下载依赖
需要下载的依赖:
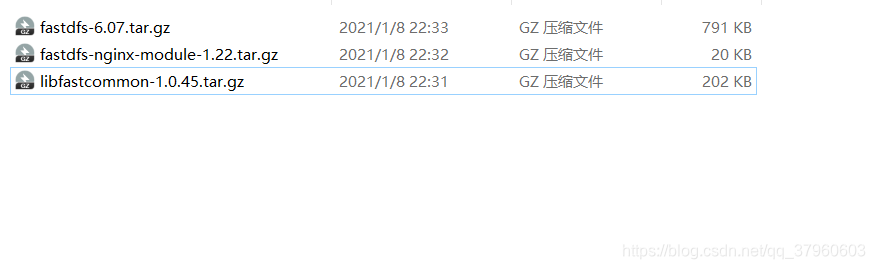
fastdfs:libfastcommon:fastdfs-nginx-module:
博主下载的依赖版本:
 修改
修改hostname,方便区分tracker和storage。 tracker虚拟机:
[root@localhost ~]# hostnamectl set-hostname tracker[root@tracker ~]#
storage虚拟机:
[root@localhost ~]# hostnamectl set-hostname storage[root@storage ~]#
tracker和storage都需要以下步骤,博主以tracker为例,大家在storage上也要进行一样的操作。
[root@tracker ~]# cd /usr/local/[root@tracker local]# mkdir FastDFS[root@tracker local]# ll总用量 0drwxr-xr-x. 2 root root 6 4月 11 2018 bindrwxr-xr-x. 2 root root 6 4月 11 2018 etcdrwxr-xr-x. 2 root root 6 1月 8 23:25 FastDFSdrwxr-xr-x. 2 root root 6 4月 11 2018 gamesdrwxr-xr-x. 2 root root 6 4月 11 2018 includedrwxr-xr-x. 2 root root 6 4月 11 2018 libdrwxr-xr-x. 2 root root 6 4月 11 2018 lib64drwxr-xr-x. 2 root root 6 4月 11 2018 libexecdrwxr-xr-x. 2 root root 6 4月 11 2018 sbindrwxr-xr-x. 5 root root 49 1月 8 22:47 sharedrwxr-xr-x. 2 root root 6 4月 11 2018 src
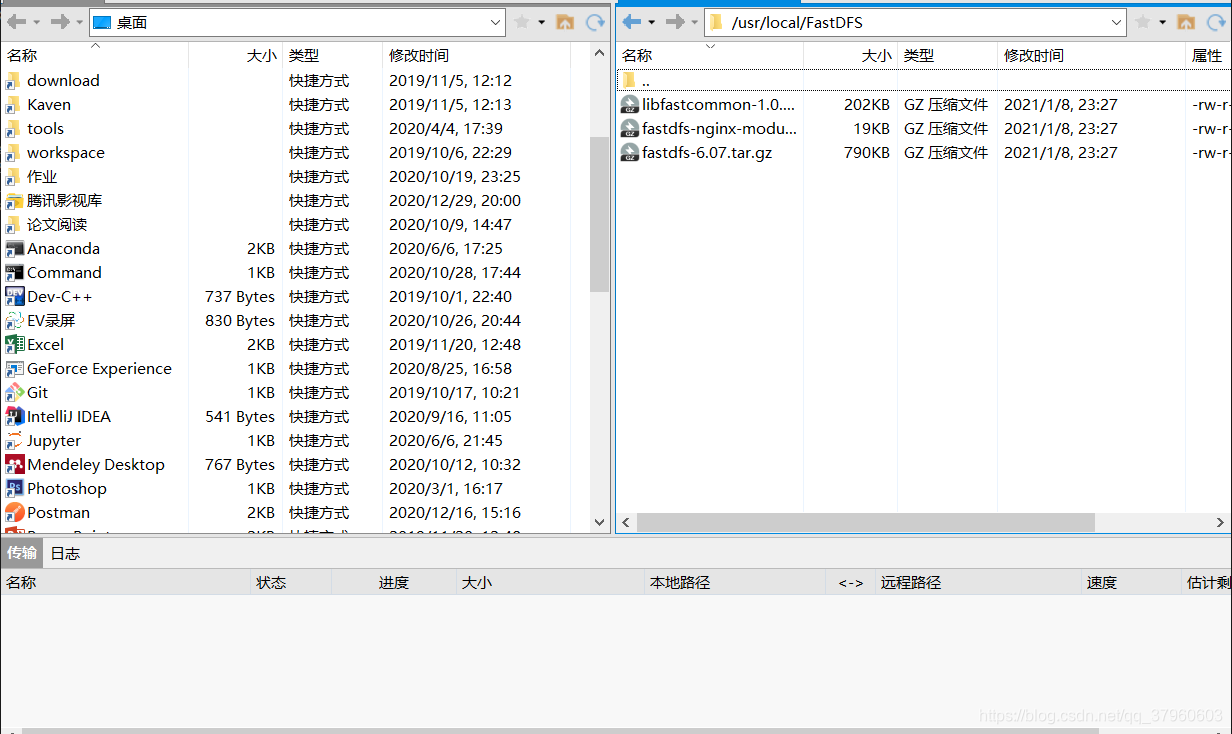
使用Xftp将下载的依赖放到tracker和storage刚刚创建的FastDFS文件夹下。
安装底层依赖
[root@tracker local]# yum install git gcc gcc-c++ make automake autoconf libtool pcre pcre-devel zlib zlib-devel openss openssl-devel wget vim -y
安装libfastcommon
先解压libfastcommon。
[root@tracker local]# cd FastDFS[root@tracker FastDFS]# ll总用量 1016-rw-r--r--. 1 root root 809381 1月 8 23:30 fastdfs-6.07.tar.gz-rw-r--r--. 1 root root 19952 1月 8 23:30 fastdfs-nginx-module-1.22.tar.gz-rw-r--r--. 1 root root 206348 1月 8 23:30 libfastcommon-1.0.45.tar.gz[root@tracker FastDFS]# tar -zxvf libfastcommon-1.0.45.tar.gz
安装libfastcommon。
[root@tracker FastDFS]# ll总用量 1016-rw-r--r--. 1 root root 809381 1月 8 23:27 fastdfs-6.07.tar.gz-rw-r--r--. 1 root root 19952 1月 8 23:27 fastdfs-nginx-module-1.22.tar.gzdrwxrwxr-x. 5 root root 168 12月 25 10:25 libfastcommon-1.0.45-rw-r--r--. 1 root root 206348 1月 8 23:27 libfastcommon-1.0.45.tar.gz[root@tracker FastDFS]# cd libfastcommon-1.0.45[root@tracker libfastcommon-1.0.45]# ll总用量 44drwxrwxr-x. 2 root root 114 12月 25 10:25 doc-rw-rw-r--. 1 root root 12401 12月 25 10:25 HISTORY-rw-rw-r--. 1 root root 674 12月 25 10:25 INSTALL-rw-rw-r--. 1 root root 1607 12月 25 10:25 libfastcommon.spec-rw-rw-r--. 1 root root 7652 12月 25 10:25 LICENSE-rwxrwxr-x. 1 root root 3454 12月 25 10:25 make.shdrwxrwxr-x. 2 root root 191 12月 25 10:25 php-fastcommon-rw-rw-r--. 1 root root 2776 12月 25 10:25 READMEdrwxrwxr-x. 3 root root 4096 12月 25 10:25 src[root@tracker libfastcommon-1.0.45]# ./make.sh...[root@tracker libfastcommon-1.0.45]# ./make.sh install
安装fastdfs
先解压fastdfs。
[root@tracker libfastcommon-1.0.45]# cd ..[root@tracker FastDFS]# ll总用量 1016-rw-r--r--. 1 root root 809381 1月 8 23:27 fastdfs-6.07.tar.gz-rw-r--r--. 1 root root 19952 1月 8 23:27 fastdfs-nginx-module-1.22.tar.gzdrwxrwxr-x. 5 root root 168 1月 8 23:40 libfastcommon-1.0.45-rw-r--r--. 1 root root 206348 1月 8 23:27 libfastcommon-1.0.45.tar.gz[root@tracker FastDFS]# tar -zxvf fastdfs-6.07.tar.gz
安装fastdfs。
[root@tracker FastDFS]# ll总用量 1020drwxrwxr-x. 12 root root 4096 12月 31 11:18 fastdfs-6.07-rw-r--r--. 1 root root 809381 1月 8 23:27 fastdfs-6.07.tar.gz-rw-r--r--. 1 root root 19952 1月 8 23:27 fastdfs-nginx-module-1.22.tar.gzdrwxrwxr-x. 5 root root 168 1月 8 23:40 libfastcommon-1.0.45-rw-r--r--. 1 root root 206348 1月 8 23:27 libfastcommon-1.0.45.tar.gz[root@tracker FastDFS]# cd fastdfs-6.07[root@tracker fastdfs-6.07]# ll总用量 140drwxrwxr-x. 3 root root 4096 12月 31 11:18 clientdrwxrwxr-x. 2 root root 189 12月 31 11:18 commondrwxrwxr-x. 2 root root 146 12月 31 11:18 conf-rw-rw-r--. 1 root root 35067 12月 31 11:18 COPYING-3_0.txtdrwxrwxr-x. 4 root root 56 12月 31 11:18 docker-rw-rw-r--. 1 root root 3204 12月 31 11:18 fastdfs.spec-rw-rw-r--. 1 root root 37049 12月 31 11:18 HISTORYdrwxrwxr-x. 2 root root 27 12月 31 11:18 imagesdrwxrwxr-x. 2 root root 48 12月 31 11:18 init.d-rw-rw-r--. 1 root root 8344 12月 31 11:18 INSTALL-rwxrwxr-x. 1 root root 5517 12月 31 11:18 make.shdrwxrwxr-x. 2 root root 4096 12月 31 11:18 php_client-rw-rw-r--. 1 root root 2448 12月 31 11:18 README.md-rw-rw-r--. 1 root root 1700 12月 31 11:18 README_zh.md-rwxrwxr-x. 1 root root 1768 12月 31 11:18 restart.sh-rwxrwxr-x. 1 root root 763 12月 31 11:18 setup.sh-rwxrwxr-x. 1 root root 1680 12月 31 11:18 stop.shdrwxrwxr-x. 4 root root 4096 12月 31 11:18 storagedrwxrwxr-x. 2 root root 4096 12月 31 11:18 testdrwxrwxr-x. 2 root root 4096 12月 31 11:18 tracker[root@tracker fastdfs-6.07]# ./make.sh...[root@tracker fastdfs-6.07]# ./make.sh install
生成了一些命令,等下会用到。
[root@tracker fastdfs-6.07]# cd /usr/bin/[root@tracker bin]# ls fdfs_*fdfs_appender_test fdfs_append_file fdfs_delete_file fdfs_file_info fdfs_regenerate_filename fdfs_test fdfs_trackerd fdfs_upload_filefdfs_appender_test1 fdfs_crc32 fdfs_download_file fdfs_monitor fdfs_storaged fdfs_test1 fdfs_upload_appender
以上是tracker和storage都需要执行的操作,接下来是tracker和storage各自的配置和启动环节。
配置tracker
修改tracker的配置文件。
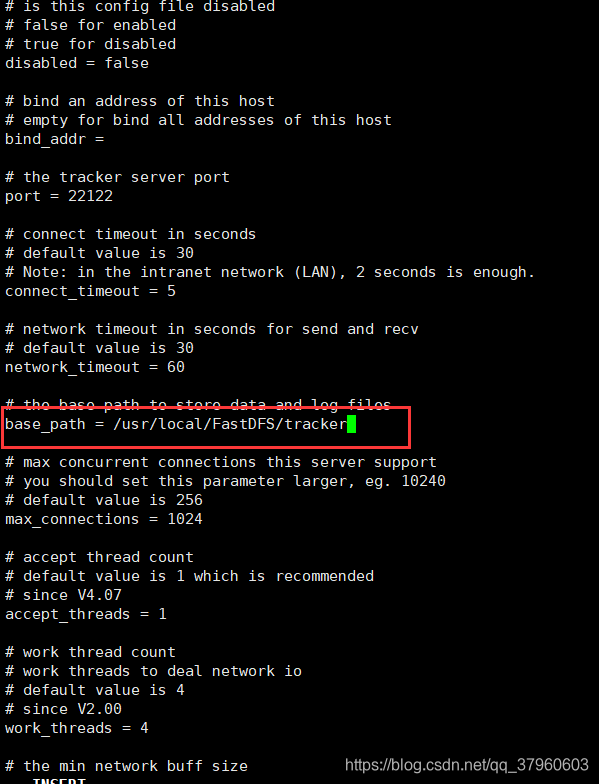
[root@tracker bin]# cd /usr/local/FastDFS[root@tracker FastDFS]# ll总用量 1020drwxrwxr-x. 12 root root 4096 12月 31 11:18 fastdfs-6.07-rw-r--r--. 1 root root 809381 1月 8 23:27 fastdfs-6.07.tar.gz-rw-r--r--. 1 root root 19952 1月 8 23:27 fastdfs-nginx-module-1.22.tar.gzdrwxrwxr-x. 5 root root 168 1月 8 23:40 libfastcommon-1.0.45-rw-r--r--. 1 root root 206348 1月 8 23:27 libfastcommon-1.0.45.tar.gz[root@tracker FastDFS]# cd fastdfs-6.07[root@tracker fastdfs-6.07]# ll总用量 144drwxrwxr-x. 3 root root 4096 1月 8 23:53 clientdrwxrwxr-x. 2 root root 4096 1月 8 23:52 commondrwxrwxr-x. 2 root root 146 12月 31 11:18 conf-rw-rw-r--. 1 root root 35067 12月 31 11:18 COPYING-3_0.txtdrwxrwxr-x. 4 root root 56 12月 31 11:18 docker-rw-rw-r--. 1 root root 3204 12月 31 11:18 fastdfs.spec-rw-rw-r--. 1 root root 37049 12月 31 11:18 HISTORYdrwxrwxr-x. 2 root root 27 12月 31 11:18 imagesdrwxrwxr-x. 2 root root 48 12月 31 11:18 init.d-rw-rw-r--. 1 root root 8344 12月 31 11:18 INSTALL-rwxrwxr-x. 1 root root 5517 12月 31 11:18 make.shdrwxrwxr-x. 2 root root 4096 12月 31 11:18 php_client-rw-rw-r--. 1 root root 2448 12月 31 11:18 README.md-rw-rw-r--. 1 root root 1700 12月 31 11:18 README_zh.md-rwxrwxr-x. 1 root root 1768 12月 31 11:18 restart.sh-rwxrwxr-x. 1 root root 763 12月 31 11:18 setup.sh-rwxrwxr-x. 1 root root 1680 12月 31 11:18 stop.shdrwxrwxr-x. 4 root root 4096 1月 8 23:53 storagedrwxrwxr-x. 2 root root 4096 12月 31 11:18 testdrwxrwxr-x. 2 root root 4096 1月 8 23:53 tracker[root@tracker fastdfs-6.07]# cd conf[root@tracker conf]# ll总用量 92-rw-rw-r--. 1 root root 23981 12月 31 11:18 anti-steal.jpg-rw-rw-r--. 1 root root 1909 12月 31 11:18 client.conf-rw-rw-r--. 1 root root 965 12月 31 11:18 http.conf-rw-rw-r--. 1 root root 31172 12月 31 11:18 mime.types-rw-rw-r--. 1 root root 10246 12月 31 11:18 storage.conf-rw-rw-r--. 1 root root 620 12月 31 11:18 storage_ids.conf-rw-rw-r--. 1 root root 9138 12月 31 11:18 tracker.conf[root@tracker conf]# vi tracker.conf
只需要修改一项配置即可,base_path用于存放tracker的数据与日志文件(大家按自己的喜好进行配置)。
启动tracker
先要创建刚刚配置的base_path。
[root@tracker conf]# mkdir -p /usr/local/FastDFS/tracker
现在可以启动tracker服务了。
[root@tracker conf]# pwd/usr/local/FastDFS/fastdfs-6.07/conf[root@tracker conf]# /usr/bin/fdfs_trackerd /usr/local/FastDFS/fastdfs-6.07/conf/tracker.conf
tracker服务启动成功。
[root@tracker conf]# ps -ef | grep trackerdroot 10150 1 0 00:10 ? 00:00:00 /usr/bin/fdfs_trackerd /usr/local/FastDFS/fastdfs-6.07/conf/tracker.confroot 10158 1280 0 00:10 pts/0 00:00:00 grep --color=auto trackerd
关闭tracker虚拟机的防火墙。
[root@tracker conf]# systemctl stop firewalld[root@tracker conf]# systemctl status firewalld ● firewalld.service - firewalld - dynamic firewall daemon Loaded: loaded (/usr/lib/systemd/system/firewalld.service; enabled; vendor preset: enabled) Active: inactive (dead) since 六 2021-01-09 10:34:15 CST; 10s ago Docs: man:firewalld(1) Process: 654 ExecStart=/usr/sbin/firewalld --nofork --nopid $FIREWALLD_ARGS (code=exited, status=0/SUCCESS) Main PID: 654 (code=exited, status=0/SUCCESS)1月 09 08:58:44 tracker systemd[1]: Starting firewalld - dynamic firewall daemon...1月 09 08:58:45 tracker systemd[1]: Started firewalld - dynamic firewall daemon.1月 09 08:58:46 tracker firewalld[654]: WARNING: AllowZoneDrifting is enabled. This is considered an insecure configuration option. It will be removed in a future release. Please...bling it now.1月 09 10:34:15 tracker systemd[1]: Stopping firewalld - dynamic firewall daemon...1月 09 10:34:15 tracker systemd[1]: Stopped firewalld - dynamic firewall daemon.Hint: Some lines were ellipsized, use -l to show in full.
配置storage
修改storage的配置文件。
[root@storage ~]# cd /usr/local/FastDFS/fastdfs-6.07/conf[root@storage conf]# vi storage.conf
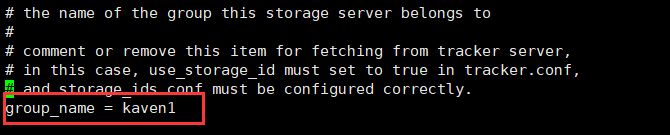
修改组名,当然这不是必须的,根据自己的喜好而定。
 端口可以不用修改。
  配置
配置base_path,用于存储日志文件。 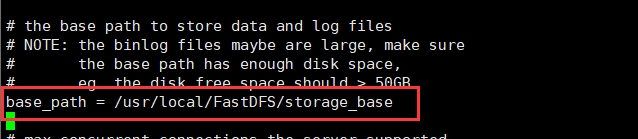 配置
配置store_path0,store_path0是FastDFS中storage存储用户文件的地方。 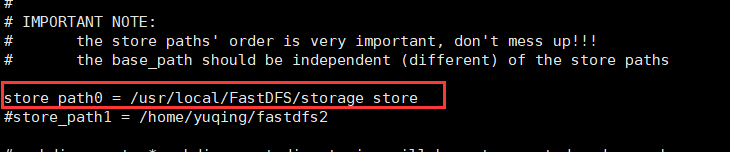 配置
配置tracker服务的地址,博主只启动了一个tracker服务,所以需要注释掉一个,tracker服务的IP地址为192.168.1.102,端口是FastDFS中tracker服务的默认端口22122。 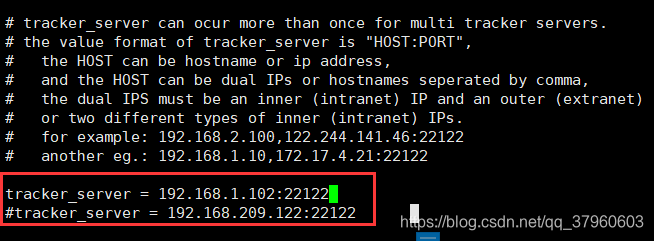
http.server_port这个端口是基于storage服务的web服务端口,FastDFS与Nginx结合时会使用到。 
创建刚刚配置的base_path和store_path0。
[root@storage conf]# mkdir -p /usr/local/FastDFS/storage_base[root@storage conf]# mkdir -p /usr/local/FastDFS/storage_store
启动storage
现在可以启动storage服务了。
[root@storage conf]# pwd/usr/local/FastDFS/fastdfs-6.07/conf[root@storage conf]# /usr/bin/fdfs_storaged /usr/local/FastDFS/fastdfs-6.07/conf/storage.conf
查看storage服务是否启动成功,很明显启动成功了。
[root@storage conf]# ps -ef | grep storagedroot 1287 1 0 09:32 ? 00:00:00 /usr/bin/fdfs_storaged /usr/local/FastDFS/fastdfs-6.07/conf/storage.confroot 1289 1222 0 09:33 pts/0 00:00:00 grep --color=auto storaged
copy下面两个文件到/etc/fdfs/下,FastDFS与Nginx结合时,Nginx需要访问这些文件。
[root@storage conf]# cp /usr/local/FastDFS/fastdfs-6.07/conf/http.conf /etc/fdfs/ [root@storage conf]# cp /usr/local/FastDFS/fastdfs-6.07/conf/mime.types /etc/fdfs/
关闭storage虚拟机的防火墙。
[root@storage conf]# systemctl stop firewalld[root@storage conf]# systemctl status firewalld ● firewalld.service - firewalld - dynamic firewall daemon Loaded: loaded (/usr/lib/systemd/system/firewalld.service; enabled; vendor preset: enabled) Active: inactive (dead) since 六 2021-01-09 10:39:29 CST; 7s ago Docs: man:firewalld(1) Process: 656 ExecStart=/usr/sbin/firewalld --nofork --nopid $FIREWALLD_ARGS (code=exited, status=0/SUCCESS) Main PID: 656 (code=exited, status=0/SUCCESS)1月 09 08:58:39 storage systemd[1]: Starting firewalld - dynamic firewall daemon...1月 09 08:58:41 storage systemd[1]: Started firewalld - dynamic firewall daemon.1月 09 08:58:41 storage firewalld[656]: WARNING: AllowZoneDrifting is enabled. This is considered an insecure configuration option. It will be removed in a future release. Please consider disabling it now.1月 09 10:39:29 xxx systemd[1]: Stopping firewalld - dynamic firewall daemon...1月 09 10:39:29 xxx systemd[1]: Stopped firewalld - dynamic firewall daemon.
测试
测试在storage上进行,需要先修改client的配置文件。
[root@storage conf]# ll总用量 92-rw-rw-r--. 1 root root 23981 12月 31 11:18 anti-steal.jpg-rw-rw-r--. 1 root root 1909 12月 31 11:18 client.conf-rw-rw-r--. 1 root root 965 12月 31 11:18 http.conf-rw-rw-r--. 1 root root 31172 12月 31 11:18 mime.types-rw-rw-r--. 1 root root 10268 1月 9 09:27 storage.conf-rw-rw-r--. 1 root root 620 12月 31 11:18 storage_ids.conf-rw-rw-r--. 1 root root 9138 12月 31 11:18 tracker.conf[root@storage conf]# vi client.conf
配置存储client日志文件的路径。
 配置
配置tracker服务的地址,和storage的配置文件是一样的。  创建存储
创建存储client日志文件的文件夹。 [root@storage conf]# mkdir -p /usr/local/FastDFS/client
先从网络上下载一张图片来进行测试。
[root@storage conf]# cd /usr/local/FastDFS[root@storage FastDFS]# mkdir test[root@storage FastDFS]# cd test[root@storage test]# wget https://pic4.zhimg.com/80/v2-a47051e92cf74930bedd7469978e6c08_hd.png--2021-01-09 13:17:45-- https://pic4.zhimg.com/80/v2-a47051e92cf74930bedd7469978e6c08_hd.png正在解析主机 pic4.zhimg.com (pic4.zhimg.com)... 122.205.109.41正在连接 pic4.zhimg.com (pic4.zhimg.com)|122.205.109.41|:443... 已连接。已发出 HTTP 请求,正在等待回应... 200 OK长度:10997 (11K) [image/png]正在保存至: “v2-a47051e92cf74930bedd7469978e6c08_hd.png”100%[=======================================================================================================================================================================>] 10,997 --.-K/s 用时 0s 2021-01-09 13:17:45 (173 MB/s) - 已保存 “v2-a47051e92cf74930bedd7469978e6c08_hd.png” [10997/10997])[root@storage test]# ll总用量 12-rw-r--r--. 1 root root 10997 8月 23 2019 v2-a47051e92cf74930bedd7469978e6c08_hd.png[root@storage test]# mv v2-a47051e92cf74930bedd7469978e6c08_hd.png kaven.png[root@storage test]# ll总用量 12-rw-r--r--. 1 root root 10997 8月 23 2019 kaven.png
使用fdfs_test命令来进行测试,很显然测试成功了。
[root@storage test]# /usr/bin/fdfs_test /usr/local/FastDFS/fastdfs-6.07/conf/client.conf upload kaven.pngThis is FastDFS client test program v6.07Copyright (C) 2008, Happy Fish / YuQingFastDFS may be copied only under the terms of the GNU GeneralPublic License V3, which may be found in the FastDFS source kit.Please visit the FastDFS Home Page http://www.fastken.com/ for more detail.[2021-01-09 13:19:42] DEBUG - base_path=/usr/local/FastDFS/client, connect_timeout=5, network_timeout=60, tracker_server_count=1, anti_steal_token=0, anti_steal_secret_key length=0, use_connection_pool=0, g_connection_pool_max_idle_time=3600s, use_storage_id=0, storage server id count: 0tracker_query_storage_store_list_without_group: server 1. group_name=, ip_addr=192.168.1.106, port=23000group_name=kaven1, ip_addr=192.168.1.106, port=23000storage_upload_by_filenamegroup_name=kaven1, remote_filename=M00/00/00/wKgBal_5PO6ATh4qAAAq9Wg-3NI680.pngsource ip address: 192.168.1.106file timestamp=2021-01-09 13:19:42file size=10997file crc32=1748950226example file url: http://192.168.1.106/kaven1/M00/00/00/wKgBal_5PO6ATh4qAAAq9Wg-3NI680.pngstorage_upload_slave_by_filenamegroup_name=kaven1, remote_filename=M00/00/00/wKgBal_5PO6ATh4qAAAq9Wg-3NI680_big.pngsource ip address: 192.168.1.106file timestamp=2021-01-09 13:19:42file size=10997file crc32=1748950226example file url: http://192.168.1.106/kaven1/M00/00/00/wKgBal_5PO6ATh4qAAAq9Wg-3NI680_big.png
下面这些是刚刚用来测试的图片文件元数据。
file timestamp=2021-01-09 13:19:42file size=10997file crc32=1748950226
这是由FastDFS创建的图片文件url。
example file url: http://192.168.1.106/kaven1/M00/00/00/wKgBal_5PO6ATh4qAAAq9Wg-3NI680.png
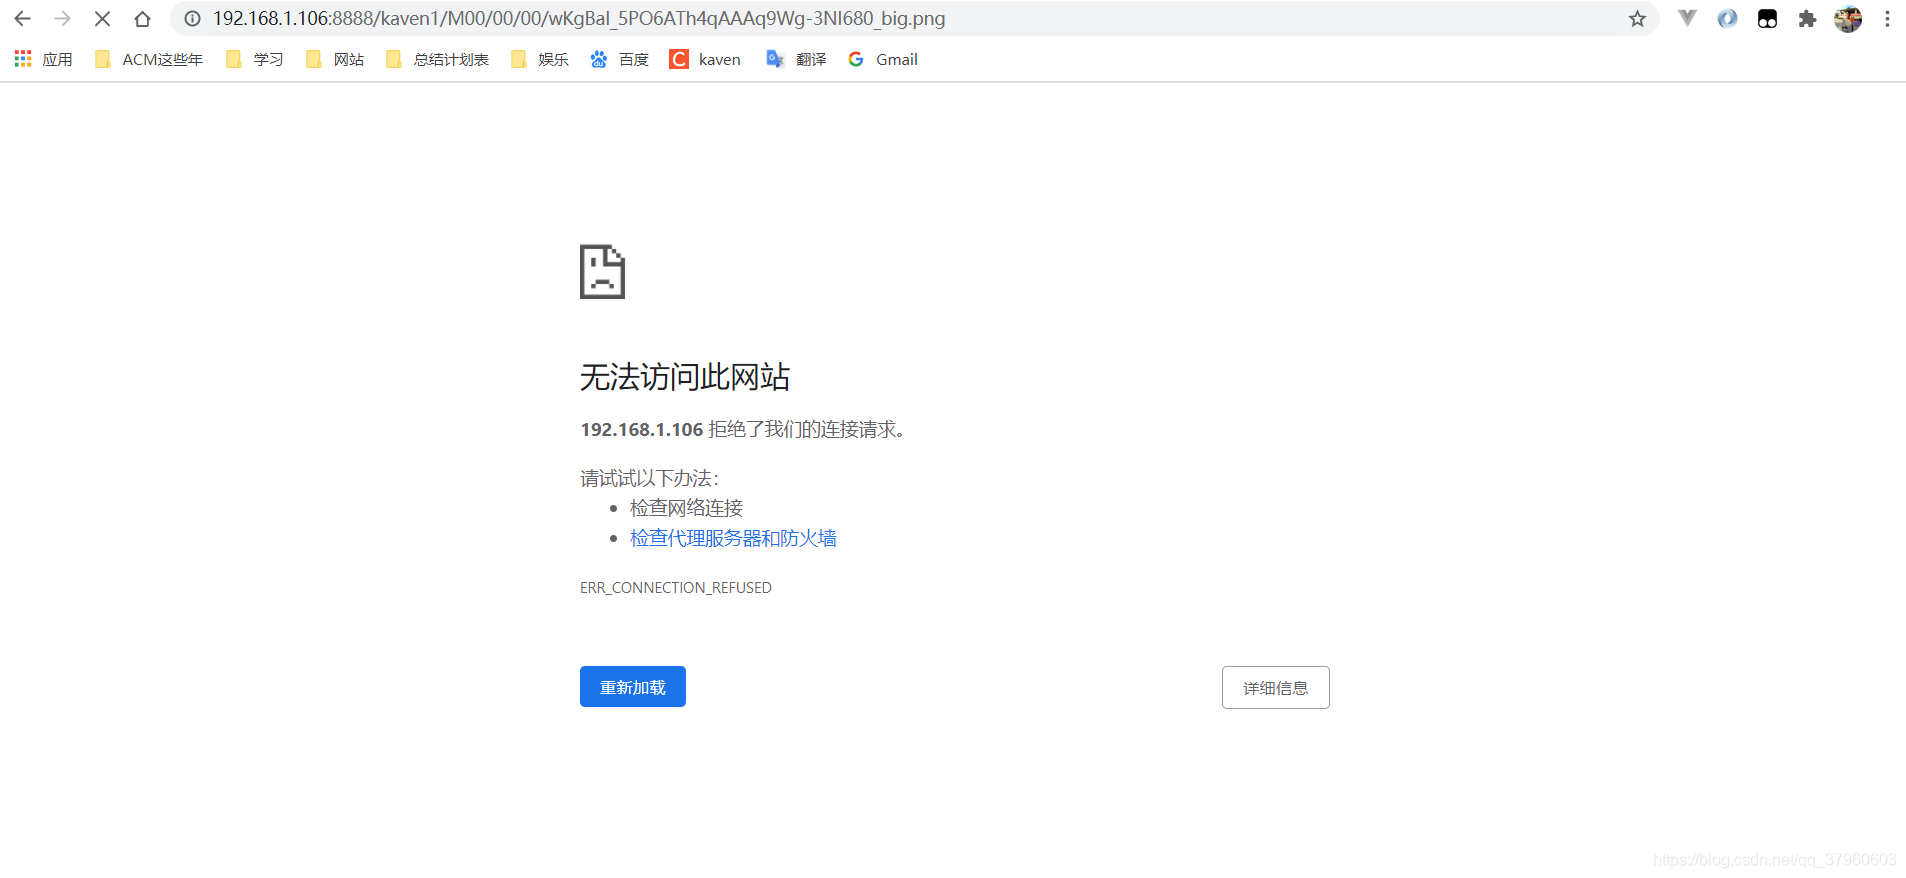
现在还访问不了,需要FastDFS结合Nginx来实现访问服务。
下面分别是组名和文件名,组名是博主之前在storage的配置文件中设置的,文件名是FastDFS自动生成的。
group_name=kaven1, remote_filename=M00/00/00/wKgBal_5PO6ATh4qAAAq9Wg-3NI680.png
这个图片文件其实在storage的配置文件中设置的store_path0下,kaven1和M00都是虚拟的路径。
[root@storage test]# cd /usr/local/FastDFS[root@storage FastDFS]# ll总用量 1020drwxr-xr-x. 2 root root 6 1月 9 10:31 clientdrwxrwxr-x. 12 root root 4096 12月 31 11:18 fastdfs-6.07-rw-r--r--. 1 root root 809381 1月 8 23:30 fastdfs-6.07.tar.gz-rw-r--r--. 1 root root 19952 1月 8 23:30 fastdfs-nginx-module-1.22.tar.gzdrwxrwxr-x. 5 root root 168 1月 8 23:40 libfastcommon-1.0.45-rw-r--r--. 1 root root 206348 1月 8 23:30 libfastcommon-1.0.45.tar.gzdrwxr-xr-x. 4 root root 30 1月 9 09:32 storage_basedrwxr-xr-x. 3 root root 18 1月 9 10:34 storage_storedrwxr-xr-x. 2 root root 21 1月 9 10:25 test[root@storage FastDFS]# cd storage_store[root@storage storage_store]# ll总用量 12drwxr-xr-x. 258 root root 8192 1月 9 10:34 data[root@storage storage_store]# cd data[root@storage data]# ls00 05 0A 0F 14 19 1E 23 28 2D 32 37 3C 41 46 4B 50 55 5A 5F 64 69 6E 73 78 7D 82 87 8C 91 96 9B A0 A5 AA AF B4 B9 BE C3 C8 CD D2 D7 DC E1 E6 EB F0 F5 FA FF01 06 0B 10 15 1A 1F 24 29 2E 33 38 3D 42 47 4C 51 56 5B 60 65 6A 6F 74 79 7E 83 88 8D 92 97 9C A1 A6 AB B0 B5 BA BF C4 C9 CE D3 D8 DD E2 E7 EC F1 F6 FB02 07 0C 11 16 1B 20 25 2A 2F 34 39 3E 43 48 4D 52 57 5C 61 66 6B 70 75 7A 7F 84 89 8E 93 98 9D A2 A7 AC B1 B6 BB C0 C5 CA CF D4 D9 DE E3 E8 ED F2 F7 FC03 08 0D 12 17 1C 21 26 2B 30 35 3A 3F 44 49 4E 53 58 5D 62 67 6C 71 76 7B 80 85 8A 8F 94 99 9E A3 A8 AD B2 B7 BC C1 C6 CB D0 D5 DA DF E4 E9 EE F3 F8 FD04 09 0E 13 18 1D 22 27 2C 31 36 3B 40 45 4A 4F 54 59 5E 63 68 6D 72 77 7C 81 86 8B 90 95 9A 9F A4 A9 AE B3 B8 BD C2 C7 CC D1 D6 DB E0 E5 EA EF F4 F9 FE[root@storage data]# cd 00[root@storage 00]# ls00 05 0A 0F 14 19 1E 23 28 2D 32 37 3C 41 46 4B 50 55 5A 5F 64 69 6E 73 78 7D 82 87 8C 91 96 9B A0 A5 AA AF B4 B9 BE C3 C8 CD D2 D7 DC E1 E6 EB F0 F5 FA FF01 06 0B 10 15 1A 1F 24 29 2E 33 38 3D 42 47 4C 51 56 5B 60 65 6A 6F 74 79 7E 83 88 8D 92 97 9C A1 A6 AB B0 B5 BA BF C4 C9 CE D3 D8 DD E2 E7 EC F1 F6 FB02 07 0C 11 16 1B 20 25 2A 2F 34 39 3E 43 48 4D 52 57 5C 61 66 6B 70 75 7A 7F 84 89 8E 93 98 9D A2 A7 AC B1 B6 BB C0 C5 CA CF D4 D9 DE E3 E8 ED F2 F7 FC03 08 0D 12 17 1C 21 26 2B 30 35 3A 3F 44 49 4E 53 58 5D 62 67 6C 71 76 7B 80 85 8A 8F 94 99 9E A3 A8 AD B2 B7 BC C1 C6 CB D0 D5 DA DF E4 E9 EE F3 F8 FD04 09 0E 13 18 1D 22 27 2C 31 36 3B 40 45 4A 4F 54 59 5E 63 68 6D 72 77 7C 81 86 8B 90 95 9A 9F A4 A9 AE B3 B8 BD C2 C7 CC D1 D6 DB E0 E5 EA EF F4 F9 FE[root@storage 00]# cd 00[root@storage 00]# lswKgBal_5PO6ATh4qAAAq9Wg-3NI680_big.png wKgBal_5PO6ATh4qAAAq9Wg-3NI680_big.png-m wKgBal_5PO6ATh4qAAAq9Wg-3NI680.png wKgBal_5PO6ATh4qAAAq9Wg-3NI680.png-m
安装fastdfs-nginx-module
安装fastdfs-nginx-module也是只在storage上进行,先解压fastdfs-nginx-module。
[root@storage 00]# cd /usr/local/FastDFS[root@storage FastDFS]# ll总用量 1020drwxr-xr-x. 2 root root 6 1月 9 10:31 clientdrwxrwxr-x. 12 root root 4096 12月 31 11:18 fastdfs-6.07-rw-r--r--. 1 root root 809381 1月 8 23:30 fastdfs-6.07.tar.gz-rw-r--r--. 1 root root 19952 1月 8 23:30 fastdfs-nginx-module-1.22.tar.gzdrwxrwxr-x. 5 root root 168 1月 8 23:40 libfastcommon-1.0.45-rw-r--r--. 1 root root 206348 1月 8 23:30 libfastcommon-1.0.45.tar.gzdrwxr-xr-x. 4 root root 30 1月 9 09:32 storage_basedrwxr-xr-x. 3 root root 18 1月 9 10:34 storage_storedrwxr-xr-x. 2 root root 21 1月 9 10:25 test[root@storage FastDFS]# tar -zxvf fastdfs-nginx-module-1.22.tar.gzfastdfs-nginx-module-1.22/fastdfs-nginx-module-1.22/HISTORYfastdfs-nginx-module-1.22/INSTALLfastdfs-nginx-module-1.22/src/fastdfs-nginx-module-1.22/src/common.cfastdfs-nginx-module-1.22/src/common.hfastdfs-nginx-module-1.22/src/configfastdfs-nginx-module-1.22/src/mod_fastdfs.conffastdfs-nginx-module-1.22/src/ngx_http_fastdfs_module.c
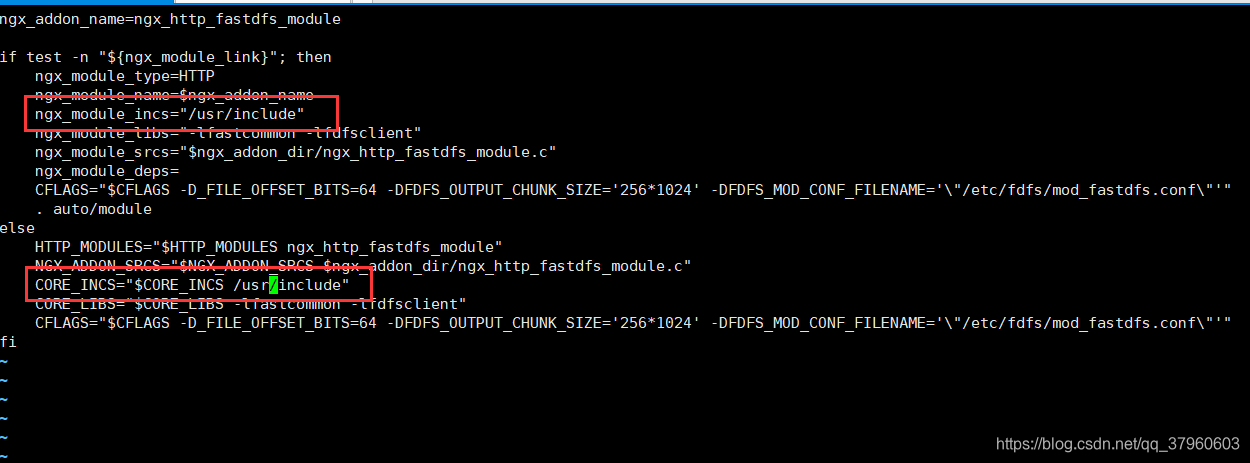
修改配置文件config。
[root@storage FastDFS]# cd fastdfs-nginx-module-1.22[root@storage fastdfs-nginx-module-1.22]# ll总用量 8-rw-rw-r--. 1 root root 3036 11月 19 2019 HISTORY-rw-rw-r--. 1 root root 2001 11月 19 2019 INSTALLdrwxrwxr-x. 2 root root 109 11月 19 2019 src[root@storage fastdfs-nginx-module-1.22]# cd src[root@storage src]# ll总用量 84-rw-rw-r--. 1 root root 43507 11月 19 2019 common.c-rw-rw-r--. 1 root root 3995 11月 19 2019 common.h-rw-rw-r--. 1 root root 848 11月 19 2019 config-rw-rw-r--. 1 root root 3725 11月 19 2019 mod_fastdfs.conf-rw-rw-r--. 1 root root 28668 11月 19 2019 ngx_http_fastdfs_module.c[root@storage src]# vi config
修改如下(就是将两个这路径/usr/local/include都修改成/usr/include):
 修改配置文件
mod_fastdfs.conf。 [root@storage src]# vi mod_fastdfs.conf
修改base_path,用于存储日志文件。
 修改
修改tracker服务地址。  修改组名,与之前的配置保持一致即可,并且将
url_have_group_name设置为true,即url中会出现组名。 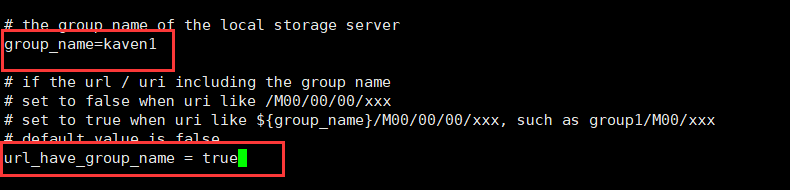 修改
修改store_path0,设置和storage配置文件中的store_path0一样即可。 
创建base_path。
[root@storage src]# mkdir /usr/local/FastDFS/tmp
copy这个配置文件到/etc/fdfs/下供Nginx结合fastdfs-nginx-module访问使用。
[root@storage src]# cp /usr/local/FastDFS/fastdfs-nginx-module-1.22/src/mod_fastdfs.conf /etc/fdfs/
安装Nginx
只需要在storage上安装Nginx即可,因为文件都是存储在storage上。
下载Nginx
Nginx下载地址:
下载稳定版(Linux系统)。
storage虚拟机中。  解压Nginx
 /usr/local/FastDFS/fastdfs-nginx-module-1.22/src,该路径是有用的,大家也输出一下,不然又得cd过去查。
[root@storage src]# pwd/usr/local/FastDFS/fastdfs-nginx-module-1.22/src[root@storage src]# cd /usr/local[root@storage local]# ll总用量 1016drwxr-xr-x. 2 root root 6 4月 11 2018 bindrwxr-xr-x. 2 root root 6 4月 11 2018 etcdrwxr-xr-x. 2 root root 6 4月 11 2018 gamesdrwxr-xr-x. 2 root root 6 4月 11 2018 includedrwxr-xr-x. 2 root root 6 4月 11 2018 libdrwxr-xr-x. 2 root root 6 4月 11 2018 lib64drwxr-xr-x. 2 root root 6 4月 11 2018 libexec-rw-r--r--. 1 root root 1039530 1月 7 16:08 nginx-1.18.0.tar.gzdrwxr-xr-x. 2 root root 6 4月 11 2018 sbindrwxr-xr-x. 5 root root 49 1月 7 15:44 sharedrwxr-xr-x. 2 root root 6 4月 11 2018 src[root@storage local]# tar -zxvf nginx-1.18.0.tar.gz
编译和安装Nginx
[root@storage local]# cd nginx-1.18.0[root@storage nginx-1.18.0]# ll总用量 764drwxr-xr-x. 6 1001 1001 4096 1月 7 16:24 auto-rw-r--r--. 1 1001 1001 302863 4月 21 2020 CHANGES-rw-r--r--. 1 1001 1001 462213 4月 21 2020 CHANGES.rudrwxr-xr-x. 2 1001 1001 168 1月 7 16:24 conf-rwxr-xr-x. 1 1001 1001 2502 4月 21 2020 configuredrwxr-xr-x. 4 1001 1001 72 1月 7 16:24 contribdrwxr-xr-x. 2 1001 1001 40 1月 7 16:24 html-rw-r--r--. 1 1001 1001 1397 4月 21 2020 LICENSEdrwxr-xr-x. 2 1001 1001 21 1月 7 16:24 man-rw-r--r--. 1 1001 1001 49 4月 21 2020 READMEdrwxr-xr-x. 9 1001 1001 91 1月 7 16:24 src
先进行配置,使用--add-module选项给Nginx添加module,其实就是将FastDFS(fastdfs-nginx-module)与Nginx进行结合。
[root@storage nginx-1.18.0]# ./configure --add-module=/usr/local/FastDFS/fastdfs-nginx-module-1.22/src
编译与安装。
[root@storage nginx-1.18.0]# make...[root@storage nginx-1.18.0]# make install
修改Nginx配置
[root@storage nginx-1.18.0]# cd /usr/local/nginx/conf[root@storage conf]# ll总用量 68-rw-r--r--. 1 root root 1077 1月 9 11:41 fastcgi.conf-rw-r--r--. 1 root root 1077 1月 9 11:41 fastcgi.conf.default-rw-r--r--. 1 root root 1007 1月 9 11:41 fastcgi_params-rw-r--r--. 1 root root 1007 1月 9 11:41 fastcgi_params.default-rw-r--r--. 1 root root 2837 1月 9 11:41 koi-utf-rw-r--r--. 1 root root 2223 1月 9 11:41 koi-win-rw-r--r--. 1 root root 5231 1月 9 11:41 mime.types-rw-r--r--. 1 root root 5231 1月 9 11:41 mime.types.default-rw-r--r--. 1 root root 2656 1月 9 11:41 nginx.conf-rw-r--r--. 1 root root 2656 1月 9 11:41 nginx.conf.default-rw-r--r--. 1 root root 636 1月 9 11:41 scgi_params-rw-r--r--. 1 root root 636 1月 9 11:41 scgi_params.default-rw-r--r--. 1 root root 664 1月 9 11:41 uwsgi_params-rw-r--r--. 1 root root 664 1月 9 11:41 uwsgi_params.default-rw-r--r--. 1 root root 3610 1月 9 11:41 win-utf[root@storage conf]# vi nginx.conf
添加一个serve,如下所示。
server { listen 8888; ## 该端口要与storage.conf中的http.server_port相同 server_name localhost; location /kaven1/M00 { ## 组名kaven1和M00是虚拟的路径,所以这里需要配置一下 ngx_fastdfs_module; } } 
启动Nginx
检查Nginx配置文件是否符合要求,很显然是符合要求的。
[root@storage conf]# cd ..[root@storage nginx]# cd sbin[root@storage sbin]# ./nginx -tngx_http_fastdfs_set pid=12499nginx: the configuration file /usr/local/nginx/conf/nginx.conf syntax is oknginx: configuration file /usr/local/nginx/conf/nginx.conf test is successful
启动Nginx,可以看到ngx_http_fastdfs_set进程也启动了。
[root@storage sbin]# ./nginxngx_http_fastdfs_set pid=12508
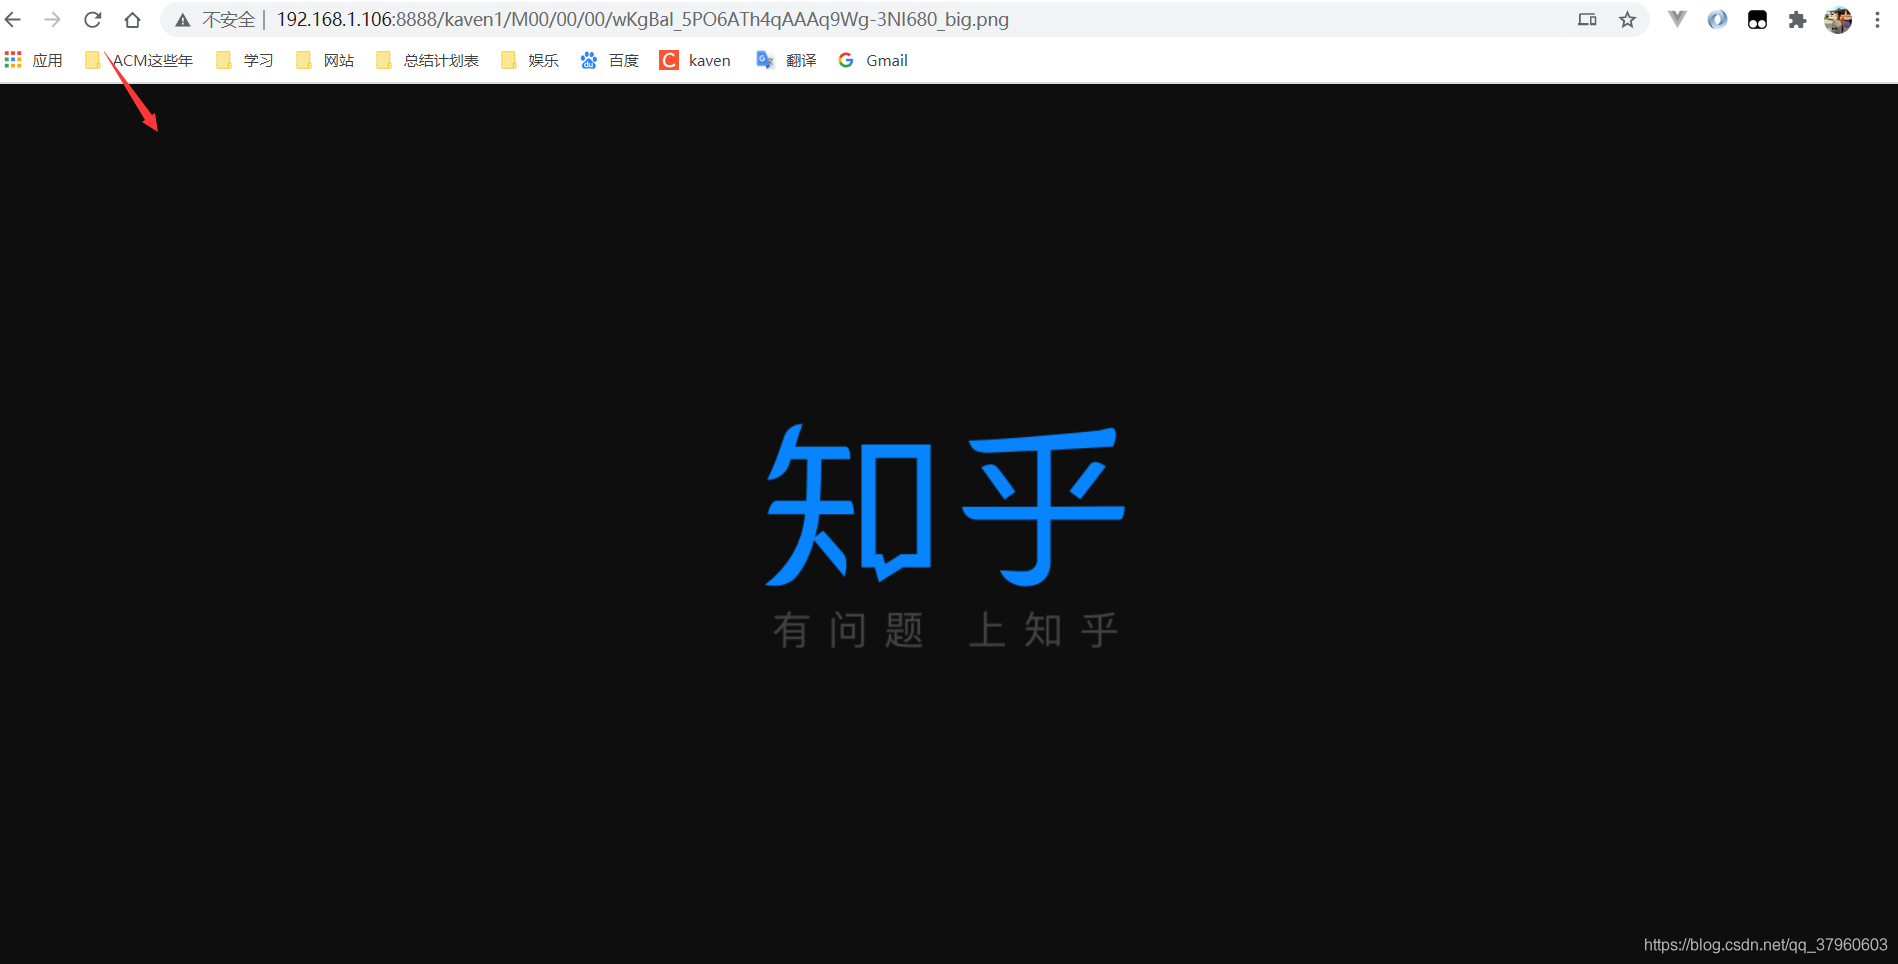
现在就可以使用Nginx访问FastDFS上的文件了。
记得加上设置的端口8888。
http://192.168.1.106:8888/kaven1/M00/00/00/wKgBal_5FneAK_TfAAAOi5813CQ7747410
写博客是博主记录自己的学习过程,如果有错误,请指正,谢谢!
转载地址:https://kaven.blog.csdn.net/article/details/112385621 如侵犯您的版权,请留言回复原文章的地址,我们会给您删除此文章,给您带来不便请您谅解!
发表评论
最新留言
关于作者
