本文共 10970 字,大约阅读时间需要 36 分钟。
ElasticSearch
ES是一个基于Lucene的分布式全文搜索服务器,它提供了一个分布式多用户能力的全文搜索引擎,基于RESTful web接口。它是用Java开发的,是当前流行的企业级搜索引擎。和SQL Server的全文索引(Fulltext Index)有点类似,都是基于分词和分段的全文搜索引擎,具有分词,同义词,词干查询的功能,但是ES天生具有分布式和实时的属性,设计用于云计算中,能够达到实时搜索,稳定,可靠,快速,安装使用方便。
通俗的讲,Elasticsearch就是一款面向文档的NoSQL,使用JSON作为文档序列化格式。但是,它的高级之处在于,使用Lucene作为核心来实现所有索引和搜索的功能,使得每个文档的内容都可以被索引、搜索、排序、过滤。同时,提供了丰富的聚合功能,可以对数据进行多维度分析。对外统一使用REST API接口进行沟通,即Client与Server之间使用HTTP协议通信。本随笔演示在Windows环境中安装ElasticSearch,以及用于管理ElasticSearch的Head插件。
下载地址:https://www.elastic.co/downloads/elasticsearch

bin:可以执行文件 config:配置文件 data:es存放数据的文件 lib:运行所需类库 logs:日志文件 modules:加载模块列表(其实是必要插件)
plugins:插件文件(需要自定义安装)
解压到指定目录。运行bin\elasticsearch.bat
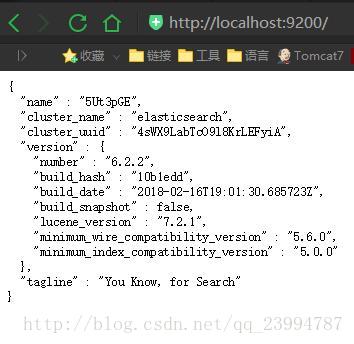
打开浏览器,输入 http://localhost:9200 ,显式以下画面,说明ES安装成功。
安装head插件为了便于管理ES,本文使用head插件,这是最初级的管理工具,在浏览器中显示ES集群,索引等信息,十分好用。1,在命令行中安装插件
按住Windows+R,输入cmd,打开命令行工具,进入到ElasticSearch的bin目录(或者直接在bin目录地址栏键入cmd然后回车),使用ES命令安装插件。
plugin install mobz/elasticsearch-head
2.通过zip包安装
1. https://github.com/mobz/elasticsearch-head下载zip 解压
2. 建立elasticsearch-2.3.1\plugins\head文件 3. 将解压后的elasticsearch-head-master文件夹下的文件copy到head 4. 运行es5. 打开http://localhost:9200/_plugin/head/
通过网页管理ElasticSearch
在本地浏览器中输入http://localhost:9200/_plugin/head/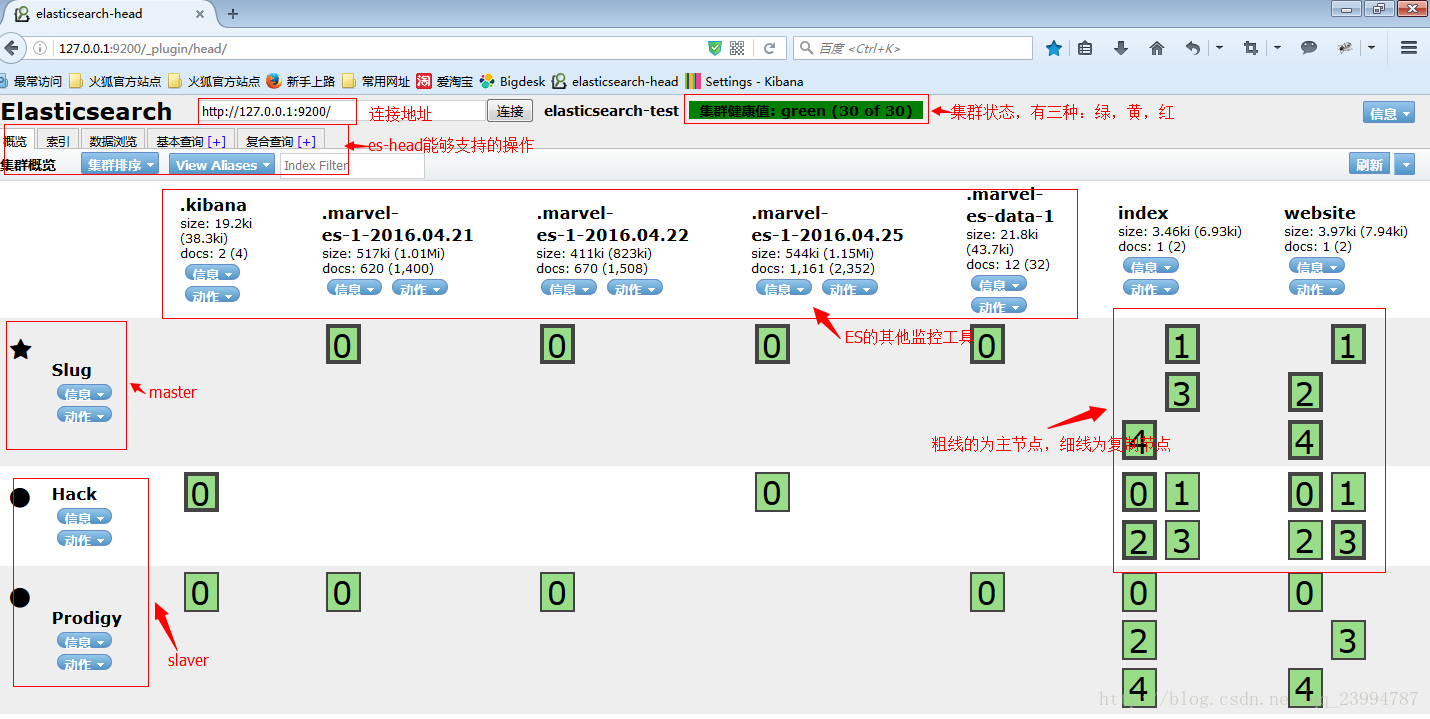
1.注意一点如果你安装后启动不了,打开插件出现下面这个!

解决办法 : 去安装目录下找到elasticsearch-6.2.2\config\elasticsearch.yml这个文件打开写入这俩行即可。
http.cors.enabled: true http.cors.allow-origin: "*"
Enable CORS in elasticsearch
When not running as a plugin of elasticsearch (which is not even possible from version 5) you must enable in elasticsearch otherwise your browser will rejects requests which appear insecure.
In elasticsearch configuration;
addhttp.cors.enabled: trueyou must also sethttp.cors.allow-originbecause no origin allowed by default.http.cors.allow-origin: ""is valid value, however it’s considered as a security risk as your cluster is open to cross origin from anywhere.
Basic Authentication
elasticsearch-head will add basic auth headers to each request if you pass in the You will also need to add http.cors.allow-headers: Authorization to the elasticsearch configuration
x-pack
elasticsearch x-pack requires basic authentication and CORS as described above. Make sure you have the correct CORS setup and then open es-head with a url like “http://localhost:9100/?auth_user=elastic&auth_password=changeme”
在存储上的基本概念,这里将其与MySQL进行了对比,从而可以更清晰的搞清楚每个概念的意义。
| Elasticsearch | MySQL |
|---|---|
| index(索引,名词) | database |
| doc type(文档类型) | table |
| document(文档) | row |
| field(字段) | column |
| mapping(映射) | schema |
| query DSL(查询语言) | SQL |
然后,来看看倒排索引的概念(官方解释)。倒排索引是搜索引擎的基石,也是Elasticsearch能实现快速全文搜索的根本。归纳起来,主要是对一个文档内容做两步操作:分词、建立“单词-文档”列表。举个例子,假如有下面两个文档:
1. {"content": "The quick brown fox jumped over the lazy dog"}2. {"content": "Quick brown foxes leap over lazy dogs in summer"} Elasticsearch会使用分词器对content字段的内容进行分词,再根据单词在文档中是否出现建立如下所示的列表,√表示单词在文档中有出现。假如我们想搜索“quick brown”,只需要找到每个词在哪个文档中出现即可。如果有多个文档匹配,可以根据匹配的程度进行打分,找出相关性高的文档。
| Term | Doc_1 | Doc_2 |
|---|---|---|
| Quick | √ | |
| The | √ | |
| brown | √ | √ |
| dog | √ | |
| dogs | √ | |
| fox | √ | |
| foxes | √ | |
| in | √ | |
| jumped | √ | |
| lazy | √ | √ |
| leap | √ | |
| over | √ | √ |
| quick | √ | |
| summer | √ | |
| the | √ |
最后,我们再回过头看看上面的映射的概念。类似于MySQL在db schema中申明每个列的数据类型、索引类型等,Elasticsearch中使用mapping来做这件事。常用的是,在mapping中申明字段的数据类型、是否建立倒排索引、建立倒排索引时使用什么分词器。默认情况下,Elasticsearch会为所有的string类型数据使用standard分词器建立倒排索引。
查看mapping:GET https://localhost:9200//_mappingNOTE: 这里的index是blog,doc type是test{ "blog": { "mappings": { "test": { "properties": { "activity_type": { "type": "string", "index": "not_analyzed" }, "address": { "type": "string", "analyzer": "ik_smart" }, "happy_party_id": { "type": "integer" }, "last_update_time": { "type": "date", "format": "yyyy-MM-dd HH:mm:ss" } } } } }}
数据插入
在MySQL中,我们需要先建立database和table,申明db schema后才可以插入数据。而在Elasticsearch,可以直接插入数据,系统会自动建立缺失的index和doc type,并对字段建立mapping。因为半结构化数据的数据结构通常是动态变化的,我们无法预知某个文档中究竟有哪些字段,如果每次插入数据都需要提前建立index、type、mapping,那就失去了其作为NoSQL的优势了。
直接插入数据:POST https://localhost:9200/blog/test{ "count": 5, "desc": "hello world"} 查看索引:GET https://localhost:9200/blog/_mapping{ "blog": { "mappings": { "test": { "properties": { "count": { "type": "long" }, "desc": { "type": "string" } } } } }} 然而这种灵活性是有限,比如上文我们提到,默认情况下,Elasticsearch会为所有的string类型数据使用standard分词器建立倒排索引,那么如果某些字段不想建立倒排索引怎么办。Elasticsearch提供了 dynamic template 的概念来针对一组index设置默认mapping,只要index的名称匹配了,就会使用该template设置的mapping进行字段映射。 ??下面所示即创建一个名称为blog的template,该template会自动匹配以”blog_”开头的index,为其自动建立mapping,对文档中的所有string自动增加一个.raw字段,并且该字段不做索引。 这也是ELK中的做法,可以查看ELK系统中Elasticsearch的template,会发现有一个名为logstash的template。
创建template:POST https://localhost:9200/_template/blog{ "template": "blog_*", "mappings": { "_default_": { "dynamic_templates": [{ "string_fields": { "mapping": { "type": "string", "fields": { "raw": { "index": "not_analyzed", "ignore_above": 256, "type": "string" } } }, "match_mapping_type": "string" } }], "properties": { "timestamp": { "doc_values": true, "type": "date" } }, "_all": { "enabled": false } } }} 直接插入数据:POST https://localhost:9200/blog_2016-12-25/test{ "count": 5, "desc": "hello world"} 插入问题还有个话题就是 批量插入 。Elasticsearch提供了 bulk API 用来做批量的操作,你可以在该API中自由组合你要做的操作和数据,一次性发送给Elasticsearch进行处理,其格式是这样的。 action_and_meta_data\noptional_source\naction_and_meta_data\noptional_source\n....action_and_meta_data\noptional_source\n 比如:{ "index" : { "_index" : "test", "_type" : "type1", "_id" : "1" } }{ "field1" : "value1" }{ "delete" : { "_index" : "test", "_type" : "type1", "_id" : "2" } }{ "create" : { "_index" : "test", "_type" : "type1", "_id" : "3" } }{ "field1" : "value3" }{ "update" : {"_id" : "1", "_type" : "type1", "_index" : "test"} }{ "doc" : {"field2" : "value2"} } 如果是针对相同的index和doc type进行操作,则在REST API中指定index和type即可。批量插入的操作举例如下: 批量插入:POST https://localhost:9200/blog_2016-12-24/test/_bulk{"index": {}}{"count": 5, "desc": "hello world 111"}{"index": {}}{"count": 6, "desc": "hello world 222"}{"index": {}}{"count": 7, "desc": "hello world 333"}{"index": {}}{"count": 8, "desc": "hello world 444"} 查看插入的结果:GET https://localhost:9200/blog_2016-12-24/test/_search 数据查询
Elasticsearch的查询语法(query DSL)分为两部分:query和filter,区别在于查询的结果是要完全匹配还是相关性匹配。filter查询考虑的是“文档中的字段值是否等于给定值”,答案在“是”与“否”中;而query查询考虑的是“文档中的字段值与给定值的匹配程度如何”,会计算出每份文档与给定值的相关性分数,用这个分数对匹配了的文档进行相关性排序。
??在实际使用中,要注意两点:第一,filter查询要在没有做倒排索引的字段上做,即上面mapping中增加的.raw字段;第二,通常使用filter来缩小查询范围,使用query进行搜索,即二者配合使用。举例来看,注意看三个不同查询在写法上的区别:
1. 只使用query进行查询:POST https://localhost:9200/user_action/_search查询的结果是page_name字段中包含了wechat所有文档这里使用size来指定返回文档的数量,默认Elasticsearch是返回前100条数据的{ "query": { "bool": { "must": [{ "match": { "page_name": "wechat" } }, { "range": { "timestamp": { "gte": 1481218631, "lte": 1481258231, "format": "epoch_second" } } }] } }, "size": 2} 2. 只使用filter进行查询:POST https://localhost:9200/user_action/_search查询的结果是page_name字段值等于"example.cn/wechat/view.html"的所有文档{ "filter": { "bool": { "must": [{ "term": { "page_name.raw": "example.cn/wechat/view.html" } }, { "range": { "timestamp": { "gte": 1481218631, "lte": 1481258231, "format": "epoch_second" } } }] } }, "size": 2} 3. 同时使用query与filter进行查询:POST https://localhost:9200/user_action/_search查询的结果是page_name字段值等于"example.cn/wechat/view.html"的所有文档{ "query": { "bool": { "filter": [{ "bool": { "must": [{ "term": { "page_name.raw": "job.gikoo.cn/wechat/view.html" } }, { "range": { "timestamp": { "gte": 1481218631, "lte": 1481258231, "format": "epoch_second" } } }] } }] } }, "size": 2} 聚合分析
类似于MySQL中的聚合由分组和聚合计算两种,Elasticsearch的聚合也有两部分组成:Buckets与Metrics。Buckets相当于SQL中的分组group by,而Metrics则相当于SQL中的聚合函数COUNT,SUM,MAX,MIN等等。聚合分析自然离不开对多个字段值进行分组,在MySQL中,我们只要使用“group by c1, c2, c3”就可以完成这样的功能,但是Elasticsearch没有这样的语法。Elasticsearch提供了另一种方法,即Buckets嵌套,仔细想想,似乎这种设计更加符合人的思维方式。举例来看具体操作方法:
1. 最简单的聚合查询POST https://localhost:9200/user_action/_search为了简单,这里删除了query的条件描述将符合条件的文档按照公司进行聚合这里有两个size,和aggs并列的size=0表示返回结果不包含查询结果,只返回聚合结果,terms里面的size表示返回的聚合结果数量{ "aggs": { "company_terms": { "terms": { "field": "company", "size": 2 } } }, "size": 0} 2. Buckets与Metric配合POST https://localhost:9200/user_action/_search将符合条件的文档按照公司进行聚合,并获取每个公司最近一次操作的时间{ "aggs": { "company_terms": { "terms": { "field": "company", "size": 2 }, "aggs": { "latest_record": { "max": { "field": "timestamp" } } } } }, "size": 0} 3. Buckets嵌套POST https://localhost:9200/user_action/_search将符合条件的文档先按照公司进行聚合,再对每个公司下的门店进行聚合,并获取每个门店最近一次操作的时间{ "aggs": { "company_terms": { "terms": { "field": "company", "size": 1 }, "aggs": { "store_terms": { "terms": { "field": "store", "size": 2 }, "aggs": { "latest_record": { "max": { "field": "timestamp" } } } } } } }, "size": 0} 转载地址:https://kevin.blog.csdn.net/article/details/79385749 如侵犯您的版权,请留言回复原文章的地址,我们会给您删除此文章,给您带来不便请您谅解!
发表评论
最新留言
关于作者
