Linux系统集群架构线上项目配置实战(二)
 安装配置expect服务
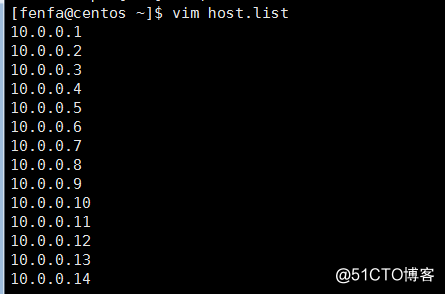
 只需要将文件替换成你所需要分发的文件即可

发布日期:2021-07-01 03:56:50
浏览次数:2
分类:技术文章
本文共 3716 字,大约阅读时间需要 12 分钟。
分发hosts文件到其它服务器
分发服务器使用全网备份服务器 首先创建分发用户[root@centos ~]# useradd fenfa -u 999[root@centos ~]# echo "123456"|passwd --stdin fenfaChanging password for user fenfa.passwd: all authentication tokens updated successfully.[root@centos ~]# /bin/cp /etc/sudoers /etc/sudoers.bak[root@centos ~]# echo "fenfa ALL=(root) NOPASSWD:/usr/bin/rsync" >>/etc/sudoers[root@centos ~]# tail -1 /etc/sudoersfenfa ALL=(root) NOPASSWD:/usr/bin/rsync
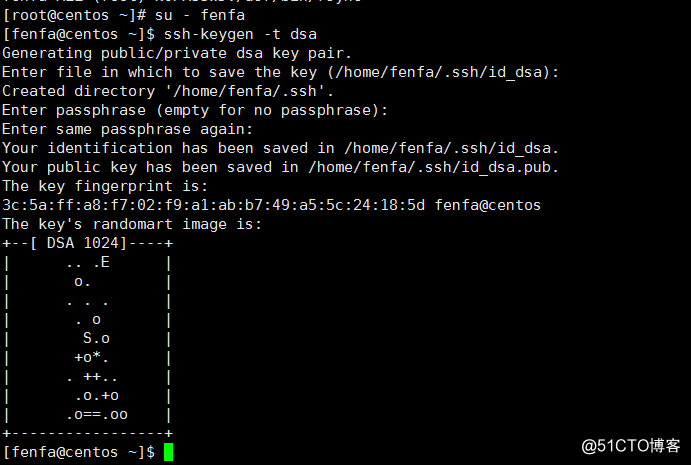
切换到fenfa用户创建密钥
安装配置expect服务 [root@centos ~]$ yum install expect* -y 编写脚本 [fenfa@centos ~]$ vim fenfa.exp#!/usr/bin/expectif { $argc != 2} {send_user "usage: expect xxxx.exp file host\n" it}#define varset file [lindex $argv 0]set host [lindex $argv 1]set password "123456"spawn ssh-copy-id -i $file fenfa@$hostexpect { "yes/no" {send "yes\r";exp_continue} "password" {send "$password\r"}}expect eof[fenfa@centos ~]$ vim fenfa_key.sh#!/bin/sh. /etc/init.d/functionsfor ip in `cat host.list`doexpect fenfa.exp ~/.ssh/id_dsa.pub $ip >/dev/null 2>&1if [ $? -eq 0 ];then action "$ip" /bin/true else action "$ip" /bin/falsefidone 执行脚本结果如下
[fenfa@centos ~]$ sh fenfa_key.sh10.0.0.1 [ OK ]10.0.0.2 [ OK ]10.0.0.3 [ OK ]10.0.0.4 [ OK ]10.0.0.5 [ OK ]10.0.0.6 [ OK ]10.0.0.7 [ OK ]10.0.0.8 [ OK ]10.0.0.9 [ OK ]10.0.0.10 [ OK ]10.0.0.11 [ OK ]10.0.0.12 [ OK ]10.0.0.13 [ OK ]10.0.0.14 [ OK ][root@centos ~]# su - fenfa[fenfa@centos ~]$ ll /home/fenfa/.ssh/total 4-rw------- 1 fenfa fenfa 602 Sep 21 12:14 authorized_keys
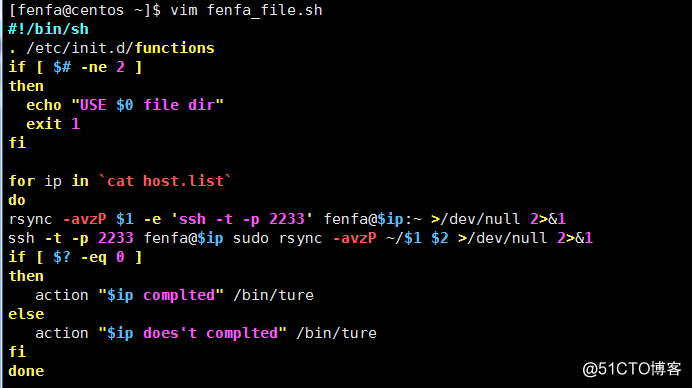
编写分发文件脚本
只需要将文件替换成你所需要分发的文件即可 **前端反向代理及管理后台服务器的配置
前端nginx反向代理服务器配置 安装所需的依赖包**[root@centos ~]# yum install pcre-devel zlib-devle openssl-devel gcc-c++ –y
编译安装nginx
cd /download/tools/wget http://nginx.org/download/nginx-1.12.1.tar.gztar zxf nginx-1.12.1.tar.gzcd nginx-1.12.1./configure --prefix=/app/nginx-1.12.1make && make install[root@centos ~]# cd /app/[root@centos app]# ln -s nginx-1.12.1 nginx[root@centos ~]# cd /app/nginx/conf/[root@centos conf]# mkdir extra[root@centos conf]# cp nginx.conf nginx.conf.bak
在nginx.conf文件后增加下面的配置
include extra/*.conf;[root@centos ~]# cd /app/nginx/conf/extra/[root@centos extra]# vim admin.mingongge.conf## HTTPS server configuration#server { listen 80; server_name admin.mingongge.com; location / { proxy_pass http://10.0.0.6:8080; proxy_connect_timeout 600; proxy_read_timeout 600; proxy_send_timeout 600; }}[root@centos extra]# vim shangjia.mingongge.conf## HTTPS server configuration#server { listen 80; server_name shangjia.mingongge.com; location / { proxy_pass http://10.0.0.7:8080; proxy_connect_timeout 600; proxy_read_timeout 600; proxy_send_timeout 600; }} **业务平台管理后台admin.mingongge.com
JDK Tomcat环境安装**tar zxf apache-tomcat-8.5.9.tar.gzmv apache-tomcat-8.5.9 /usr/local/tomcattar zxf jdk-8u111-linux-x64.tar.gz -C /usr/local/cd /usr/local/ln -s jdk1.8.0_111 jdkcat >>/etc/profile <
JDK Tomcat环境配置
echo "this is the admin.mingongge.com" >/www/admin/index.html/usr/local/tomcat/bin/startup.sh
商家管理后台 shangjia.mingongge.com
JDK Tomcat环境安装请参考前面的步骤echo "this is the shangjia.mingongge.com" >/www/shangjia/index.html/usr/local/tomcat/bin/startup.sh
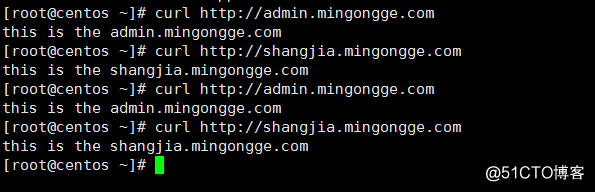
测试反向代理
[root@centos ~]# curl http://admin.mingongge.comthis is the admin.mingongge.com[root@centos ~]# curl http://shangjia.mingongge.comthis is the shangjia.mingongge.com
更多精彩内容请关注 民工哥微信公众号
转载地址:https://mingongge.blog.csdn.net/article/details/79278164 如侵犯您的版权,请留言回复原文章的地址,我们会给您删除此文章,给您带来不便请您谅解!
发表评论
最新留言
留言是一种美德,欢迎回访!
[***.207.175.100]2024年04月17日 07时02分47秒
关于作者

喝酒易醉,品茶养心,人生如梦,品茶悟道,何以解忧?唯有杜康!
-- 愿君每日到此一游!
推荐文章
【备忘】nginx 配置 某个路径代理
2019-05-03
【备忘】 git log
2019-05-03
【备忘】chrome插件
2019-05-03
浅谈Q的基本实现
2019-05-03
[备忘] 命令行连接无线网 linux
2019-05-03
备忘 socks 转http
2019-05-03
visual studio code使用------ 代码提示
2019-05-03
[备忘] linux 有用却不常用命令
2019-05-03
基本的http压力测试工具
2019-05-03
微信开发公众号本地调试
2019-05-03
[备忘] redis 生产环境配置
2019-05-03
[备忘] linux 有用却不常用命令
2019-05-03
git 自动部署
2019-05-03
Webstorm 快捷键
2019-05-03
[备忘] [坑坑坑!]windows tar 压缩文件夹到指定目录下面
2019-05-03
[备忘]Nginx 禁止IP访问及未绑定的域名跳转
2019-05-03
【备忘】
2019-05-03
centos 搭建PPTP
2019-05-03
【备忘】 vscode 必备插件
2019-05-03
letsencrypt 快速入手
2019-05-03
白红宇的个人博客 - 记录点点滴滴的事 - 您是第 311887044 位访客
访问时间: 2024-05-08 03:26:47
访问IP: 18.221.13.173
Copyright © 2020 - 2023 blog.css8.cn 京ICP备2021015314号-1
手机版