OpenCV——使用普通摄像头进行深度估计
发布日期:2021-07-01 04:09:00
浏览次数:2
分类:技术文章
本文共 2869 字,大约阅读时间需要 9 分钟。
使用深度摄像头可以在捕获图像时估计图像与摄像头之间的距离。但是对于普通摄像头,可以使用属于立体视觉(stereo vision)几何学的极几何(Epipolar Geometry)从同一物体的两张不同图像上提取三维信息。
如果运行失败()。
下面是一个例子:
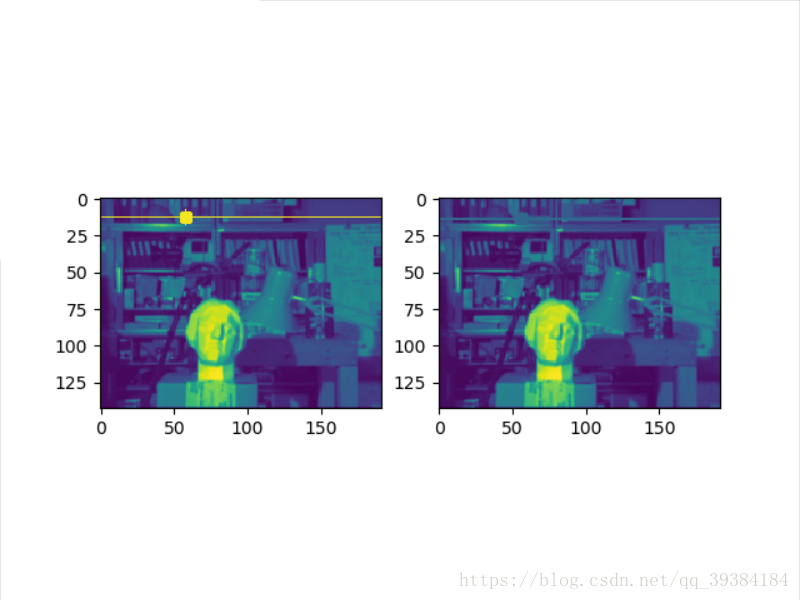
# 从视差图得到图像深度import cv2import numpy as npfrom matplotlib import pyplot as pltdef to_uint8(data): # maximum pixel latch = np.zeros_like(data) latch[:] = 255 # minimum pixel zeros = np.zeros_like(data) # unrolled to illustrate steps d = np.maximum(zeros, data) d = np.minimum(latch, d) # cast to uint8 return np.asarray(d, dtype="uint8")def draw_lines(img1, img2, lines, pts1, pts2): ''' img1 - image on which we draw the epilines for the points in img2 lines - corresponding epilines ''' print img1.shape r, c, ch = img1.shape clr1 = cv2.pyrDown(cv2.imread('stacked1.png', 0)) clr2 = cv2.pyrDown(cv2.imread('stacked2.png', 0)) for r, pt1, pt2 in zip(lines, pts1, pts2): color = tuple(np.random.randint(0, 255, 3).tolist()) x0, y0 = map(int, [0, -r[2] / r[1]]) x1, y1 = map(int, [c, -(r[2] + r[0] * c) / r[1]]) clr1 = cv2.line(clr1, (x0, y0), (x1, y1), color, 1) clr1 = cv2.circle(clr1, tuple(pt1), 5, color, -1) clr2 = cv2.circle(clr2, tuple(pt2), 5, color, -1) return clr1, clr2img1 = to_uint8(cv2.pyrDown(cv2.imread('stacked1.png', cv2.COLOR_BGR2GRAY))) # queryimage # left imageimg2 = to_uint8(cv2.pyrDown(cv2.imread('stacked2.png', cv2.COLOR_BGR2GRAY))) # trainimage # right imagesift = cv2.xfeatures2d.SIFT_create()# find the keypoints and descriptors with SIFTkp1, des1 = sift.detectAndCompute(img1, None)kp2, des2 = sift.detectAndCompute(img2, None)# FLANN parametersFLANN_INDEX_KDTREE = 0index_params = dict(algorithm=FLANN_INDEX_KDTREE, trees=5)search_params = dict(checks=50)flann = cv2.FlannBasedMatcher(index_params, search_params)matches = flann.knnMatch(des1, des2, k=2)good = []pts1 = []pts2 = []# ratio test as per Lowe's paperfor i, (m, n) in enumerate(matches): if m.distance < 0.8 * n.distance: good.append(m) pts2.append(kp2[m.trainIdx].pt) pts1.append(kp1[m.queryIdx].pt)pts1 = np.int32(pts1)pts2 = np.int32(pts2)F, mask = cv2.findFundamentalMat(pts1, pts2, cv2.FM_LMEDS)# We select only inlier pointspts1 = pts1[mask.ravel() == 1]pts2 = pts2[mask.ravel() == 1]# Find epilines corresponding to points in right image (second image) and# drawing its lines on left imagelines1 = cv2.computeCorrespondEpilines(pts2.reshape(-1, 1, 2), 2, F)lines1 = lines1.reshape(-1, 3)img5, img6 = draw_lines(img1, img2, lines1, pts1, pts2)# Find epilines corresponding to points in left image (first image) and# drawing its lines on right imagelines2 = cv2.computeCorrespondEpilines(pts1.reshape(-1, 1, 2), 1, F)lines2 = lines2.reshape(-1, 3)img3, img4 = draw_lines(img2, img1, lines2, pts2, pts1)plt.subplot(121), plt.imshow(img5)plt.subplot(122), plt.imshow(img3)plt.show() - stacked1.png
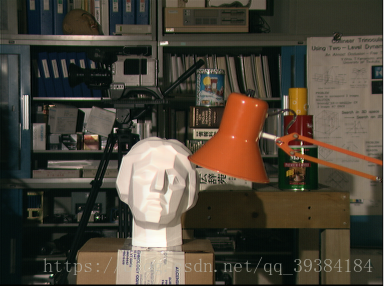
- stacked2.png

- 运行结果
转载地址:https://mortal.blog.csdn.net/article/details/83278317 如侵犯您的版权,请留言回复原文章的地址,我们会给您删除此文章,给您带来不便请您谅解!
发表评论
最新留言
留言是一种美德,欢迎回访!
[***.207.175.100]2024年04月23日 00时39分18秒
关于作者

喝酒易醉,品茶养心,人生如梦,品茶悟道,何以解忧?唯有杜康!
-- 愿君每日到此一游!
推荐文章
iOS-TextField知多少
2019-05-03
用javascript协助导入图片
2019-05-03
iOS移动开发周报-第18期
2019-05-03
iOS移动开发周报-第17期
2019-05-03
iOS移动开发周报-第23期
2019-05-03
iOS移动开发周报-第22期
2019-05-03
适合码农工作时玩的游戏:Scrum
2019-05-03
iOS移动开发周报-第24期
2019-05-03
深度解析开发项目之 05 - 解决textField编辑之后点击其他内容改变的问题
2019-05-03
将textField编辑完内容作为参数发送请求
2019-05-03
使用RBTool自动提交code review请求
2019-05-03
个人总结
2019-05-03
使用Objective-C的文档生成工具:appledoc
2019-05-03
Git 的使用感受
2019-05-03
使用 Git 来管理 Xcode 中的代码片段
2019-05-03
斯坦福大学 iOS 开发公开课总结
2019-05-03
iOS5中UIViewController的新方法
2019-05-03
象写程序一样写博客:搭建基于github的博客
2019-05-03
给NSString增加Java风格的方法
2019-05-03
给iOS工程增加Daily Build
2019-05-03
白红宇的个人博客 - 记录点点滴滴的事 - 您是第 311912952 位访客
访问时间: 2024-05-08 05:41:42
访问IP: 18.219.22.107
Copyright © 2020 - 2023 blog.css8.cn 京ICP备2021015314号-1
手机版