iOS开发- 隐藏键盘总结
当对于有多个UITextField控件都想通过点击“Return”来隐藏自身软键盘的情况,这时的最好办法是使用Did End on Exit事件。在点击软键盘右下角的“Return”按钮后,会触发该事件。
该事件有一个sender参数表示当前文本框,这样便可以编写一个通用的事件处理方法(.m文件)——
然后在.h文件中填写该方法的声明——
回到storyboard,并按command+option+enter打开辅助窗口,使辅助窗口显示.h文件。 选中一个UITextField控件,点击鼠标右键弹出面板,鼠标左键按住Did End on Exit事件旁边的圆圈,然后拖曳到右侧.h文件的TextField_DidEndOnExit方法上,便会建立好事件连接。 随后按照同样的做法,将其他UITextField控件的Did End on Exit事件也连接到TextField_DidEndOnExit方法。
运行一下,可发现每个文本框的软键盘都可以通过点击“Return”来隐藏了。
当页面中有很多个文本框时,如果每次都需要点文本框激活软键盘、输入后点击Return隐藏软键盘、再点击下一个文本框……这样操作起来太繁琐了。 于是我们希望能够实现点击Return时能够自动转到下一个文本框。尤其是对于最后一个文本框,希望能够在点击Return时执行下一步操作。
例如对于登录页面。它上面有 账号文本框(nameTextField)、密码文本框(passTextField)、登录按钮(loginButton)。
我们希望——点击账号文本框软键盘的Return时跳转到密码文本框,点击密码文本框软键盘的Return时执行登录。
因为这两个文本框的功能不同,不能像上一节那样写一个TextField_DidEndOnExit做统一处理,而应该分别建立各自的事件处理方法。
回到storyboard,右击账号文本框(nameTextField)弹出面板,按住Did End on Exit事件旁边的圆圈,然后拖曳到右侧.h文件的空白地方,此时会弹出一个对话框给方法命名。输入名称 (nameTextField_DidEndOnExit)后回车确定,便自动生成了该事件方法。
随后按照同样的做法,为密码文本框(passTextField)的Did End on Exit事件连接方法(passTextField_DidEndOnExit)。
来到.m文件,填写具体代码——
对于账号文本框转密码文本框,不需要隐藏软键盘,只需要调用becomeFirstResponder激活新的文本框就行了。
对于密码文本框Return后执行登录。因为不再需要显示软键盘,所以还是得调用resignFirstResponder隐藏软键盘,然后触发登录按钮(loginButton)的UIControlEventTouchUpInside事件进行登录。
运行一下,可发现已经达到我们希望的效果了。点击账号文本框软键盘的Return时跳转到密码文本框,点击密码文本框软键盘的Return时执行登录。
怎么都是“Return”,转换文本框与执行登录明明是不同的功能?
于是将账号文本框的Return Key属性设为“Next”,将密码文本框的Return Key属性设为“Done”,使界面与功能一致。
只能通过Return关闭软键盘太不灵活了,应该提供轻触背景隐藏软键盘的功能。
在storyboard,点击背景View,将它的Custom Class设置为UIControl,这样才会出现Touch Down事件。
右击背景View弹出面板,按住Touch Down事件旁边的圆圈,然后拖曳到右侧.h文件的空白地方建立该事件的处理方法。
来到.m文件,填写具体代码——
发布日期:2021-09-29 09:56:16
浏览次数:2
分类:技术文章
本文共 3674 字,大约阅读时间需要 12 分钟。
一、隐藏自身软键盘
当对于有多个UITextField控件都想通过点击“Return”来隐藏自身软键盘的情况,这时的最好办法是使用Did End on Exit事件。在点击软键盘右下角的“Return”按钮后,会触发该事件。
该事件有一个sender参数表示当前文本框,这样便可以编写一个通用的事件处理方法(.m文件)——
- - (IBAction)TextField_DidEndOnExit:(id)sender {
- // 隐藏键盘.
- [sender resignFirstResponder];
- }
然后在.h文件中填写该方法的声明——
- - (IBAction)TextField_DidEndOnExit:(id)sender;
回到storyboard,并按command+option+enter打开辅助窗口,使辅助窗口显示.h文件。 选中一个UITextField控件,点击鼠标右键弹出面板,鼠标左键按住Did End on Exit事件旁边的圆圈,然后拖曳到右侧.h文件的TextField_DidEndOnExit方法上,便会建立好事件连接。 随后按照同样的做法,将其他UITextField控件的Did End on Exit事件也连接到TextField_DidEndOnExit方法。
运行一下,可发现每个文本框的软键盘都可以通过点击“Return”来隐藏了。
二、点击Return自动转到下个文本框
当页面中有很多个文本框时,如果每次都需要点文本框激活软键盘、输入后点击Return隐藏软键盘、再点击下一个文本框……这样操作起来太繁琐了。 于是我们希望能够实现点击Return时能够自动转到下一个文本框。尤其是对于最后一个文本框,希望能够在点击Return时执行下一步操作。
例如对于登录页面。它上面有 账号文本框(nameTextField)、密码文本框(passTextField)、登录按钮(loginButton)。
我们希望——点击账号文本框软键盘的Return时跳转到密码文本框,点击密码文本框软键盘的Return时执行登录。
因为这两个文本框的功能不同,不能像上一节那样写一个TextField_DidEndOnExit做统一处理,而应该分别建立各自的事件处理方法。
回到storyboard,右击账号文本框(nameTextField)弹出面板,按住Did End on Exit事件旁边的圆圈,然后拖曳到右侧.h文件的空白地方,此时会弹出一个对话框给方法命名。输入名称 (nameTextField_DidEndOnExit)后回车确定,便自动生成了该事件方法。
随后按照同样的做法,为密码文本框(passTextField)的Did End on Exit事件连接方法(passTextField_DidEndOnExit)。
来到.m文件,填写具体代码——
- - (IBAction)nameTextField_DidEndOnExit:(id)sender {
- // 将焦点移至下一个文本框.
- [self.passTextField becomeFirstResponder];
- }
- - (IBAction)passTextField_DidEndOnExit:(id)sender {
- // 隐藏键盘.
- [sender resignFirstResponder];
- // 触发登陆按钮的点击事件.
- [self.loginButton sendActionsForControlEvents:UIControlEventTouchUpInside];
- }
对于账号文本框转密码文本框,不需要隐藏软键盘,只需要调用becomeFirstResponder激活新的文本框就行了。
对于密码文本框Return后执行登录。因为不再需要显示软键盘,所以还是得调用resignFirstResponder隐藏软键盘,然后触发登录按钮(loginButton)的UIControlEventTouchUpInside事件进行登录。
运行一下,可发现已经达到我们希望的效果了。点击账号文本框软键盘的Return时跳转到密码文本框,点击密码文本框软键盘的Return时执行登录。
怎么都是“Return”,转换文本框与执行登录明明是不同的功能?
于是将账号文本框的Return Key属性设为“Next”,将密码文本框的Return Key属性设为“Done”,使界面与功能一致。
三、轻触背景隐藏软键盘
只能通过Return关闭软键盘太不灵活了,应该提供轻触背景隐藏软键盘的功能。
在storyboard,点击背景View,将它的Custom Class设置为UIControl,这样才会出现Touch Down事件。
右击背景View弹出面板,按住Touch Down事件旁边的圆圈,然后拖曳到右侧.h文件的空白地方建立该事件的处理方法。
来到.m文件,填写具体代码——
- - (IBAction)View_TouchDown:(id)sender {
- // 发送resignFirstResponder.
- [[UIApplication sharedApplication] sendAction:@selector(resignFirstResponder) to:nil from:nil forEvent:nil];
- }
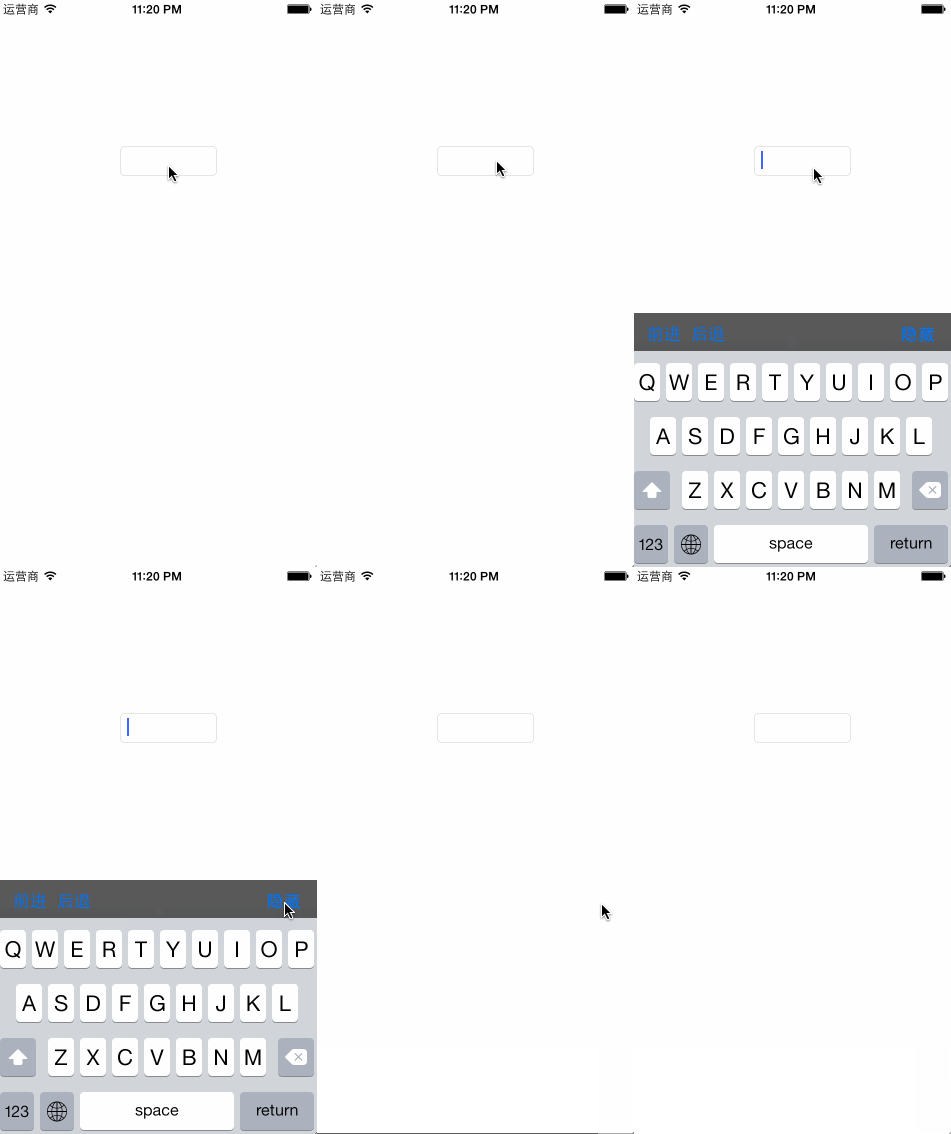
四、自定义键盘
可以通过自定义键盘, 在键盘上加入你需要的功能, 即可。
效果如下:
代码如下:
- - (void)viewDidLoad
- {
- [super viewDidLoad];
- // Do any additional setup after loading the view, typically from a nib.
- if (self.keyboardToolbar == nil)
- {
- self.keyboardToolbar = [[UIToolbar alloc] initWithFrame:CGRectMake(0, 0, self.view.bounds.size.width, 38.0f)];
- self.keyboardToolbar.barStyle = UIBarStyleBlackTranslucent;
- UIBarButtonItem *previousBarItem = [[UIBarButtonItem alloc] initWithTitle:NSLocalizedString(@"前进", @"")
- style:UIBarButtonItemStyleBordered
- target:self
- action:@selector(previousField:)];
- UIBarButtonItem *nextBarItem = [[UIBarButtonItem alloc] initWithTitle:NSLocalizedString(@"后退", @"")
- style:UIBarButtonItemStyleBordered
- target:self
- action:@selector(nextField:)];
- UIBarButtonItem *spaceBarItem = [[UIBarButtonItem alloc] initWithBarButtonSystemItem:UIBarButtonSystemItemFlexibleSpace
- target:nil
- action:nil];
- UIBarButtonItem *doneBarItem = [[UIBarButtonItem alloc] initWithTitle:NSLocalizedString(@"隐藏", @"")
- style:UIBarButtonItemStyleDone
- target:self
- action:@selector(resignKeyboard:)];
- [self.keyboardToolbar setItems:[NSArray arrayWithObjects:previousBarItem, nextBarItem, spaceBarItem, doneBarItem, nil]];
- }
- self.myTextView.inputAccessoryView = self.keyboardToolbar;
- }
- #pragma mark - your code
- - (void)resignKeyboard:(id)sender
- {
- [self.myTextView resignFirstResponder];
- }
- - (void)previousField:(id)sender
- {
- }
- - (void)nextField:(id)sender
- {
- }
转载地址:https://blog.csdn.net/hengshujiyi/article/details/30261945 如侵犯您的版权,请留言回复原文章的地址,我们会给您删除此文章,给您带来不便请您谅解!
发表评论
最新留言
哈哈,博客排版真的漂亮呢~
[***.90.31.176]2024年04月05日 23时00分46秒
关于作者

喝酒易醉,品茶养心,人生如梦,品茶悟道,何以解忧?唯有杜康!
-- 愿君每日到此一游!
推荐文章
JQuery(3)--冒泡效果
2019-04-27
异常(2)-- UnsatisfiedLinkError: dalvik.system.PathClassLoader[DexPathList[[zip file "/data/app/项目包名
2019-04-27
Android软键盘(1)---输入法界面管理(打开/关闭/状态获取)
2019-04-27
Android动态设置view的高度宽度
2019-04-27
css3 属性 text-overflow 实现截取多余文字内容 以省略号来代替多余内容
2019-04-27
vue 事件总线EventBus的概念、使用以及注意点
2019-04-27
JavaScript 用七种方式教你判断一个变量是否为数组类型
2019-04-27
细讲前端设置cookie, 储存用户登录信息
2019-04-27
Web前端安全策略之CSRF的攻击与防御
2019-04-27
斯坦福CS236-深度生成模型2019-全套课程资料分享
2019-04-27
知识图谱(KG)存储、可视化、公开数据集、图计算、图编程工具分享
2019-04-27
伯克利-《神经技术导论2020(带字幕)》
2019-04-27
机器学习经典书籍-《贝叶斯推理与机器学习》
2019-04-27
欧洲计算机视觉国际会议ECCR20最新论文整理分享
2019-04-27
20年6月最新-《深度神经网络的高效处理技术综述》
2019-04-27
BiliBili 100+国际名校免费公开课整理分享
2019-04-27
清华大学计算机学科推荐学术会议和期刊列表
2019-04-27
【组队学习】【24期】Docker教程
2019-04-27
Datawhale组队学习周报(第010周)
2019-04-27
