【实战】python以及opencv实现信用卡的数字识别


 结果展示
结果展示 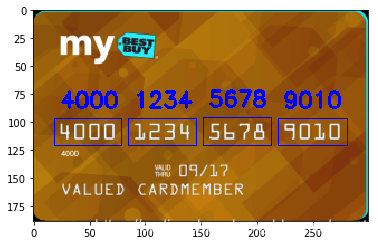
发布日期:2021-06-29 15:45:48
浏览次数:2
分类:技术文章
本文共 6225 字,大约阅读时间需要 20 分钟。
本项目利用python以及opencv实现信用卡的数字识别
- 前期准备
- 导入工具包
- 定义功能函数
- 模板图像处理
- 读取模板图像
cv2.imread(img) - 灰度化处理
cv2.cvtColor(img,cv2.COLOR_BGR2GRAY) - 二值化
cv2.threshold() - 轮廓
- 轮廓
- 读取模板图像
- 信用卡图像处理
- 读取信用卡图像
cv2.imread(img) - 灰度化处理
cv2.cvtColor(img,cv2.COLOR_BGR2GRAY) - 礼帽处理
cv2.morphologyEx(gray,cv2.MORPH_TOPHAT,rectKernel) - Sobel边缘检测
cv2.Sobel(tophat, ddepth=cv2.CV_32F, dx=1, dy=0, ksize=-1) - 闭操作
cv2.morphologyEx(gradX, cv2.MORPH_CLOSE, rectKernel) - 计算轮廓
cv2.findContours - 模板检测
cv2.matchTemplate(roi, digitROI,cv2.TM_CCOEFF)
- 读取信用卡图像
原始数据展示
结果展示 1 前期准备
# 导入工具包# opencv读取图片的格式为b g r# matplotlib图片的格式为 r g bimport numpy as npimport cv2from imutils import contoursimport matplotlib.pyplot as plt%matplotlib inline
# 信用卡的位置predict_card = "images/credit_card_01.png"# 模板的位置template = "images/ocr_a_reference.png"
# 指定信用卡类型FIRST_NUMBER = { "3": "American Express", "4": "Visa", "5": "MasterCard", "6": "Discover Card"} # 定义一些功能函数# 对框进行排序def sort_contours(cnts, method="left-to-right"): reverse = False i = 0 if method == "right-to-left" or method == "bottom-to-top": reverse = True if method == "top-to-bottom" or method == "bottom-to-top": i = 1 boundingBoxes = [cv2.boundingRect(c) for c in cnts] #用一个最小的矩形,把找到的形状包起来x,y,h,w (cnts, boundingBoxes) = zip(*sorted(zip(cnts, boundingBoxes), key=lambda b: b[1][i], reverse=reverse)) return cnts, boundingBoxes# 调整图片尺寸大小def resize(image, width=None, height=None, inter=cv2.INTER_AREA): dim = None (h, w) = image.shape[:2] if width is None and height is None: return image if width is None: r = height / float(h) dim = (int(w * r), height) else: r = width / float(w) dim = (width, int(h * r)) resized = cv2.resize(image, dim, interpolation=inter) return resized# 定义cv2展示函数def cv_show(name,img): cv2.imshow(name,img) cv2.waitKey(0) cv2.destroyAllWindows()
2 对模板图像进行预处理操作
读取模板图像
# 读取模板图像img = cv2.imread(template)cv_show("img",img)plt.imshow(img) ![[外链图片转存失败(img-bqUi8zm7-1565866397218)(output_11_1.png)]](https://img-blog.csdnimg.cn/20190815185621363.png)
模板图像转灰度图像
# 转灰度图ref = cv2.cvtColor(img,cv2.COLOR_BGR2GRAY)cv_show("ref",ref)plt.imshow(ref) ![[外链图片转存失败(img-OfiXb5he-1565866397219)(output_13_1.png)]](https://img-blog.csdnimg.cn/20190815185629528.png)
转为二值图像
ref = cv2.threshold(ref,10,255,cv2.THRESH_BINARY_INV)[1]cv_show("ref",ref)plt.imshow(ref) ![[外链图片转存失败(img-9ebIW8hU-1565866397220)(output_15_1.png)]](https://img-blog.csdnimg.cn/20190815185637320.png)
计算轮廓
#cv2.findContours()函数接受的参数为二值图,即黑白的(不是灰度图),cv2.RETR_EXTERNAL只检测外轮廓,cv2.CHAIN_APPROX_SIMPLE只保留终点坐标#返回的list中每个元素都是图像中的一个轮廓# 在二值化后的图像中计算轮廓refCnts,hierarchy = cv2.findContours(ref.copy(),cv2.RETR_EXTERNAL,cv2.CHAIN_APPROX_SIMPLE)# 在原图上画出轮廓cv2.drawContours(img,refCnts,-1,(0,0,255),3)cv_show("img",img)plt.imshow(img) ![[外链图片转存失败(img-Dtk5KqNI-1565866397221)(output_17_1.png)]](https://img-blog.csdnimg.cn/20190815185644974.png)
print(np.array(refCnts).shape)# 排序,从左到右,从上到下refCnts = sort_contours(refCnts,method="left-to-right")[0] digits = { }# 遍历每一个轮廓for (i, c) in enumerate(refCnts): # 计算外接矩形并且resize成合适大小 (x, y, w, h) = cv2.boundingRect(c) roi = ref[y:y + h, x:x + w] roi = cv2.resize(roi, (57, 88)) # 每一个数字对应每一个模板 digits[i] = roi (10,)
3 对信用卡进行处理
初始化卷积核
rectKernel = cv2.getStructuringElement(cv2.MORPH_RECT, (9, 3))sqKernel = cv2.getStructuringElement(cv2.MORPH_RECT, (5, 5))
读取信用卡
image = cv2.imread(predict_card)cv_show("image",image)plt.imshow(image) ![[外链图片转存失败(img-WMVg6Luz-1565866397225)(output_23_1.png)]](https://img-blog.csdnimg.cn/2019081518565631.png?x-oss-process=image/watermark,type_ZmFuZ3poZW5naGVpdGk,shadow_10,text_aHR0cHM6Ly9jb2RpbmdjaGFvemhhbmcuYmxvZy5jc2RuLm5ldA==,size_16,color_FFFFFF,t_70)
对图像进行预处理操作
# 先对图像进行resize操作image = resize(image,width=300)# 灰度化处理gray = cv2.cvtColor(image,cv2.COLOR_BGR2GRAY)cv_show("gray",gray)plt.imshow(gray) ![[外链图片转存失败(img-OLdT4boh-1565866397226)(output_25_1.png)]](https://img-blog.csdnimg.cn/20190815185703517.png?x-oss-process=image/watermark,type_ZmFuZ3poZW5naGVpdGk,shadow_10,text_aHR0cHM6Ly9jb2RpbmdjaGFvemhhbmcuYmxvZy5jc2RuLm5ldA==,size_16,color_FFFFFF,t_70)
对图像礼帽操作
- 礼帽 = 原始输入-开运算结果
- 开运算:先腐蚀,再膨胀
- 突出更明亮的区域
tophat = cv2.morphologyEx(gray,cv2.MORPH_TOPHAT,rectKernel)cv_show("tophat",tophat)plt.imshow(tophat) ![[外链图片转存失败(img-0yzMkO55-1565866397227)(output_28_1.png)]](https://img-blog.csdnimg.cn/20190815185711123.png?x-oss-process=image/watermark,type_ZmFuZ3poZW5naGVpdGk,shadow_10,text_aHR0cHM6Ly9jb2RpbmdjaGFvemhhbmcuYmxvZy5jc2RuLm5ldA==,size_16,color_FFFFFF,t_70)
用Sobel算子边缘检测
gradX = cv2.Sobel(tophat, ddepth=cv2.CV_32F, dx=1, dy=0, ksize=-1)gradX = np.absolute(gradX)(minVal, maxVal) = (np.min(gradX), np.max(gradX))gradX = (255 * ((gradX - minVal) / (maxVal - minVal)))gradX = gradX.astype("uint8")print (np.array(gradX).shape)cv_show("gradX",gradX)plt.imshow(gradX) (189, 300)
![[外链图片转存失败(img-uoAHXkVD-1565866397232)(output_30_2.png)]](https://img-blog.csdnimg.cn/20190815185719842.png?x-oss-process=image/watermark,type_ZmFuZ3poZW5naGVpdGk,shadow_10,text_aHR0cHM6Ly9jb2RpbmdjaGFvemhhbmcuYmxvZy5jc2RuLm5ldA==,size_16,color_FFFFFF,t_70)
对图像闭操作
- 闭操作:先膨胀,再腐蚀
- 可以将数字连在一起
gradX = cv2.morphologyEx(gradX, cv2.MORPH_CLOSE, rectKernel) cv_show("gradX",gradX)plt.imshow(gradX) ![[外链图片转存失败(img-WHOvOarz-1565866397234)(output_33_1.png)]](https://img-blog.csdnimg.cn/20190815185726687.png?x-oss-process=image/watermark,type_ZmFuZ3poZW5naGVpdGk,shadow_10,text_aHR0cHM6Ly9jb2RpbmdjaGFvemhhbmcuYmxvZy5jc2RuLm5ldA==,size_16,color_FFFFFF,t_70)
#THRESH_OTSU会自动寻找合适的阈值,适合双峰,需把阈值参数设置为0thresh = cv2.threshold(gradX, 0, 255,cv2.THRESH_BINARY | cv2.THRESH_OTSU)[1] cv_show("thresh",thresh)plt.imshow(thresh) ![[外链图片转存失败(img-rJfxoo8f-1565866397237)(output_34_1.png)]](https://img-blog.csdnimg.cn/20190815185733456.png?x-oss-process=image/watermark,type_ZmFuZ3poZW5naGVpdGk,shadow_10,text_aHR0cHM6Ly9jb2RpbmdjaGFvemhhbmcuYmxvZy5jc2RuLm5ldA==,size_16,color_FFFFFF,t_70)
# 再进行一次闭操作thresh = cv2.morphologyEx(thresh, cv2.MORPH_CLOSE, sqKernel) #再来一个闭操作cv_show("thresh",thresh)plt.imshow(thresh) ![[外链图片转存失败(img-DQjqCRvK-1565866397240)(output_35_1.png)]](https://img-blog.csdnimg.cn/20190815185742283.png?x-oss-process=image/watermark,type_ZmFuZ3poZW5naGVpdGk,shadow_10,text_aHR0cHM6Ly9jb2RpbmdjaGFvemhhbmcuYmxvZy5jc2RuLm5ldA==,size_16,color_FFFFFF,t_70)
计算轮廓
threshCnts, hierarchy = cv2.findContours(thresh.copy(), cv2.RETR_EXTERNAL,cv2.CHAIN_APPROX_SIMPLE)cnts = threshCntscur_img = image.copy()cv2.drawContours(cur_img,cnts,-1,(0,0,255),3) cv_show("img",cur_img)plt.imshow(cur_img) ![[外链图片转存失败(img-B5JW2tVN-1565866397260)(output_37_1.png)]](https://img-blog.csdnimg.cn/20190815185749279.png?x-oss-process=image/watermark,type_ZmFuZ3poZW5naGVpdGk,shadow_10,text_aHR0cHM6Ly9jb2RpbmdjaGFvemhhbmcuYmxvZy5jc2RuLm5ldA==,size_16,color_FFFFFF,t_70)
locs = []# 遍历轮廓for (i, c) in enumerate(cnts): # 计算矩形 (x, y, w, h) = cv2.boundingRect(c) ar = w / float(h) # 选择合适的区域,根据实际任务来,这里的基本都是四个数字一组 if ar > 2.5 and ar < 4.0: if (w > 40 and w < 55) and (h > 10 and h < 20): #符合的留下来 locs.append((x, y, w, h))# 将符合的轮廓从左到右排序locs = sorted(locs, key=lambda x:x[0])output = []
模板匹配
# 遍历每一个轮廓中的数字for (i, (gX, gY, gW, gH)) in enumerate(locs): # initialize the list of group digits groupOutput = [] # 根据坐标提取每一个组 group = gray[gY - 5:gY + gH + 5, gX - 5:gX + gW + 5] cv_show("group",group) # 预处理 group = cv2.threshold(group, 0, 255,cv2.THRESH_BINARY | cv2.THRESH_OTSU)[1] cv_show("group",group) # 计算每一组的轮廓 digitCnts,hierarchy = cv2.findContours(group.copy(), cv2.RETR_EXTERNAL,cv2.CHAIN_APPROX_SIMPLE) digitCnts = contours.sort_contours(digitCnts,method="left-to-right")[0] # 计算每一组中的每一个数值 for c in digitCnts: # 找到当前数值的轮廓,resize成合适的的大小 (x, y, w, h) = cv2.boundingRect(c) roi = group[y:y + h, x:x + w] roi = cv2.resize(roi, (57, 88)) cv_show("roi",roi) # 计算匹配得分 scores = [] # 在模板中计算每一个得分 for (digit, digitROI) in digits.items(): # 模板匹配 result = cv2.matchTemplate(roi, digitROI,cv2.TM_CCOEFF) (_, score, _, _) = cv2.minMaxLoc(result) scores.append(score) # 得到最合适的数字 groupOutput.append(str(np.argmax(scores))) # 画出来 cv2.rectangle(image, (gX - 5, gY - 5),(gX + gW + 5, gY + gH + 5), (0, 0, 255), 1) cv2.putText(image, "".join(groupOutput), (gX, gY - 15),cv2.FONT_HERSHEY_SIMPLEX, 0.65, (0, 0, 255), 2) # 得到结果 output.extend(groupOutput) # 打印结果print("Credit Card Type: {}".format(FIRST_NUMBER[output[0]]))print("Credit Card #: {}".format("".join(output)))cv_show("Image",image)plt.imshow(image) Credit Card Type: VisaCredit Card #: 4000123456789010
![[外链图片转存失败(img-EkSaLNgx-1565866397264)(output_41_2.png)]](https://img-blog.csdnimg.cn/20190815185809920.png?x-oss-process=image/watermark,type_ZmFuZ3poZW5naGVpdGk,shadow_10,text_aHR0cHM6Ly9jb2RpbmdjaGFvemhhbmcuYmxvZy5jc2RuLm5ldA==,size_16,color_FFFFFF,t_70)
转载地址:https://codingchaozhang.blog.csdn.net/article/details/99650303 如侵犯您的版权,请留言回复原文章的地址,我们会给您删除此文章,给您带来不便请您谅解!
发表评论
最新留言
哈哈,博客排版真的漂亮呢~
[***.90.31.176]2024年05月02日 02时48分12秒
关于作者

喝酒易醉,品茶养心,人生如梦,品茶悟道,何以解忧?唯有杜康!
-- 愿君每日到此一游!
推荐文章
SpringBoot 整合 JWT 实现统一认证
2019-04-29
TypeError: this.getOptions is not a function
2019-04-29
el-table 二维数组合并行
2019-04-29
UR5e机械臂运行一直阻塞在waitForServer
2019-04-29
ROS把pkg1下的某个头文件和源文件生成动态链接库供pkg2调用
2019-04-29
使用urdf_tutorial快速可视化urdf文件
2019-04-29
SQl 数据完整性(随堂博客)
2019-04-29
左连接、右连接、内连接
2019-04-29
MySQL DQL语句基础(随堂博客)
2019-04-29
利用MySQL进行数据复杂查询(1)
2019-04-29
MySQL 表与表之间的关系
2019-04-29
pymysql 的基础应用
2019-04-29
Python 管理程序改进——连接MYSQL
2019-04-29
Python 爬虫-豆瓣影星图片下载
2019-04-29
网页端数据库操作界面—主题函数文件
2019-04-29
网页端数据库操作界面-Html页面(1)
2019-04-29
Python爬虫 百度热搜热点
2019-04-29
excel的常用函数(二)
2019-04-29
excel文本函数
2019-04-29
白红宇的个人博客 - 记录点点滴滴的事 - 您是第 310067925 位访客
访问时间: 2024-05-02 16:29:00
访问IP: 18.220.16.184
Copyright © 2020 - 2023 blog.css8.cn 京ICP备2021015314号-1
手机版