本文共 20725 字,大约阅读时间需要 69 分钟。
SpringBoot的配置和注解详解
SpringBoot能够帮助我们快速的构建项目,相比于SSM框架我们基本不用刻意的编写大量繁琐的配置,而专心的将精力放在编码上,这与SpringBoot的自动配置机制有着极大的关系,而自动配置原理依赖着其底层的注解,在研究底层SpringBoot底层的源码时,会发现诸多的如:
这篇博客是本人根据B站中尚硅谷雷老师的课程和其笔记总结的,在此特别感谢! 这篇就博客前面都是比较偏向于基础的,如创建快速项目、注解学习等的,到后面会较浅显的介绍自动配置的原理;xxxAutoConfiguration类、xxxConfiguration类、xxxProperties类、@Conditional注解、@Conditionalxxx注解等,这些类和注解之间都是有着极其特殊的关系的;
文章目录
快速创建SpringBoot项目的步骤
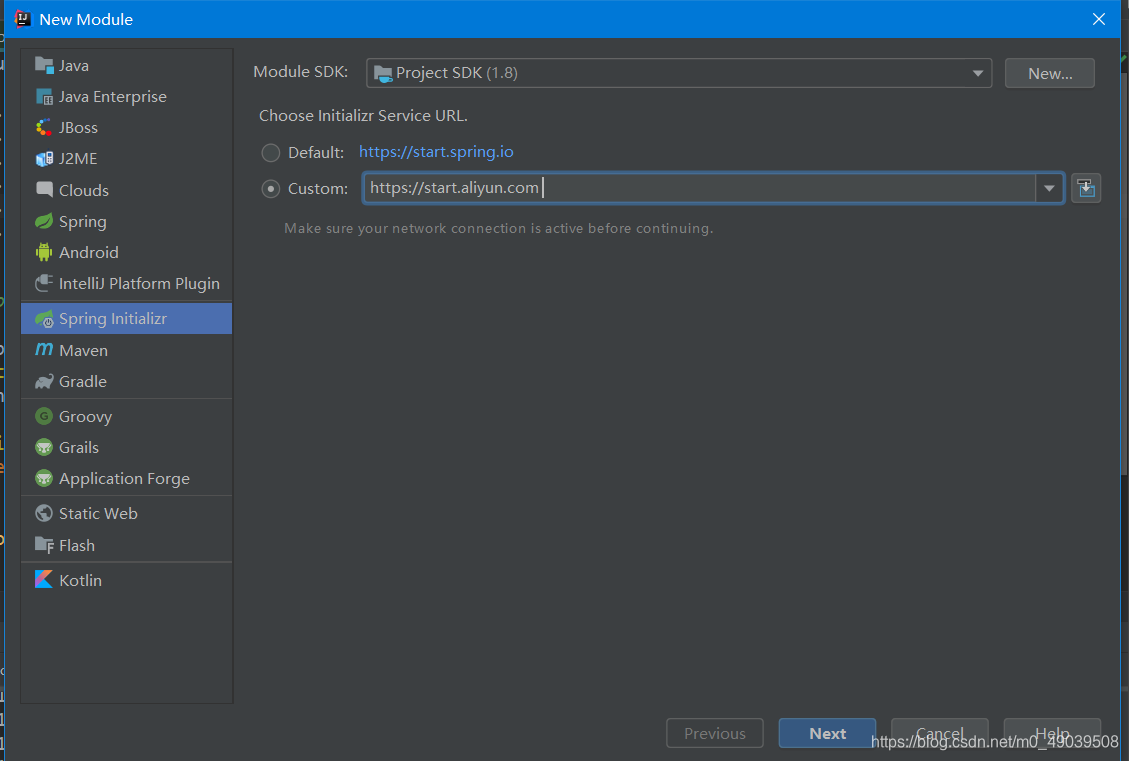
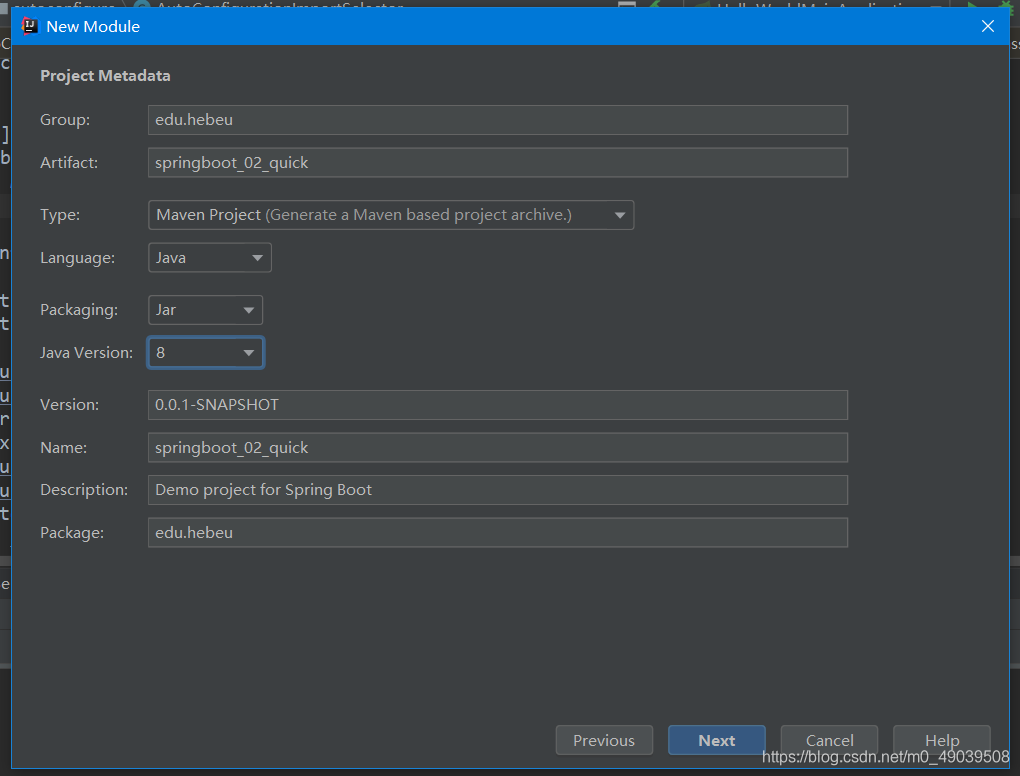 3. 选择需要的模块,finish进行下载,下载完成之后SpringBoot项目就创建好了;
 生成项目的特点
- 主程序已经生成好了,我们只需要自己的逻辑
- resources目录下的结构
- static:保存所有的静态资源(如css、js、images)
- templates:保存所有的模板页面(SpringBoot默认jar包使用嵌入式的Tomcat,默认不支持JSP页面),可以使用的模板引擎(freemarker、thymelear)
- application.properties:SpringBoot应用的配置文件,可以修改一些默认配置
配置文件
全局配置文件
spring boot使用一个全局的配置文件,配置文件名是固定的,放在src/main/resources目录或类路径/config下:
- application.properties
- application.yml / application.yaml
全局配置文件的作用?
修改spring boot项目自动配置的默认值(因为spring boot在底层都给我们自动配置好了);
YAML
yml的含义?
yml是YAML(YAML Ain’t Markup Language)语言的文件,以数据为中心,比.json、.xml等更适合做配置文件;
-
YAML A Markup Language:是一个标记语言
-
YAML isn’t Markup Language:不是一个标记语言
-
语法格式,如:
-
server: port: 9000
yml的语法?
-
YAML基本语法
- 使用缩进表示层级关系
key:(空格)value表示一对键值对(空格必须要有,不能省)- 缩进时不允许使用Tab键,只允许使用空格
- 缩进的空格数目不重要,只要相同层级的元素左侧对齐(表示同一层级)即可
- 大小写敏感
-
YAML支持的三种数据结构
-
对象、Map:键值对的集合,以
k: v:(换行) 对象还是k: v的方式,只注意缩进就行了,如下:-
friends: lastName: zhangsan age: 20或者通过行内写法:friends: { lastName: lisi,age: 20}
-
-
数组(List、Set):一组按次序排列的值,用
-(空格)值表示数组中的一个元素,如下:-
pets: - cat - dog - pig或者通过行内写法:pets: [cat,dog,pig]
-
-
字面量:单个的,不可再分的值(数组、字符串、布尔、…),以
k: v字面量直接写,字符串默认不需要加单引号/双引号;- “”:双引号,不会转义字符串里面的特殊字符,特殊字符串会作为本身的含义;如:
name: "zhang\nsan"输出zhang 换行 san; - ‘’:单引号,会转义字符串里面的特殊字符,特殊字符串最终就只能是普通的字符串;如:
zhang\nsan输出zhang\nsan;
- “”:双引号,不会转义字符串里面的特殊字符,特殊字符串会作为本身的含义;如:
-
将全局配置文件的值注入到JavaBean
配置文件
person: lastName: zhangsan age: 20 boss: true birthday: 2000/10/30 map: {k1: v1,k2: 12} list: - lisi - 张三 - wangwu dog: name: doudou age: 14 通过@ConfigurationProperties注解进行注入
JavaBean类内的属性:
/** 将配置文件中的值映射到Person中:使用@ConfigurationProperties注解即可; - @ConfigurationProperties的作用:告知SpringBoot将本类中的所有书写和配置文件中相关的配置进行绑定(默认是从全局配置文件中获取值); prefix = "person":配置文件中哪个下面的所有属性进行一一映射; 需要注意:只有这个组件是容器的组件,才能使用容器提供的@ConfigurationProperties功能(使用@ConfigurationProperties注解的前提),此还要在这个类上使用@Component注解将该类注入容器; */@Component@ConfigurationProperties(prefix = "person")public class Person { private String lastName; private Integer age; private Boolean boos; private Date birthday; private Map map; private List 为了方便进行配置文件的导入,可以导入官方推荐的一个Maven依赖,如下:
org.springframework.boot spring-boot-configuration-processor
通过@Value注解进行注入
演示上述的JavaBean类部分属性进行注入
/** * 使用Spring的@Value()注解默认将 全局配置文件的值 \ 自己指定的值 赋给JavaBean内的属性; * 使用@Value注解可以参考Spring中的标签 */@Value("${person.last-name}") // 将配置文件内key为person.last-name的键值对对应的值赋给被标注的属性(lastName)private String lastName;@Value("#{11*2}") // 将11*2的结果赋给被标注的属性(age)private Integer age;@Value("true") // 将被标注的属性(boss)赋值为trueprivate Boolean boss;
@ConfigurationProperties注解和@Value注解的比较
| @ConfigurationProperties | @Value | |
|---|---|---|
| 功能 | 批量注入配置文件中的属性 | 一个一个的指定 |
| 松散绑定 | 能支持(能识别) | 不支持(不能识别) |
| SpEL | 不支持 | 支持 |
| JSR303数据校验 | 支持 | 不支持 |
| 复杂类型封装 | 支持 | 不支持 |
松散绑定?
属性名匹配规则(Relaxed binding),以下是在配置文件中进行编写的:
- person.firstName:使用标准写法
- person.first-name:大写用-
- person.first_name:大写用_
- PERSON_FIRST_NAME:推荐系统属性使用这种写法
因此如果使用@ConfigurationProperties注解,对上述的几种命名该注解都能正确的解析;但是如果使用@Value注解,上述的几种命名的key都必须要有@Value("key")内指定的保持一致(因为该注解不支持松散绑定的写法)
结论?
-
如果说,我们只是在某个业务逻辑中需要获取一个配置文件中的某项值,使用@Value注解;
-
如果说,我们专门编写了一个JavaBean来和配置文件进行映射,我们就直接使用@ConfigurationProperties注解;
-
特殊时,这两种注解可以结合使用;
配置文件注入值数据校验
先导入依赖:
org.springframework.boot spring-boot-starter-validation
测试代码:
@Component@ConfigurationProperties(prefix = "person")@Validated // 被该注解标注的类在注入值时会加入数据校验的功能public class Person { @Email // 表示被标注的属性(lastName)注入数据时必须是邮箱格式的数据 private String lastName; 将指定类路径的配置文件内的数据注入到JavaBean
在resources目录下新建一个属性配置文件person.properties
person.last-name=李四person.age=22person.birthday=2020/4/23person.boss=trueperson.map.k1=v3person.map.k2=20person.map.2k=25person.list=a,v,g,b,d,cperson.dog.name=xiaohuperson.dog.age=14
通过@PropertySource()配合@ConfigurationProperties注解进行注入
Person类中进行注入
/** *从 指定路径下获取加载配置文件,使用@PropertySource(指定路径的配置文件) + @ConfigurationProperties(属性文件的哪个数据)注解配合实现将 指定的配置文件(不是全局配置文件) 内的数据赋给JavaBean内的属性 */@Component@PropertySource(value = { "classpath:person.properties"}) // 从指定的类路径下加载获取配置文件信息,并将内部的数据绑定到被标注的类(Person)中@ConfigurationProperties(prefix = "person")public class Person { private String lastName; private Integer age; private Boolean boss; private Date birthday; private Map map; private List 使用@ImportResource注解导入自定义的配置文件
*作用:*导入Spring的配置文件,让配置文件里面的内容生效;因为SpringBoot里面没有Spring的配置文件,我们自己编写的配置文件也不能自动识别并加载,如果想让Spring的配置文件生效且加载进来,就可以使用此注解,将该注解标志在配置类上,如下:
新建类:edu.hebeu.service.HelloService
在resources目录下创建编写一个名为bean.xml的spring配置文件,如下:
使用ImportResource注解标注在配置类上并加载配置文件
@ImportResource(locations = { "classpath:bean.xml"}) // 加载类路径下的bean.xml配置文件@SpringBootApplicationpublic class SpringbootConfigApplication { public static void main(String[] args) { SpringApplication.run(SpringbootConfigApplication.class, args); }} Test代码–测试:
/** * SpringBoot的单元测试,可以在测试期间很方便的使用类似编码一样的自动注入容器功能 */@SpringBootTestclass SpringbootConfigApplicationTests { @Autowired private ApplicationContext ioc; // 自动注入IOC容器 /** * 判断容器内是否含有某个Bean */ @Test void testIsHave() { System.out.println("容器内是否存在该bean?" + ioc.containsBean("helloService")); // 输出为true,即存在名为helloService的容器 }} SpringBoot给容器添加组件的推荐方式
对于上述向IOC容器添加组件的方式在SpringBoot中其实是不推荐的(SpringBoot推荐使用全注解方式),可以采用如下的方式:通过编写配置类(配置类代替之前编写的配置文件)
编写配置类edu.hebeu.config.MyConfig
@Configuration // 指明该类是一个配置类,用来替代之前的Spring配置文件public class MyConfig { @Bean /*对应 编写完上述的类后,无需任何操作,就能实现注入容器了!测试:
@SpringBootTestclass SpringbootConfigApplicationTests { @Autowired private ApplicationContext ioc; // 自动注入IOC容器 /** * 判断容器内是否含有某个Bean */ @Test void testIsHave() { System.out.println("容器内是否存在该bean?" + ioc.containsBean("helloService")); // 输出为true,即存在名为helloService的容器 }} 配置文件占位符
配置文件可以使用占位符
配置文件中可以使用随机数,通过RandomValuePropertySource,如:${random.value}、${random.int}、${random.long}、${random.int(10)}、${random.int[1024,65536]}
属性配置占位符
app.name=MyAppapp.description=${app.name} is a Spring Boot application - 可以在配置文件中引用前面的配置过的属性(优先级前面配置过的这里都能用)
${app.name:默认值}来指定找不到属性时的默认值
例如:
person.last-name=张三${random.uuid}person.age=${random.int}person.birthday=2020/4/19person.boss=trueperson.map.k1=v3<>${person.hello}person.map.k2=20person.map.2k=25person.list=a,v,g,b,d,cperson.dog.name=${person.last-name}<>xiaohu<>${person.hello:NoHello}person.dog.age=${random.int(9,20)} Profile
Profile是Spring对不同环境提供不同配置功能的支持,可以通过激活、指定参数等方式快速切换环境;
多profile文件格式:
我们编写主配置文件时,文件名可以是application-{profile}.properties/yml(yaml),需要注意,默认使用的是全局配置文件:application.properties配置文件内的配置
- 格式:application-{profile}.properties,如下:
- application-dev.properties、application-prod.properties
如:新建application-dev.properties配置文件、新建application-prod.properties配置文件,并在内部配置相应的环境
YML支持多文档块方式
在使用.yml配置文件时可以使用多properties文档块模式,
# Document1文档块server: port: 8888spring: profiles: active: prod # 激活prod文档块(生产时的环境)# active: dev # 激活dev文档块(开发时的环境)---# Document2文档块#server:# port: 12000---# Document3文档块server: port: 8844spring: profiles: dev # 指明该文档块是dev---# Document4文档块server: port: 11000spring: profiles: prod # 指明该文档块是prod
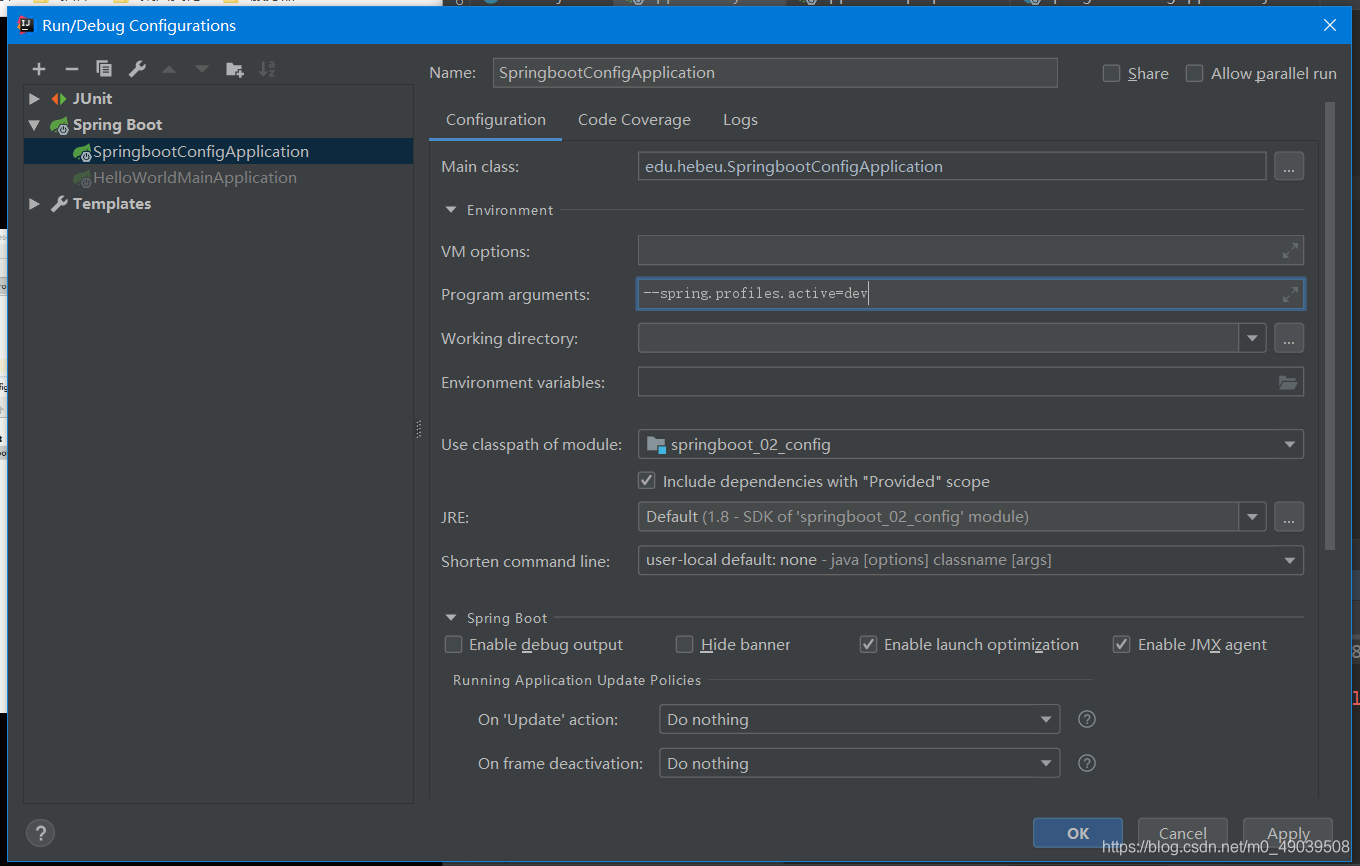
激活方式:
通过命令行激活:如:--spring.profiles.active=dev、--spring.profiles.active=prod,注意如果其他的激活方式也设值了,但是还是会根据该激活方式来运行程序
- 指定使用dev模式
通过配置文件激活:spring.profiles.active=dev
- 通过全局配置文件
application.properties内指定
# 激活application-dev.properties配置文件(开发时)# spring.profiles.active=dev# 激活application-prod.properties配置文件(生产时)spring.profiles.active=prod
- 通过全局配置文件
application.yml内指定
spring: profiles: active: prod # 激活prod文档块(生产时的环境)# active: dev # 激活dev文档块(开发时的环境)
通过命令行参数激活:-spring.profiles.active=dev
将项目打包,在控cmd通过java -jar jar包名 --spring.profiles.active=dev、或者java -jar jar包名 --spring.profiles.active=prod来指定激活方式运行该jar包;
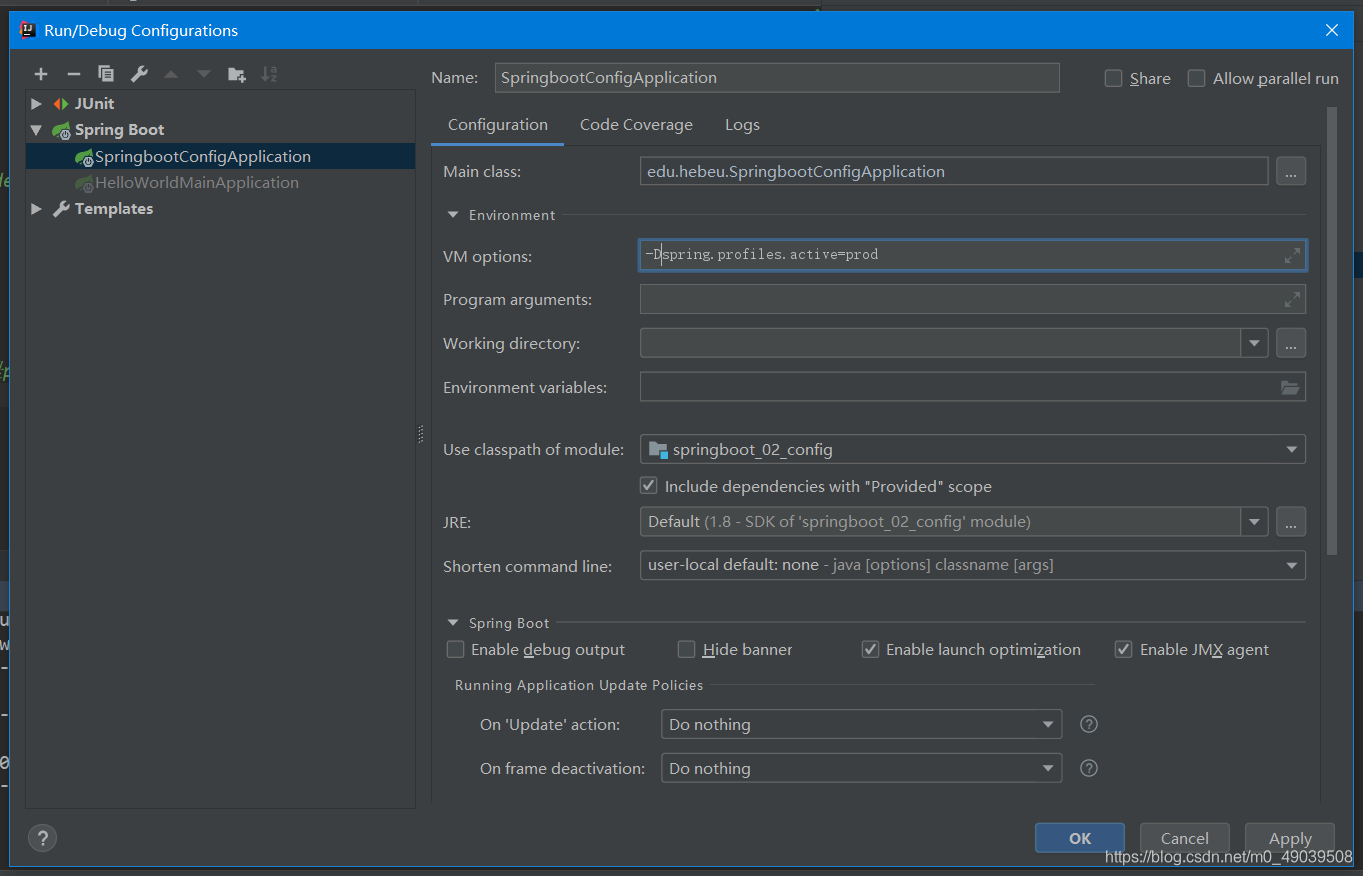
通过JVM虚拟机参数激活:-Dspring.profiles.active=dev
如:
配置文件的加载位置
SpringBoot启动会扫描一下位置的application.properties或者application.yml/yaml文件作为SpringBoot的默认配置文件;、
-
file:./config/ -
file:./ -
classpath:./config/ -
classpath:/ -
以上是按照优先级从高到低的顺序,所有位置的文件都会被加载,高优先级别配置内容会覆盖低优先级配置内容。
-
我们也可以通过配置
spring.config.location来改变默认位置-
# 指定要配置文件的路径#spring.config.location=D:/myConfig.properties
-
需要注意:项目打包好以后,我们可以使用命令行参数的形式启动项目,启动时我们需要指定配置文件的新位置,指定配置文件和默认加载的这些配置文件共同起作用(一起加载),形成互补配置,使用:
java -jar 打包好的jar包名.jar --spring.config.location=指定配置文件的路径;
-
外部配置加载顺序
SpringBoot支持多种外部配置方式,优先级如下,需要注意优先级高的覆盖优先级低的配置,所有配置会形成互补(如果有不同内容):
- 命令行参数
- 来自java:comp/env的JNDI属性
- Java系统属性(System.getProperties())
- 操作系统环境变量
- RandomValuePropertySource配置的random.*属性值
- jar包外部的
application-{profile}.properties或application.yml(带spring.profile)配置文件 - jar包内部的
application-{profile}.properties或application.yml(带spring.profile)配置文件 - jar包外部的
application.properties或application.yml(不带spring.profile)配置文件 - jar包内部的
application.properties或application.yml(不带spring.profile)配置文件 - @Configuration注解类上的@PropertySource
- 通过SpringApplication。setDefaultProperties指定的默认属性
自动配置原理
配置文件到底能写什么?怎么写?
自动配置原理?
-
SpringBoot启动时加载主配置类,开启了自动配置功能
@EnableAutoConfiguration(@SpringBootApplication注解源码里)-
@EnableAutoConfiguration作用:利用AutoConfigurationImportSelector类(@EnableAutoConfiguration源码里)给容器中导入一些组件; -
利用
AutoConfigurationImportSelector类的父类AutoConfigurationImportSelector的
String[] selectImports(AnnotationMetadata annotationMetadata) { // ... AutoConfigurationImportSelector.AutoConfigurationEntry autoConfigurationEntry = this.getAutoConfigurationEntry(annotationMetadata); // ...}追取到:
AutoConfigurationImportSelector.AutoConfigurationEntry getAutoConfigurationEntry(AnnotationMetadata annotationMetadata) { // ... // 用来获取配置候选项 Listconfigurations = this.getCandidateConfigurations(annotationMetadata, attributes); // ...} 追取到:
List
getCandidateConfigurations(AnnotationMetadata metadata, AnnotationAttributes attributes) { List configurations = SpringFactoriesLoader.loadFactoryNames(this.getSpringFactoriesLoaderFactoryClass(), this.getBeanClassLoader()); Assert.notEmpty(configurations, "No auto configuration classes found in META-INF/spring.factories. If you are using a custom packaging, make sure that file is correct."); return configurations; } 追取到
loadFactoryNames()方法:List
loadFactoryNames(Class factoryType, @Nullable ClassLoader classLoader) { String factoryTypeName = factoryType.getName(); return (List)loadSpringFactories(classLoader).getOrDefault(factoryTypeName, Collections.emptyList()); } 追取到
loadSpringFactories()方法:Map
urls = classLoader != null ? classLoader.getResources("META-INF/spring.factories") : ClassLoader.getSystemResources("META-INF/spring.factories"); // 这里会把扫描到的文件内容包装成properties对象并返回 while(urls.hasMoreElements()) { URL url = (URL)urls.nextElement(); UrlResource resource = new UrlResource(url); Properties properties = PropertiesLoaderUtils.loadProperties(resource); Iterator var6 = properties.entrySet().iterator(); while(var6.hasNext()) { Entry entry = (Entry)var6.next(); String factoryTypeName = ((String)entry.getKey()).trim(); String[] var9 = StringUtils.commaDelimitedListToStringArray((String)entry.getValue()); int var10 = var9.length; for(int var11 = 0; var11 < var10; ++var11) { String factoryImplementationName = var9[var11]; result.add(factoryTypeName, factoryImplementationName.trim()); } } } cache.put(classLoader, result); return result;} 回到
List<String> getCandidateConfigurations(AnnotationMetadata metadata, AnnotationAttributes attributes)方法,继续追取getSpringFactoriesLoaderFactoryClass()方法Class getSpringFactoriesLoaderFactoryClass() { // 返回EnableAutoConfiguration类的字节码 return EnableAutoConfiguration.class;}因此可以大概清晰:从
loadSpringFactories()方法中将获取到的EnableAutoConfiguration.class类(类名)对应的值。然后把它们添加到容器中 -
结论:将类路径下的META-INF/spring.factories里面配置的所有EnableAutoConfiguration的值加入到容器中,如下图所示;
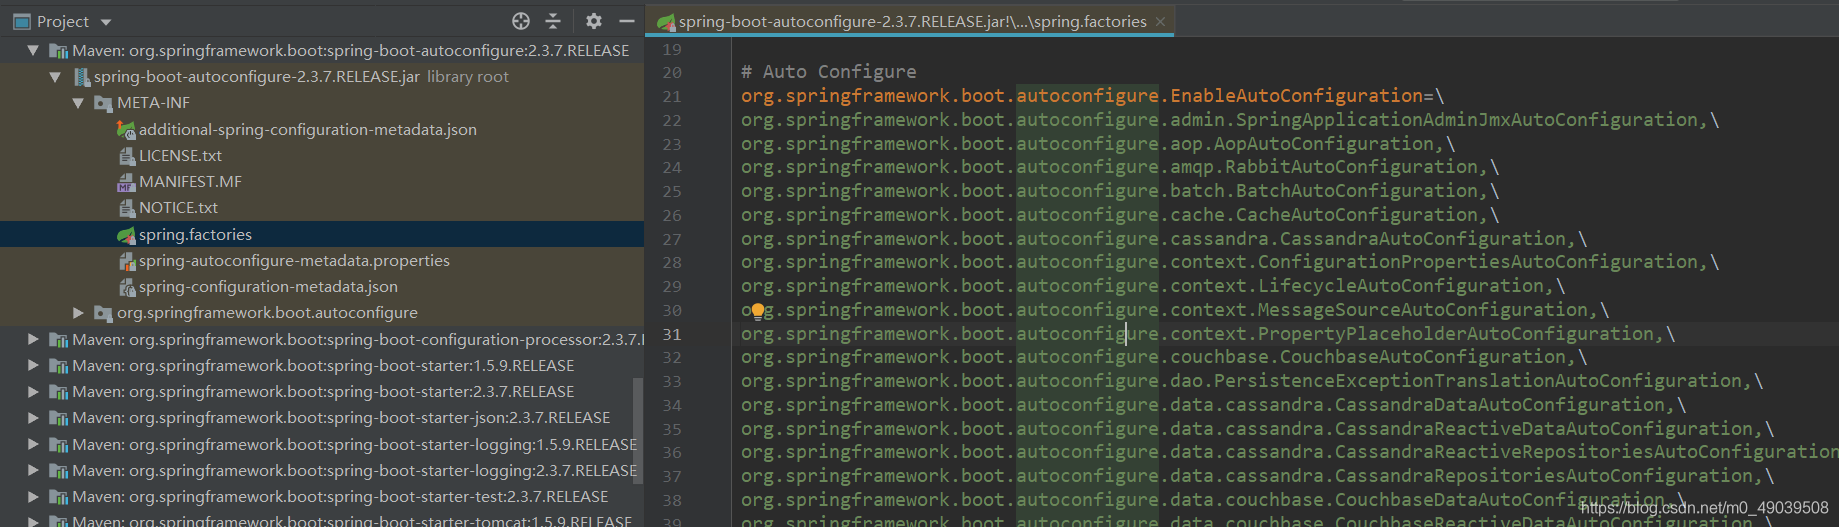
其中每一个xxxAutoConfiguration类都是容器中的一个组件,都加入到了容器中,用它们来做自动配置(自动配置的开始);
-
每一个自动配置类进行自动配置功能,这里以
HttpEncodingAutoConfiguration类进行分析,来解释自动配置原理;-
HttpEncodingAutoConfiguration类部分源码:@Configuration(proxyBeanMethods = false) // 表示这是一个配置类,也可以给容器中添加组件@EnableConfigurationProperties(ServerProperties.class) // 启用ConfigurationProperties功能,将配置文件中对应的值和ServerProperties绑定起来,并把ServerProperties加入到容器中// Spring底层@Condition注解,根据不同的条件,如果满足指定的条件。整个配置类里面的配置就会生效;这里的这个注解是用来判断当前的应用是否是WEB应用,如果是,择当前配置类生效,如果不是就不生效;@ConditionalOnWebApplication(type = ConditionalOnWebApplication.Type.SERVLET)// 判断当前项目有没有这个类(CharacterEncodingFilter类),该类是SpringMVC中进行乱码解决的过滤器@ConditionalOnClass(CharacterEncodingFilter.class)// 判断配置文件中是否存在某个配置("prefix对应值.value对应值" 的配置),如果不存在判断是否还成立/生效("matchIfMissing对应值"决定);这里就表示判断配置文件是否有"server.servlet.encoding.enabled"配置,即使没有该属性(不配置该属性),也是默认生效的@ConditionalOnProperty(prefix = "server.servlet.encoding", value = "enabled", matchIfMissing = true)public class HttpEncodingAutoConfiguration { // 因此这里可以这样理解这些注解,根据当前不同的条件判断,决定这个配置类是否生效,这个配置类一旦生效,该配置类就会给容器中添加各种组件,这些组件的属性是从对应的properties类中获取的,这些类里面的每一个属性(properties成员变量)又是和配置文件绑定的; private final Encoding properties; /** * 构造器 * 此时因为ServerProperties类已经通过上面的@EnableConfigurationProperties注解与配置文件绑定并加入到容器中了,所以这里通过该参数properties,可以实现将配置文件的配置内容交给这个配置类的properties成员变量 */ public HttpEncodingAutoConfiguration(ServerProperties properties) { this.properties = properties.getServlet().getEncoding(); } /** * */ @Bean // 给容器中添加该方法返回值对应的组件,并且这个组件的某些在需要从properties属性获取 @ConditionalOnMissingBean // 该注解表示如果容器中没有这个组件才会将该组件加入到容器 public CharacterEncodingFilter characterEncodingFilter() { CharacterEncodingFilter filter = new OrderedCharacterEncodingFilter(); filter.setEncoding(this.properties.getCharset().name()); filter.setForceRequestEncoding(this.properties.shouldForce(Encoding.Type.REQUEST)); filter.setForceResponseEncoding(this.properties.shouldForce(Encoding.Type.RESPONSE)); return filter; } }追取:
构造器:HttpEncodingAutoConfiguration(ServerProperties properties) { this.properties = properties.getServlet().getEncoding();}追取:
getEncoding()方法:Encoding getEncoding() { return this.encoding;}// encoding属性:@NestedConfigurationPropertyprivate final Encoding encoding = new Encoding();追取:
Encoding的构造器:Encoding() { this.charset = DEFAULT_CHARSET;}// Encoding类内部的重要成员public static final Charset DEFAULT_CHARSET;private Charset charset;static { DEFAULT_CHARSET = StandardCharsets.UTF_8;}回到
HttpEncodingAutoConfiguration类,追取ServerProperties类,:@ConfigurationProperties(prefix = "server", ignoreUnknownFields = true)public class ServerProperties { private Integer port; private InetAddress address; @NestedConfigurationProperty private final ErrorProperties error = new ErrorProperties(); private ForwardHeadersStrategy forwardHeadersStrategy; private String serverHeader; private DataSize maxHttpHeaderSize = DataSize.ofKilobytes(8); // ...发现相关的属性都在这里,因此。所有在配置文件中能配置的属性都是在
xxxProperties类中封装的;配置文件能配置什么,就可以参照某个功能对应的这个属性类
结论
通过自动配置原理,我们可以发现:
- SpringBoot启动会加载大量的自动配置类
- 我们根据需要的功能看看有没有SpringBoot默认写好的自动配置类,如果有,我们再来看这个自动配置类中到底配置了哪些组件(只有我们要配置的组件有,我们就不需要再来配置了,当然如果没有,就需要我们自己写入);
- 给容器中自动配置类添加组件时,会从properties类中获取某些属性,我们就可以在配置文件中指定这些属性的值;
- SpringBoot有非常多的这种模式:
- xxxAutoConfiguration:自动配置类,会给容器中添加组件;
- xxxProperties:封装配置文件中相关的属性;
-
@Conditional
在上一步的源码分析中,我们发现了许多的@Conditionalxxx注解,这些注解都是用来决定自动配置类能否生效,这些@Conditionalxxx都是利用Spring底层的@Conditional做的,如@ConditionalOnClass注解:
@Target({ ElementType.TYPE, ElementType.METHOD })@Retention(RetentionPolicy.RUNTIME)@Documented@Conditional(OnClassCondition.class) // public @interface ConditionalOnClass { 追入OnClassCondition类
// 该类中的重要方法:用来判断是否是Java代码class OnClassCondition extends FilteringSpringBootCondition { } SpringBoot派生出的一些@Conditional注解的举例:
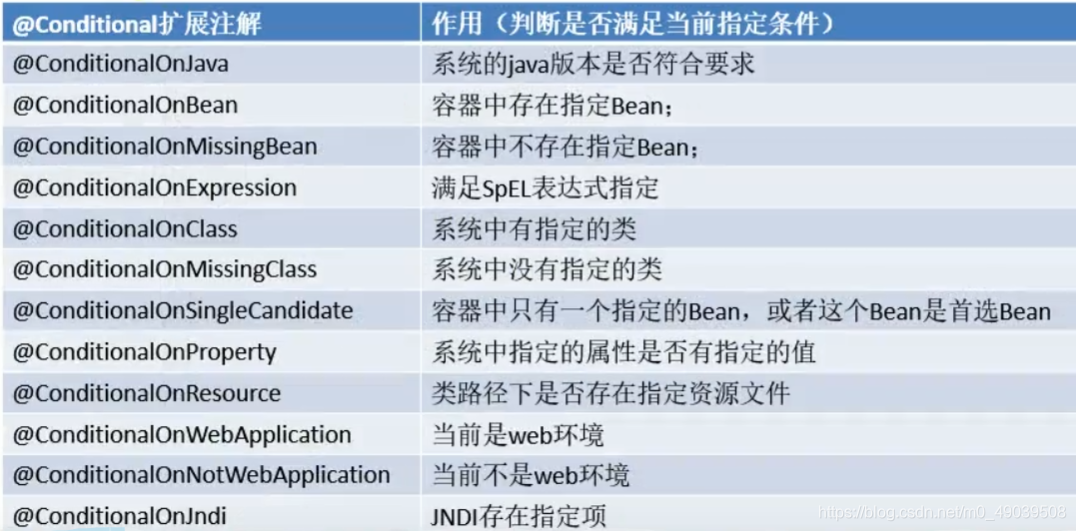
Spring注解版原生的@Conditional注解的作用:必须是@Conditional指定的条件成立,才给容器中添加组件,配置类里面的所有的内容才生效;
需要注意:自动配置类必须在一定的条件下才能生效,那么如何知道哪些自动配置类生效?
可在配置文件中添加debug=true,即开启SpringBoot的debug模式来查看自动配置报告,这样我们就可以控制台打印处知道哪些自动配置类生效了;
如下:
============================CONDITIONS EVALUATION REPORT // 表示自动配置报告============================// 这是生效(启用)的自动配置类Positive matches:----------------- AopAutoConfiguration matched: - @ConditionalOnProperty (spring.aop.auto=true) matched (OnPropertyCondition) AopAutoConfiguration.ClassProxyingConfiguration matched: - @ConditionalOnMissingClass did not find unwanted class 'org.aspectj.weaver.Advice' (OnClassCondition) - @ConditionalOnProperty (spring.aop.proxy-target-class=true) matched (OnPropertyCondition) DispatcherServletAutoConfiguration matched: - @ConditionalOnClass found required class 'org.springframework.web.servlet.DispatcherServlet' (OnClassCondition) - found 'session' scope (OnWebApplicationCondition) DispatcherServletAutoConfiguration.DispatcherServletConfiguration matched: - @ConditionalOnClass found required class 'javax.servlet.ServletRegistration' (OnClassCondition) - Default DispatcherServlet did not find dispatcher servlet beans (DispatcherServletAutoConfiguration.DefaultDispatcherServletCondition) DispatcherServletAutoConfiguration.DispatcherServletRegistrationConfiguration matched: - @ConditionalOnClass found required class 'javax.servlet.ServletRegistration' (OnClassCondition) - DispatcherServlet Registration did not find servlet registration bean (DispatcherServletAutoConfiguration.DispatcherServletRegistrationCondition) DispatcherServletAutoConfiguration.DispatcherServletRegistrationConfiguration#dispatcherServletRegistration matched: - @ConditionalOnBean (names: dispatcherServlet types: org.springframework.web.servlet.DispatcherServlet; SearchStrategy: all) found bean 'dispatcherServlet' (OnBeanCondition) EmbeddedWebServerFactoryCustomizerAutoConfiguration matched: - @ConditionalOnWebApplication (required) found 'session' scope (OnWebApplicationCondition) EmbeddedWebServerFactoryCustomizerAutoConfiguration.TomcatWebServerFactoryCustomizerConfiguration matched: - @ConditionalOnClass found required classes 'org.apache.catalina.startup.Tomcat', 'org.apache.coyote.UpgradeProtocol' (OnClassCondition) // 这是没有生效(没有启用)的自动配置类Negative matches:----------------- ActiveMQAutoConfiguration: Did not match: - @ConditionalOnClass did not find required class 'javax.jms.ConnectionFactory' (OnClassCondition) AopAutoConfiguration.AspectJAutoProxyingConfiguration: Did not match: - @ConditionalOnClass did not find required class 'org.aspectj.weaver.Advice' (OnClassCondition) ArtemisAutoConfiguration: Did not match: - @ConditionalOnClass did not find required class 'javax.jms.ConnectionFactory' (OnClassCondition) BatchAutoConfiguration: Did not match: - @ConditionalOnClass did not find required class 'org.springframework.batch.core.launch.JobLauncher' (OnClassCondition) CacheAutoConfiguration: Did not match: - @ConditionalOnBean (types: org.springframework.cache.interceptor.CacheAspectSupport; SearchStrategy: all) did not find any beans of type org.springframework.cache.interceptor.CacheAspectSupport (OnBeanCondition) Matched: - @ConditionalOnClass found required class 'org.springframework.cache.CacheManager' (OnClassCondition)ectj.weaver.Advice' (OnClassCondition) ArtemisAutoConfiguration: Did not match: - @ConditionalOnClass did not find required class 'javax.jms.ConnectionFactory' (OnClassCondition) BatchAutoConfiguration: Did not match: - @ConditionalOnClass did not find required class 'org.springframework.batch.core.launch.JobLauncher' (OnClassCondition) CacheAutoConfiguration: Did not match: - @ConditionalOnBean (types: org.springframework.cache.interceptor.CacheAspectSupport; SearchStrategy: all) did not find any beans of type org.springframework.cache.interceptor.CacheAspectSupport (OnBeanCondition) Matched: - @ConditionalOnClass found required class 'org.springframework.cache.CacheManager' (OnClassCondition)
至此,我的笔记就全部展示完了,但是SpringBoot的自动配置原理并非仅仅这么一点东西,我们应该虚心学习,才能掌握更深更多的知识!
转载地址:https://blog.csdn.net/m0_49039508/article/details/116500783 如侵犯您的版权,请留言回复原文章的地址,我们会给您删除此文章,给您带来不便请您谅解!
发表评论
最新留言
关于作者
