本文共 36580 字,大约阅读时间需要 121 分钟。
SpringBoot对静态资源映射规则和请求映射处理的原理解析
这篇博文是学习B站尚硅谷雷老师的SpringBoot2做出的笔记总结,再次表示由衷的感谢!
文章目录
SpringBoot对静态资源处理
先看WebMvcAutoConfiguration类内的一些重要代码:
// 资源的属性,以xxxProperties,可以推断该属性对应的类型是一个配置类,并且与配置文件内的配置进行了绑定private final ResourceProperties resourceProperties;// 这个方法是用来处理所有的`webjars/***`请求的,让这些请求都去'classpath:/META-INF/resources/webjars/'目录下找资源@Overridepublic void addResourceHandlers(ResourceHandlerRegistry registry) { if (!this.resourceProperties.isAddMappings()) { logger.debug("Default resource handling disabled"); return; } Integer cachePeriod = this.resourceProperties.getCachePeriod(); if (!registry.hasMappingForPattern("/webjars/**")) { customizeResourceHandlerRegistration( registry.addResourceHandler("/webjars/**") .addResourceLocations( "classpath:/META-INF/resources/webjars/") .setCachePeriod(cachePeriod)); // 设置的资源缓存时间 } String staticPathPattern = this.mvcProperties.getStaticPathPattern(); if (!registry.hasMappingForPattern(staticPathPattern)) { customizeResourceHandlerRegistration( registry.addResourceHandler(staticPathPattern) // 添加资源映射 .addResourceLocations( this.resourceProperties.getStaticLocations()) .setCachePeriod(cachePeriod)); }}// 配置欢迎页面映射的方法@Beanpublic WelcomePageHandlerMapping welcomePageHandlerMapping( ResourceProperties resourceProperties) { // 创建欢迎页映射处理器对象实例,其中观察源码,发现getStaticPathPattern()的返回值是 /** return new WelcomePageHandlerMapping(resourceProperties.getWelcomePage(), this.mvcProperties.getStaticPathPattern());}// 配置图标(网页的标签处的小图标)@Configuration@ConditionalOnProperty(value = "spring.mvc.favicon.enabled", matchIfMissing = true)public static class FaviconConfiguration { private final ResourceProperties resourceProperties; public FaviconConfiguration(ResourceProperties resourceProperties) { this.resourceProperties = resourceProperties; } @Bean public SimpleUrlHandlerMapping faviconHandlerMapping() { SimpleUrlHandlerMapping mapping = new SimpleUrlHandlerMapping(); mapping.setOrder(Ordered.HIGHEST_PRECEDENCE + 1); // 把所有的 **/favicon.ico请求都映射到 mapping.setUrlMap(Collections.singletonMap("**/favicon.ico", faviconRequestHandler())); return mapping; } @Bean public ResourceHttpRequestHandler faviconRequestHandler() { ResourceHttpRequestHandler requestHandler = new ResourceHttpRequestHandler(); requestHandler .setLocations(this.resourceProperties.getFaviconLocations()); return requestHandler; }} 再追入ResourceProperties类内:
@ConfigurationProperties(prefix = "spring.resources", ignoreUnknownFields = false) // 该属性类与 配置文件的 spring.resources 绑定public class ResourceProperties implements ResourceLoaderAware { // 该类可以设置和资源有关的参数,如缓存时间等 private static final String[] RESOURCE_LOCATIONS; private static final String[] SERVLET_RESOURCE_LOCATIONS = { "/" }; private static final String[] CLASSPATH_RESOURCE_LOCATIONS = { "classpath:/META-INF/resources/", "classpath:/resources/", "classpath:/static/", "classpath:/public/" }; // 默认的静态资源目录 static { RESOURCE_LOCATIONS = new String[CLASSPATH_RESOURCE_LOCATIONS.length + SERVLET_RESOURCE_LOCATIONS.length]; System.arraycopy(SERVLET_RESOURCE_LOCATIONS, 0, RESOURCE_LOCATIONS, 0, SERVLET_RESOURCE_LOCATIONS.length); System.arraycopy(CLASSPATH_RESOURCE_LOCATIONS, 0, RESOURCE_LOCATIONS, SERVLET_RESOURCE_LOCATIONS.length, CLASSPATH_RESOURCE_LOCATIONS.length); } private String staticPathPattern = "/**"; private String[] staticLocations = RESOURCE_LOCATIONS; public String getStaticPathPattern() { return this.staticPathPattern; } public String[] getStaticLocations() { return this.staticLocations; } // 获取欢迎页 public Resource getWelcomePage() { for (String location : getStaticWelcomePageLocations()) { Resource resource = this.resourceLoader.getResource(location); try { if (resource.exists()) { resource.getURL(); return resource; } } catch (Exception ex) { // Ignore } } return null; } private String[] getStaticWelcomePageLocations() { // 获取欢迎页位置 String[] result = new String[this.staticLocations.length]; for (int i = 0; i < result.length; i++) { String location = this.staticLocations[i]; if (!location.endsWith("/")) { location = location + "/"; } result[i] = location + "index.html"; } return result; } List getFaviconLocations() { // 获取网页的小图标 List locations = new ArrayList ( this.staticLocations.length + 1); if (this.resourceLoader != null) { for (String location : this.staticLocations) { locations.add(this.resourceLoader.getResource(location)); } } locations.add(new ClassPathResource("/")); return Collections.unmodifiableList(locations); }} webjars
-
观察上述的源码,可以发现所有的
/webjars/**请求都要去classpath:/META-INF/resources/webjars/找资源,如下演示:-
webjars:以jar包的方式引入静态资源,如下在
pom.xml文件中引入: -
org.webjars jquery 3.3.1 -
此时在项目依赖报下会找到该jquery资源,如图:[外链图片转存失败,源站可能有防盗链机制,建议将图片保存下来直接上传(img-y73Vxnz2-1620467492285)(web开发的学习.assets/搜狗截图20180203181751.png)]
-
此时可以通过
127.0.0.1:端口/访问名/webjars/资源文件名进行资源的访问,如这里可以通过http://localhost:8080/webjars/jquery/3.3.1/jquery.js进行访问jquery.js文件
-
静态资源目录
-
类路径下(
resources/目录下)的"META-INF/resources/", "resources/","static/", "public/"都是静态资源目录;(我这里试了一下,发现 public/目录、resources/目录、static/目录都不成功,我的spring boot版本是2.3.7的) -
观察上述源码,可以发现静态资源映射的是
/**,所有的请求都会先看Controller能不能处理,如果能处理就处理掉该请求,如果没有处理就将请求作为静态资源的文件名去静态资源文件夹下处理(找对应的静态资源),如果静态资源也没有处理(没有找到该请求对应的静态资源文件名),那么就是404页面;- 通过
127.0.0.1:端口/放在上述任意一个文件夹的静态资源文件路径名,如:http://localhost:8080/asserts/css/bootstrap.min.css;
- 通过
配置自定义的静态资源目录
可以通过在配置文件中通过如下配置修改静态文件夹的路径:
# 指定自定义的几个静态资源目录spring.resources.static-locations=classpath:/my_resources/,classpath:/my_hello/
静态资源访问前缀
静态资源访问默认无前缀(/**),如果需要配置请求静态资源的前缀,可以在配置文件加入:
spring: mvc: static-path-pattern: /my_static/** # 指明该项目的静态资源请求都是以 /my_static/ 开头的
自定义欢迎页
- 方式一、观察上述源码,欢迎页通过上述的静态资源目录下的所有
index.xml页面,被/**映射;如访问localhost:8080/就会访问静态资源目录下的index页面- 测试总结:1、可以配置静态资源路径;2、但是***不可以配置静态资源的访问前缀***,否则就会导致在请求 / 时不能将 index.heml静态资源映射成功;
- 方式二、通过Controller能处理 /index
自定义favicon
- 通过上述的源码分析,所有的
/favicon.ico请求都是在上述的静态资源目录下找favicon.ico文件作为网页的小图标,测试不成功可以F12调式模式,在里面选择关闭缓存在此刷新即可;- 测试总结:不可以配置静态资源的访问前缀,否则就会导致
favicon.ico文件不能加载成功;
- 测试总结:不可以配置静态资源的访问前缀,否则就会导致
静态资源映射规则的原理
首先,我们需要知道:
- SpringBoot启动默认加载
xxxAutoConfiguration类(自动配置类); - SpringMVC功能配置大多都在
WebMvcAutoConfiguration自动配置类中
WebMvcAutoConfiguration类的重要代码:
@Configuration(proxyBeanMethods = false)@ConditionalOnWebApplication(type = Type.SERVLET) // 当前是WEB环境,类型是SERVLET时该配置类才会生效@ConditionalOnClass({ Servlet.class, DispatcherServlet.class, WebMvcConfigurer.class }) // 系统中存在这些类该配置类才会生效,这些类在导入SpringMVC相关的依赖后都会存在@ConditionalOnMissingBean(WebMvcConfigurationSupport.class) // 容器中没有该类型的组件时该配置类才会生效@AutoConfigureOrder(Ordered.HIGHEST_PRECEDENCE + 10)@AutoConfigureAfter({ DispatcherServletAutoConfiguration.class, TaskExecutionAutoConfiguration.class, ValidationAutoConfiguration.class })/*通过上述注解的分析,可以知道该配置类会生效!!!*/public class WebMvcAutoConfiguration { @Bean @ConditionalOnMissingBean(FormContentFilter.class) @ConditionalOnProperty(prefix = "spring.mvc.formcontent.filter", name = "enabled", matchIfMissing = true) // 系统(配置文件)中 spring.mvc.formcontent.filter 有值时该方法生效 public OrderedFormContentFilter formContentFilter() { // 表单内容的过滤器 return new OrderedFormContentFilter(); } @Configuration(proxyBeanMethods = false) // 指明该类是一个配置类 @Import(EnableWebMvcConfiguration.class) @EnableConfigurationProperties({ WebMvcProperties.class, ResourceProperties.class }) // 表示该配置类与属性配置类WebMvcProperties、ResourceProperties绑定,并将这两个属性配置类导入到容器中 @Order(0) public static class WebMvcAutoConfigurationAdapter implements WebMvcConfigurer { // MVC相关配置类的适配器 private static final Log logger = LogFactory.getLog(WebMvcConfigurer.class); private final ResourceProperties resourceProperties; private final WebMvcProperties mvcProperties; private final ListableBeanFactory beanFactory; private final ObjectProvider messageConvertersProvider; private final ObjectProvider dispatcherServletPath; private final ObjectProvider > servletRegistrations; final ResourceHandlerRegistrationCustomizer resourceHandlerRegistrationCustomizer; /* 构造器(这里引出SpringBoot源码的一个小细节:以后在SpringBoot源码中发现某个类只有一个有参构造器,那么在大部分情况下该有参构造器所有参数的值都会从容器中获取!!!); 参数分析: ResourceProperties resourceProperties:获取配置文件的 spring.resources.xxx 的信息 WebMvcProperties mvcProperties:获取配置文件的 spring.mvc.xxx 的信息 ListableBeanFactory beanFactory:获取容器工厂(Bean工厂,即IOC) ObjectProvider messageConvertersProvider:找到所有的HttpMessageConverters ObjectProvider resourceHandlerRegistrationCustomizerProvider:找到所有的资源处理器的自定义器 ObjectProvider > servletRegistrations:找到所有的ServletRegistrationBean,ServletRegistrationBean的作用就是用来注册原生的Servlet、Listener、Filter等 */ public WebMvcAutoConfigurationAdapter(ResourceProperties resourceProperties, WebMvcProperties mvcProperties, ListableBeanFactory beanFactory, ObjectProvider messageConvertersProvider, ObjectProvider resourceHandlerRegistrationCustomizerProvider, ObjectProvider dispatcherServletPath, ObjectProvider > servletRegistrations) { this.resourceProperties = resourceProperties; this.mvcProperties = mvcProperties; this.beanFactory = beanFactory; this.messageConvertersProvider = messageConvertersProvider; this.resourceHandlerRegistrationCustomizer = resourceHandlerRegistrationCustomizerProvider.getIfAvailable(); this.dispatcherServletPath = dispatcherServletPath; this.servletRegistrations = servletRegistrations; } @Bean @ConditionalOnMissingBean // 容器中不存在InternalResourceViewResolver类(视图解析器)时该方法生效 public InternalResourceViewResolver defaultViewResolver() { // 向容器中添加视图解析器的组件 InternalResourceViewResolver resolver = new InternalResourceViewResolver(); resolver.setPrefix(this.mvcProperties.getView().getPrefix()); resolver.setSuffix(this.mvcProperties.getView().getSuffix()); return resolver; } @Bean @ConditionalOnMissingBean // 容器中不存在LocaleResolver类(国际化支持的组件)时该方法生效 @ConditionalOnProperty(prefix = "spring.mvc", name = "locale") public LocaleResolver localeResolver() { // 向容器中添加国际化支持的组件 if (this.mvcProperties.getLocaleResolver() == WebMvcProperties.LocaleResolver.FIXED) { return new FixedLocaleResolver(this.mvcProperties.getLocale()); } AcceptHeaderLocaleResolver localeResolver = new AcceptHeaderLocaleResolver(); localeResolver.setDefaultLocale(this.mvcProperties.getLocale()); return localeResolver; } @Override public MessageCodesResolver getMessageCodesResolver() { // 给国际化支持的组件设置消息解析的属性 if (this.mvcProperties.getMessageCodesResolverFormat() != null) { DefaultMessageCodesResolver resolver = new DefaultMessageCodesResolver(); resolver.setMessageCodeFormatter(this.mvcProperties.getMessageCodesResolverFormat()); return resolver; } return null; } @Override public void addFormatters(FormatterRegistry registry) { ApplicationConversionService.addBeans(registry, this.beanFactory); // 向IOC中添加格式化器 } @Override public void addResourceHandlers(ResourceHandlerRegistry registry) { // 添加资源处理器(所有的资源处理默认规则在此) if (!this.resourceProperties.isAddMappings()) { // 判断配置文件的spring.resources.add-mapping属性是否为false,如果为false,就进入该判断,结束该方法(下面就不执行了,即所有的默认配置都不生效) logger.debug("Default resource handling disabled"); return; } /*这里开始进行默认配置*/ Duration cachePeriod = this.resourceProperties.getCache().getPeriod(); // 获取静态资源的缓存规则(缓存时间,秒计) CacheControl cacheControl = this.resourceProperties.getCache().getCachecontrol().toHttpCacheControl(); // 决定是否注册 /webjars/** 的规则 if (!registry.hasMappingForPattern("/webjars/**")) { // 如果没有注册 /webjars/** 的规则 customizeResourceHandlerRegistration(registry.addResourceHandler("/webjars/**") // 注册 /webjars/** 的规则 .addResourceLocations("classpath:/META-INF/resources/webjars/") // 让该规则去 类路径下的 /META-INF/resources/webjars/ 目录找静态资源 .setCachePeriod(getSeconds(cachePeriod)).setCacheControl(cacheControl)); // 设置该规则的缓存策略 } // 决定是否注册 静态资源路径 的规则 String staticPathPattern = this.mvcProperties.getStaticPathPattern(); // 获取静态资源规则 /**(MvcProperties属性类的源码分析得出) if (!registry.hasMappingForPattern(staticPathPattern)) { // 如果没有注册 /** 规则 customizeResourceHandlerRegistration(registry.addResourceHandler(staticPathPattern) // 注册 /** 规则 .addResourceLocations(getResourceLocations(this.resourceProperties.getStaticLocations() // 让该规则去 "classpath:/META-INF/resources/", "classpath:/resources/", "classpath:/static/", "classpath:/public/" 目录下找静态资源(ResourceProperties属性类的源码分析得出) .setCachePeriod(getSeconds(cachePeriod)).setCacheControl(cacheControl)); // 设置该规则的缓存策略 } } } @Configuration(proxyBeanMethods = false) // 指明该类是自动配置类 public static class EnableWebMvcConfiguration extends DelegatingWebMvcConfiguration implements ResourceLoaderAware { @Bean public WelcomePageHandlerMapping welcomePageHandlerMapping(ApplicationContext applicationContext, FormattingConversionService mvcConversionService, ResourceUrlProvider mvcResourceUrlProvider) { // 向容器中添加欢迎页映射处理器的组件 WelcomePageHandlerMapping welcomePageHandlerMapping = new WelcomePageHandlerMapping( new TemplateAvailabilityProviders(applicationContext), applicationContext, getWelcomePage(), this.mvcProperties.getStaticPathPattern()); // 获取配置文件的 spring.mvc.static-path-pattern属性的值 welcomePageHandlerMapping.setInterceptors(getInterceptors(mvcConversionService, mvcResourceUrlProvider)); welcomePageHandlerMapping.setCorsConfigurations(getCorsConfigurations()); return welcomePageHandlerMapping; } } } WebMvcProperties类的重要代码:
@ConfigurationProperties(prefix = "spring.mvc") // 表示与配置文件的 spring.mvc 进行绑定public class WebMvcProperties { private String staticPathPattern = "/**"; ResourcesProperties类的重要代码:
@ConfigurationProperties(prefix = "spring.resources", ignoreUnknownFields = false) // 表示与配置文件的 spring.resources 进行绑定public class ResourceProperties { private static final String[] CLASSPATH_RESOURCE_LOCATIONS = { "classpath:/META-INF/resources/", "classpath:/resources/", "classpath:/static/", "classpath:/public/" }; private String[] staticLocations = CLASSPATH_RESOURCE_LOCATIONS; private boolean addMappings = true; private final Chain chain = new Chain(); private final Cache cache = new Cache(); public static class Cache { @DurationUnit(ChronoUnit.SECONDS) private Duration period; // 缓存的时间,通过在配置文件中的 spring.resources.cache.period 属性进行配置,秒 } WelcomePageHandlerMapping类的重要代码
final class WelcomePageHandlerMapping extends AbstractUrlHandlerMapping { private static final Log logger = LogFactory.getLog(WelcomePageHandlerMapping.class); WelcomePageHandlerMapping(TemplateAvailabilityProviders templateAvailabilityProviders, ApplicationContext applicationContext, Optional welcomePage, String staticPathPattern) { if (welcomePage.isPresent() && "/**".equals(staticPathPattern)) { // 如果欢迎页存在,并且 /** 是访问路径;因此如果配置了自定义静态访问前缀,该欢迎页功能就会失效;那么如果要使用该欢迎页功能,就必须是默认的静态资源访问规则 /** logger.info("Adding welcome page: " + welcomePage.get()); setRootViewName("forward:index.html"); } else if (welcomeTemplateExists(templateAvailabilityProviders, applicationContext)) { // 否则 logger.info("Adding welcome page template: index"); setRootViewName("index"); // 调用 Controller,来处理 /index请求 } }} 对于 favicon.ico来说,其是浏览器默认发送的 /favicon.ico请求,整个session期间不会再获取,因此当静态资源访问前缀改变之后,该请求自然就不能找到favicon资源了;
总结:
- 分析SpringBoot源码时的一个小细节:以后在SpringBoot源码中发现某个类只有一个有参构造器,那么在大部分情况下该有参构造器所有参数的值都会从容器中获取;
- 可以通过修改配置文件的spring.resources.add-mapping属性为false,禁用掉所有的静态资源规则;该属性默认为true,即表示不禁用静态资源默认规则
SpringBoot对请求处理
REST风格
- 以前设置请求,如:/getUserAll、/getUser、/deleteUser、…
- REST风格(使用HTTP请求方式动词来表示对资源的操作)支持:/user GET-获取用户 DELETE-删除用户 PUT-修改用户 POST-保存用户
SpringBoot如何支持使用REST风格
-
接收各个请求如下所示:
-
@RestControllerpublic class UserController { @RequestMapping(value = "user", method = RequestMethod.GET) public String getUser() { return "REST---GET请求"; } @RequestMapping(value = "user", method = RequestMethod.POST) public String saveUser() { return "REST---POST请求"; } @RequestMapping(value = "user", method = RequestMethod.DELETE) public String deleteUser() { return "REST---DELETE请求"; } @RequestMapping(value = "user", method = RequestMethod.PUT) public String alterUser() { return "REST---PUT请求"; }}
-
-
使用表单如何发送REST请求,需要在配置文件中设置
spring.mvc.hiddenmethod.filter.enabled的属性值为true: -
-
使用客户端工具发送时(如接口测试工具、Android发送请求、前后端分离项目等),可以直接选择发送的请求类型,不需要特殊的处理,因此不需要在配置文件中设置
spring.mvc.hiddenmethod.filter.enabled的属性值,直接发送对应类型的请求即可;
支持REST风格的原理分析
WebMvcAutoConfiguration重要代码:
@Configuration(proxyBeanMethods = false)@ConditionalOnWebApplication(type = Type.SERVLET) // 当前是WEB环境,类型是SERVLET时该配置类才会生效@ConditionalOnClass({ Servlet.class, DispatcherServlet.class, WebMvcConfigurer.class }) // 系统中存在这些类该配置类才会生效,这些类在导入SpringMVC相关的依赖后都会存在@ConditionalOnMissingBean(WebMvcConfigurationSupport.class) // 容器中没有该类型的组件时该配置类才会生效@AutoConfigureOrder(Ordered.HIGHEST_PRECEDENCE + 10)@AutoConfigureAfter({ DispatcherServletAutoConfiguration.class, TaskExecutionAutoConfiguration.class, ValidationAutoConfiguration.class })/*通过上述注解的分析,可以知道该配置类会生效!!!*/public class WebMvcAutoConfiguration { @Bean @ConditionalOnMissingBean(HiddenHttpMethodFilter.class) // 容器中没有该类型的组件时就启用该方法 @ConditionalOnProperty(prefix = "spring.mvc.hiddenmethod.filter", name = "enabled", matchIfMissing = false) // 系统(配置文件)中 spring.mvc.hiddenmethod.filter的enabled属性值为true时该方法生效,该值默认为false public OrderedHiddenHttpMethodFilter hiddenHttpMethodFilter() { // SpringMVC用来兼容REST风格接口的 return new OrderedHiddenHttpMethodFilter(); } } OrderedHiddenHttpMethodFilter类的重要代码:
public class OrderedHiddenHttpMethodFilter extends HiddenHttpMethodFilter implements OrderedFilter { } HiddenHttpMethodFilter类的重要代码:
public class HiddenHttpMethodFilter extends OncePerRequestFilter { // 这些是允许的请求参数,包括PUT、DELETE、PATCH private static final List ALLOWED_METHODS = Collections.unmodifiableList(Arrays.asList(HttpMethod.PUT.name(), HttpMethod.DELETE.name(), HttpMethod.PATCH.name())); private static final List ALLOWED_METHODS = Collections.unmodifiableList(Arrays.asList(HttpMethod.PUT.name(), HttpMethod.DELETE.name(), HttpMethod.PATCH.name())); /** Default method parameter: {@code _method}. */ public static final String DEFAULT_METHOD_PARAM = "_method"; // 表单的隐藏的参数项(即提交来的表单内要有name值为 _method的表单项) private String methodParam = DEFAULT_METHOD_PARAM; @Override protected void doFilterInternal(HttpServletRequest request, HttpServletResponse response, FilterChain filterChain) throws ServletException, IOException { HttpServletRequest requestToUse = request; // 接收原生的request 请求 if ("POST".equals(request.getMethod()) && request.getAttribute(WebUtils.ERROR_EXCEPTION_ATTRIBUTE) == null) { // 表示当请求是POST类型且没有请求没有异常 String paramValue = request.getParameter(this.methodParam); // 通过原生的request获取 _method 参数的值 if (StringUtils.hasLength(paramValue)) { // 如果 _method参数的值不为""且不为null String method = paramValue.toUpperCase(Locale.ENGLISH); // 将 _method参数的值都转换成英文大写 if (ALLOWED_METHODS.contains(method)) { // 如果 转换成大写后的_method参数的值在允许的请求参数中包括 requestToUse = new HttpMethodRequestWrapper(request, method); // 将 _method参数对应的值与原生的request整合成包装的request(如DELETE类型的请求、PUT类型的请求、PATCH类型的请求) } } } filterChain.doFilter(requestToUse, response); // 将包装后的request和原生的response放行 } // 这个类用来将原生的request与 Rest请求的类型包装成新的request private static class HttpMethodRequestWrapper extends HttpServletRequestWrapper { private final String method; public HttpMethodRequestWrapper(HttpServletRequest request, String method) { super(request); this.method = method; } // 重写了原生的HttpServletRequest类的getMethod()实例方法 @Override public String getMethod() { return this.method; } } } HttpServletRequestWrapper类的重要代码:
public class HttpServletRequestWrapper extends ServletRequestWrapper implements HttpServletRequest { // 实现了原生的HttpServletRequest 结论:
- 表单提交要使用REST发送PUT、DELETE请求时,应该带上 _method的参数,参数值对应的为 PUT、DELETE,且表单提交的method应该为POST,同时配置文件必须设置
spring.mvc.hiddenmethod.filter.enabled的属性值为true;- 请求会被HiddenHttpMethodFilter拦截,当请求正常,且请求类型为POST,_method有值,并且值在转换成大写后为PUT、DELETE、PATCH时,就会将原生的request和 _method组合包装成一个新的request,并将包装后的request放行;
- 需要注意:包装后的request重写了
getMethod()方法,getMethod()方法返回值是包装request时传入的 _method参数的值; - 过滤器链放行的是包装后的request,那么以后此方法调用
getMethod()方法就是调用包装的request的getMethod()方法;
- 需要注意:包装后的request重写了
- 请求会被HiddenHttpMethodFilter拦截,当请求正常,且请求类型为POST,_method有值,并且值在转换成大写后为PUT、DELETE、PATCH时,就会将原生的request和 _method组合包装成一个新的request,并将包装后的request放行;
- 使用客户端工具(如接口工具、前后端分离项目、Android请求等)发送REST请求时,配置文件不需要设置
spring.mvc.hiddenmethod.filter.enabled的属性,因为它们可以决定发送何种请求;
SpringBoot请求映射原理的分析
寻找切入点
须知,在SpringBoot中所有的请求都会先经过DispatcherServlet,该类继承于FrameworkServlet,FrameWorkServlet继承于HttpServletBean,HttpServletBean继承于原生的HttpServlet,它们之间的继承关系如下图所示:

HttpServletBean并没有重写HttpServlet内相关的方法,而是其子类FrameworkServlet重写了这写方法,如下图所示: 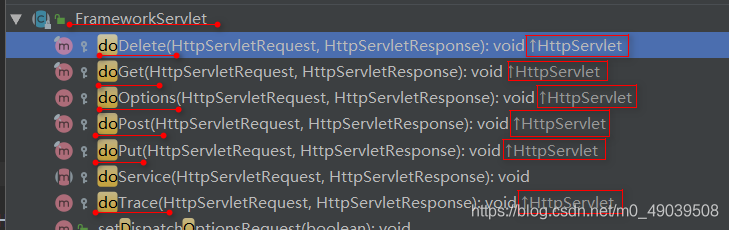 针对上述的
针对上述的doGet()、doPost()、doDelete()、doPut()、...等方法都调用了FrameworkServlet内部的processRequest()方法,==doGet()、doPost()、doDelete()、doPut()、...等方法==的代码如下: @Overrideprotected void service(HttpServletRequest request, HttpServletResponse response) throws ServletException, IOException { HttpMethod httpMethod = HttpMethod.resolve(request.getMethod()); if (httpMethod == HttpMethod.PATCH || httpMethod == null) { processRequest(request, response); } else { super.service(request, response); }}@Overrideprotected final void doGet(HttpServletRequest request, HttpServletResponse response) throws ServletException, IOException { processRequest(request, response);}@Overrideprotected final void doPost(HttpServletRequest request, HttpServletResponse response) throws ServletException, IOException { processRequest(request, response);}@Overrideprotected final void doPut(HttpServletRequest request, HttpServletResponse response) throws ServletException, IOException { processRequest(request, response);}@Overrideprotected final void doDelete(HttpServletRequest request, HttpServletResponse response) throws ServletException, IOException { processRequest(request, response);}@Overrideprotected void doOptions(HttpServletRequest request, HttpServletResponse response) throws ServletException, IOException { if (this.dispatchOptionsRequest || CorsUtils.isPreFlightRequest(request)) { processRequest(request, response); if (response.containsHeader("Allow")) { return; } } super.doOptions(request, new HttpServletResponseWrapper(response) { @Override public void setHeader(String name, String value) { if ("Allow".equals(name)) { value = (StringUtils.hasLength(value) ? value + ", " : "") + HttpMethod.PATCH.name(); } super.setHeader(name, value); } });}@Overrideprotected void doTrace(HttpServletRequest request, HttpServletResponse response) throws ServletException, IOException { if (this.dispatchTraceRequest) { processRequest(request, response); if ("message/http".equals(response.getContentType())) { return; } } super.doTrace(request, response);} 先来个小结:请求到来后,会调用HttpServlet内的doGet()或doPost()方法,然后都会调用到FrameworkServlet的processRequest()方法,因此,对processRequest()方法我们要做重点的研究,FrameworkServlet类的processRequest()方法内的代码如下:
protected final void processRequest(HttpServletRequest request, HttpServletResponse response) throws ServletException, IOException { /*这些都是初始化过程*/ long startTime = System.currentTimeMillis(); Throwable failureCause = null; LocaleContext previousLocaleContext = LocaleContextHolder.getLocaleContext(); LocaleContext localeContext = buildLocaleContext(request); RequestAttributes previousAttributes = RequestContextHolder.getRequestAttributes(); ServletRequestAttributes requestAttributes = buildRequestAttributes(request, response, previousAttributes); WebAsyncManager asyncManager = WebAsyncUtils.getAsyncManager(request); asyncManager.registerCallableInterceptor(FrameworkServlet.class.getName(), new RequestBindingInterceptor()); initContextHolders(request, localeContext, requestAttributes);/*这些都是初始化过程*/ /*此处为核心*/ try { doService(request, response); // 调用本类的doService()方法 } /*这些都是异常处理过程和处理完后的清理过程*/ catch (ServletException | IOException ex) { failureCause = ex; throw ex; } catch (Throwable ex) { failureCause = ex; throw new NestedServletException("Request processing failed", ex); } finally { resetContextHolders(request, previousLocaleContext, previousAttributes); if (requestAttributes != null) { requestAttributes.requestCompleted(); } logResult(request, response, failureCause, asyncManager); publishRequestHandledEvent(request, response, startTime, failureCause); }}/*这些都是异常处理过程和处理完后的清理过程*/ 因此FrameworkServlet类的processRequest()方法会调用自身的doService()方法,doService()方法的代码如下:
protected abstract void doService(HttpServletRequest request, HttpServletResponse response) throws Exception;
但是发现FrameworkServlet类的doService()方法是抽象的,因此我们此时应该去FrameworkServlet类的子类DispatcherServlet去分析doService()方法,DispatcherServlet类的doService()方法内的代码如下所示:
@Overrideprotected void doService(HttpServletRequest request, HttpServletResponse response) throws Exception { logRequest(request); /*这些是初始化过程*/ Map attributesSnapshot = null; if (WebUtils.isIncludeRequest(request)) { attributesSnapshot = new HashMap<>(); Enumeration attrNames = request.getAttributeNames(); while (attrNames.hasMoreElements()) { String attrName = (String) attrNames.nextElement(); if (this.cleanupAfterInclude || attrName.startsWith(DEFAULT_STRATEGIES_PREFIX)) { attributesSnapshot.put(attrName, request.getAttribute(attrName)); } } } request.setAttribute(WEB_APPLICATION_CONTEXT_ATTRIBUTE, getWebApplicationContext()); request.setAttribute(LOCALE_RESOLVER_ATTRIBUTE, this.localeResolver); request.setAttribute(THEME_RESOLVER_ATTRIBUTE, this.themeResolver); request.setAttribute(THEME_SOURCE_ATTRIBUTE, getThemeSource()); if (this.flashMapManager != null) { FlashMap inputFlashMap = this.flashMapManager.retrieveAndUpdate(request, response); if (inputFlashMap != null) { request.setAttribute(INPUT_FLASH_MAP_ATTRIBUTE, Collections.unmodifiableMap(inputFlashMap)); } request.setAttribute(OUTPUT_FLASH_MAP_ATTRIBUTE, new FlashMap()); request.setAttribute(FLASH_MAP_MANAGER_ATTRIBUTE, this.flashMapManager); } /*这些是初始化过程*/ /*此处是核心*/ try { doDispatch(request, response); } /*这些是处理完成后的过程*/ finally { if (!WebAsyncUtils.getAsyncManager(request).isConcurrentHandlingStarted()) { // Restore the original attribute snapshot, in case of an include. if (attributesSnapshot != null) { restoreAttributesAfterInclude(request, attributesSnapshot); } } }}/*这些是处理完成后的过程*/ 因此DispatcherServlet类的doService()方法会调用本类的doDispatch()方法,这里也要说明一下DispatchServlet类的doDispatch()方法是每个请求都会调用的,因此该方法也是最重要的方法,我们要着重的分析它,DispatchServlet类的doDispatch()方法代码如下:
protected void doDispatch(HttpServletRequest request, HttpServletResponse response) throws Exception { HttpServletRequest processedRequest = request; HandlerExecutionChain mappedHandler = null; boolean multipartRequestParsed = false; // 该变量用来保持是否为文件上传请求的判断值 WebAsyncManager asyncManager = WebAsyncUtils.getAsyncManager(request); // 对请求使用异步管理器 try { ModelAndView mv = null; Exception dispatchException = null; try { processedRequest = checkMultipart(request); // 检查是否文件上传 multipartRequestParsed = (processedRequest != request); // 如果是文件上传请求,就将该请求进行转换 /*找到当前请求是使用哪个Handler(哪个Controller的哪个方法)处理*/ mappedHandler = getHandler(processedRequest); if (mappedHandler == null) { noHandlerFound(processedRequest, response); return; } // Determine handler adapter for the current request. HandlerAdapter ha = getHandlerAdapter(mappedHandler.getHandler()); // Process last-modified header, if supported by the handler. String method = request.getMethod(); boolean isGet = "GET".equals(method); if (isGet || "HEAD".equals(method)) { long lastModified = ha.getLastModified(request, mappedHandler.getHandler()); if (new ServletWebRequest(request, response).checkNotModified(lastModified) && isGet) { return; } } if (!mappedHandler.applyPreHandle(processedRequest, response)) { return; } // Actually invoke the handler. mv = ha.handle(processedRequest, response, mappedHandler.getHandler()); if (asyncManager.isConcurrentHandlingStarted()) { return; } applyDefaultViewName(processedRequest, mv); mappedHandler.applyPostHandle(processedRequest, response, mv); } catch (Exception ex) { dispatchException = ex; } catch (Throwable err) { // As of 4.3, we're processing Errors thrown from handler methods as well, // making them available for @ExceptionHandler methods and other scenarios. dispatchException = new NestedServletException("Handler dispatch failed", err); } processDispatchResult(processedRequest, response, mappedHandler, mv, dispatchException); } catch (Exception ex) { triggerAfterCompletion(processedRequest, response, mappedHandler, ex); } catch (Throwable err) { triggerAfterCompletion(processedRequest, response, mappedHandler, new NestedServletException("Handler processing failed", err)); } finally { if (asyncManager.isConcurrentHandlingStarted()) { // Instead of postHandle and afterCompletion if (mappedHandler != null) { mappedHandler.applyAfterConcurrentHandlingStarted(processedRequest, response); } } else { // Clean up any resources used by a multipart request. if (multipartRequestParsed) { cleanupMultipart(processedRequest); } } }} **再做一次小结:**对SpringMVC功能的分析都从org.springframework.web.servlet.DispatcherServlet#doDispatch()方法进行分析
开始分析
先在DispatcherServlet类的doDispatch()方法上打个断点,以DEBUG运行,在访问一个GET类型的/user请求,此时如下图所示:

 一直放行到如下图的位置:
  此时查看
此时查看mappedHandler变量,发现改变量保存了我们这个请求对应的Controller层的getUser()方法如下图所示: 
mappedHandler = getHandler(processedRequest)这条语句是如何判断出请求对应的哪个Controlller的方法呢?这就必须要分析getHandler()方法,我们将之前的断点消除,在mappedHandler = getHandler(processedRequest)语句处打上一个新断点,然后在此发送之前的请求,如下图所示:  然后
然后Step Into进到getHandler()方法,查看如下的变量: 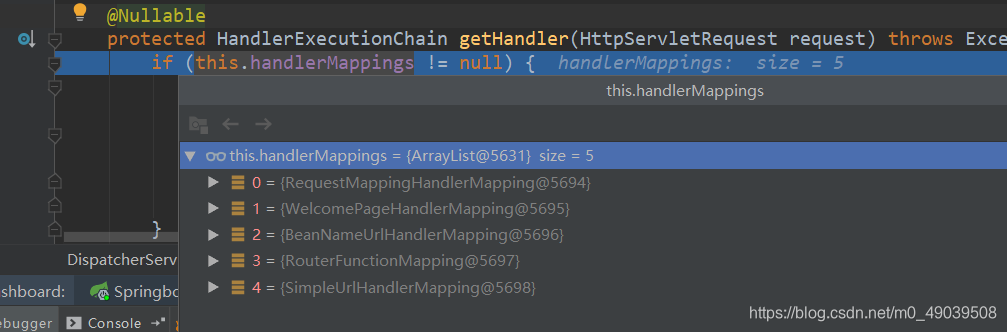
getHandler()方法的源码: @Nullableprotected HandlerExecutionChain getHandler(HttpServletRequest request) throws Exception { if (this.handlerMappings != null) { for (HandlerMapping mapping : this.handlerMappings) { // 此时this.handlerMappings已经通过SpringMVC自动扫描@Controller解析@RequestMapping保存了我们所有定义的请求路径;此时遍历所有的HandlerMapping HandlerExecutionChain handler = mapping.getHandler(request); if (handler != null) { return handler; } } } return null;} 对上述的5个HandlerMapping,因此进行5次循环,分别表示:
- RequestMappingHandlerMapping:RequestMapping注解的处理器映射,内部保存了所有
@RequestMapping和Handler的映射规则,是通过SpringBoot为我们加入的能自动扫描所有的@Controller,并解析所有的标注了@xxxMapping,并将将它们全部保存到该HandlerMapping中; - WelcomePageHandlerHandlerMapping:欢迎页的HandlerMapping
- BeanNameUrlHandlerMapping
- RouterFunctionMapping
- SimpleUrlHandlerMapping
一直放行到如下位置:
 此时查看
此时查看mapping变量,发现其保存了我们定义的所有的请求路径和其对应的方法,如下图所示: 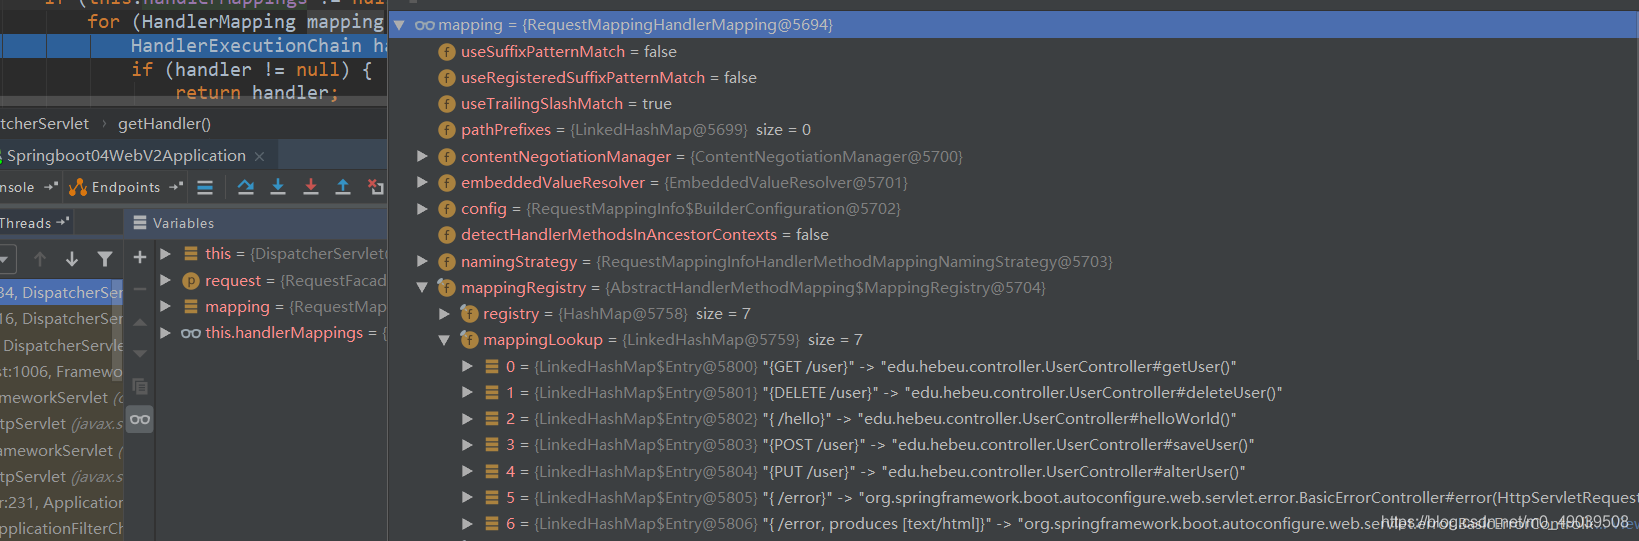
Step Into进HadlerExecutionChain handler = mapping.getHandler(request)语句的getHandler方法,进入如下图的代码:  再
再Step Into进入Object handler = getHandlerInternal(request)语句的getHandlerInternal()方法,然后一直放行到如下图位置:  再
再Step Into进入return super.getHandlerInternal(request)语句的getHandlerInternal()方法,然后一直放行到如下图所示的位置: 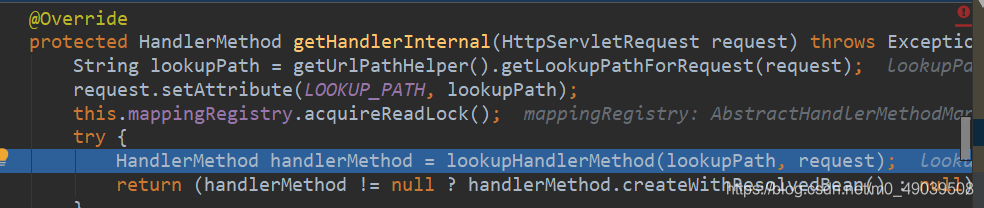 再
再Step Into进入HandlerMethod handlerMethod = lookupHandlerMethod(lookupPath, request);语句的lookupHandlerMethod()方法,lookupHandlerMethod()方法的源码如下所示: @Nullableprotected HandlerMethod lookupHandlerMethod(String lookupPath, HttpServletRequest request) throws Exception { // 参数lookupPath就是我们发送来的请求的路径,参数request就是原生的request;该方法用来通过请求路径名获取最佳的匹配 List matches = new ArrayList<>(); List directPathMatches = this.mappingRegistry.getMappingsByUrl(lookupPath); // 通过 请求来的路径 名 去找谁能处理该请求 if (directPathMatches != null) { // 如果不为空,即找到了能够处理该请求的mapping addMatchingMappings(directPathMatches, matches, request); // 将找到的 这些能够处理该请求的mapping加入到待匹配的集合中 } if (matches.isEmpty()) { // 如果没有能够处理该请求的mapping addMatchingMappings(this.mappingRegistry.getMappings().keySet(), matches, request); } if (!matches.isEmpty()) { // 如果有能够处理该请求的mapping Match bestMatch = matches.get(0); // 将0索引位置(第一个位置)的mapping取出,即如果同时找到了许多mapping,就认为第一个是最匹配的 if (matches.size() > 1) { // 如果找到的最佳匹配不止一个 Comparator comparator = new MatchComparator(getMappingComparator(request)); matches.sort(comparator); bestMatch = matches.get(0); if (logger.isTraceEnabled()) { logger.trace(matches.size() + " matching mappings: " + matches); } if (CorsUtils.isPreFlightRequest(request)) { return PREFLIGHT_AMBIGUOUS_MATCH; } Match secondBestMatch = matches.get(1); if (comparator.compare(bestMatch, secondBestMatch) == 0) { Method m1 = bestMatch.handlerMethod.getMethod(); Method m2 = secondBestMatch.handlerMethod.getMethod(); String uri = request.getRequestURI(); throw new IllegalStateException( "Ambiguous handler methods mapped for '" + uri + "': {" + m1 + ", " + m2 + "}"); // 抛出异常 } } request.setAttribute(BEST_MATCHING_HANDLER_ATTRIBUTE, bestMatch.handlerMethod); handleMatch(bestMatch.mapping, lookupPath, request); return bestMatch.handlerMethod; } else { return handleNoMatch(this.mappingRegistry.getMappings().keySet(), lookupPath, request); }} addMatchingMappings()方法的源码:
private void addMatchingMappings(Collectionmappings, List matches, HttpServletRequest request) { for (T mapping : mappings) { T match = getMatchingMapping(mapping, request); if (match != null) { matches.add(new Match(match, this.mappingRegistry.getMappings().get(mapping))); } }}
对上述的分析进行总结:
- 所有的请求映射都在HandlerMapping中;
- SpringBoot自动配置了欢迎页的HandlerMapping,所有能够通过访问
/访问到index.html页面; - 请求到来后,挨个尝试所有的HandlerMapping,是否有该请求的信息
- 如果有就找到这个请求对应的handler;
- 如果没有就是尝试下一个HandlerMapping
- 进入
WebMvcAutoConfiguration,找对应的被@Bean标注的返回值类型为xxxHandlerMapping的方法,可以发现SpringBoot为我们自动加入配置了RequestMappingHandlerMapping类型的、WelcomePageHandlerMapping等类型的HandlerMapping; - 我们如果需要自定义的映射处理,我们也可以自己给容器中放HandlerMapping;
转载地址:https://blog.csdn.net/m0_49039508/article/details/116536437 如侵犯您的版权,请留言回复原文章的地址,我们会给您删除此文章,给您带来不便请您谅解!
发表评论
最新留言
关于作者
