本文共 11387 字,大约阅读时间需要 37 分钟。
开源中国iOS客户端目前的托管地址
用到的第三方
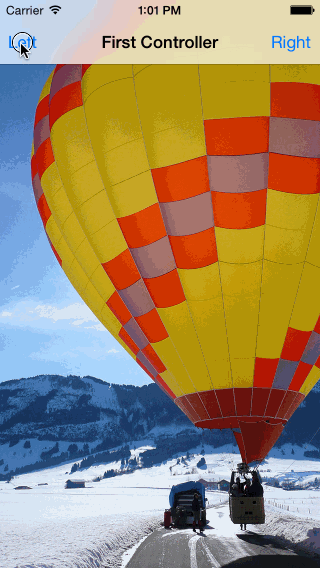
RESideMenu
实现了侧滑菜单,效果如下:
TOWebViewController
用来在app内view web网页。
GRMustache
Flexible and production-ready Mustache templates for MacOS Cocoa and iOS。可以使用模板来渲染HTML界面。
在本app中,DetailsViewController获取到数据后,webView加载html,就使用到了模板:[self.detailsView loadHTMLString:newsDetails.html baseURL:[[NSBundle mainBundle] resourceURL]];
newsDetails.html为html字符串:
+ (NSString *)HTMLWithData:(NSDictionary *)data usingTemplate:(NSString *)templateName{ //html模板 NSString *templatePath = [[NSBundle mainBundle] pathForResource:templateName ofType:@"html" inDirectory:@"html"]; NSString *template = [NSString stringWithContentsOfFile:templatePath encoding:NSUTF8StringEncoding error:nil]; NSMutableDictionary *mutableData = [data mutableCopy]; [mutableData setObject:@(((AppDelegate *)[UIApplication sharedApplication].delegate).inNightMode) forKey:@"night"]; return [GRMustacheTemplate renderObject:mutableData fromString:template error:nil];} 参考文章:
模块分析
详情页面DetailsViewController
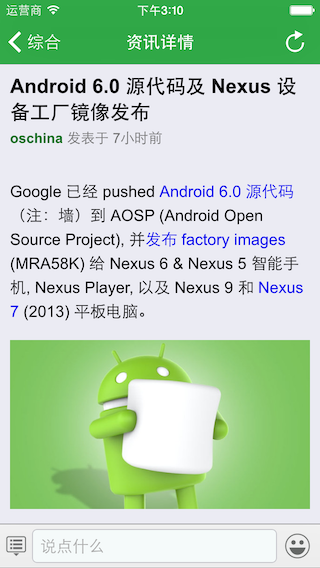
DetailsViewController继承自BottomBarViewController。DetailsViewController的界面构成,主要如下:中间的UIWebView,底部的EditingBar或者OperationBar。
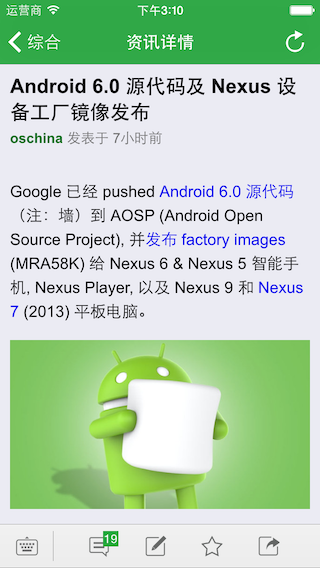
OperationBar
OperationBar继承子UIToolbar,添加有自定义的UIBarButtonItem。

通过以下的方式调整OperationBar的items
// 资讯、博客和软件详情没有“举报”选项if (_commentType == CommentTypeNews || _commentType == CommentTypeSoftware || _commentType == CommentTypeBlog) { NSLog(@"Before: self.operationBar.items:%@", self.operationBar.items); self.operationBar.items = [self.operationBar.items subarrayWithRange:NSMakeRange(0, 12)]; NSLog(@"After: self.operationBar.items:%@", self.operationBar.items);} EditingBar
EditingBar通用继承自UIToolbar,左右是UIButton,中间是一个UITextView。

输入文本textView为GrowingTextView继承自PlaceholderTextView,PlaceholderTextView继承自UITextView。
PlaceholderTextView是带有占位符的UITextView。 GrowingTextView是自增长型的UITextView。它是通过如下的方式计算高度:- (CGFloat)measureHeight{ //[self layoutIfNeeded]; //NSLog(@"frameHeight: %f", self.frame.size.height); //NSLog(@"lineHeight: %f", self.font.lineHeight); //NSLog(@"contentSize:(height): %f, (width):%f", self.contentSize.height, self.contentSize.width); //NSLog(@"Height: %f", [self sizeThatFits:self.frame.size].height + 15); return ceilf([self sizeThatFits:self.frame.size].height + 10);} EditingBar的textView在输入的时候,会自动增长高度。这个过程是在BottomBarViewController中处理的。
添加通知,观察UITextView的变化:[[NSNotificationCenter defaultCenter] addObserver:self selector:@selector(textDidUpdate:) name:UITextViewTextDidChangeNotification object:nil];
然后处理高度变化,在这里调整的是textView的editingBarHeightConstraint约束的大小。
- (void)textDidUpdate:(NSNotification *)notification{ [self updateInputBarHeight];}- (void)updateInputBarHeight{ CGFloat inputbarHeight = [self appropriateInputbarHeight]; if (inputbarHeight != self.editingBarHeightConstraint.constant) { self.editingBarHeightConstraint.constant = inputbarHeight; [self.view layoutIfNeeded]; }}- (CGFloat)appropriateInputbarHeight{ CGFloat height = 0; CGFloat minimumHeight = [self minimumInputbarHeight]; CGFloat newSizeHeight = [self.textView measureHeight]; CGFloat maxHeight = self.textView.maxHeight; self.textView.scrollEnabled = newSizeHeight >= maxHeight; if (newSizeHeight < minimumHeight) { height = minimumHeight; } else if (newSizeHeight < self.textView.maxHeight) { height = newSizeHeight; } else { height = self.textView.maxHeight; } return roundf(height);} 在键盘出来和消失的时候,_editingBar会向上移动或者恢复到底部。处理的过程是,注册键盘通知:
[[NSNotificationCenter defaultCenter] addObserver:self selector:@selector(keyboardWillShow:) name:UIKeyboardWillShowNotification object:nil];[[NSNotificationCenter defaultCenter] addObserver:self selector:@selector(keyboardWillHide:) name:UIKeyboardWillHideNotification object:nil];
处理键盘通知,同样是改变约束:
- (void)keyboardWillShow:(NSNotification *)notification{ _emojiPageVC.view.hidden = YES; _isEmojiPageOnScreen = NO; CGRect keyboardBounds = [notification.userInfo[UIKeyboardFrameEndUserInfoKey] CGRectValue]; _keyboardHeightConstraint.constant = keyboardBounds.size.height; [self updateBarHeight];}- (void)keyboardWillHide:(NSNotification *)notification{ _keyboardHeightConstraint.constant = 0; [self updateBarHeight];}- (void)updateBarHeight{ [self.view setNeedsUpdateConstraints]; [UIView animateKeyframesWithDuration:0.25 //animationDuration delay:0 options:7 << 16 //animationOptions animations:^{ [self.view layoutIfNeeded]; } completion:nil];} 在当前用户未登陆时,在点击发送send按钮后会跳转到登陆的界面:
- (BOOL)textView:(UITextView *)textView shouldChangeTextInRange:(NSRange)range replacementText:(NSString *)text{ if ([text isEqualToString: @"\n"]) { if ([Config getOwnID] == 0) {//未登录 UIStoryboard *storyboard = [UIStoryboard storyboardWithName:@"Login" bundle:nil]; LoginViewController *loginVC = [storyboard instantiateViewControllerWithIdentifier:@"LoginViewController"]; [self.navigationController pushViewController:loginVC animated:YES]; } else { [self sendContent]; [textView resignFirstResponder]; } return NO; } return YES;} 如何调整约束
- You need to call layoutIfNeeded within the animation block. Apple actually recommends you call it once before the animation block to ensure that all pending layout operations have been completed
- You need to call it specifically on the parent view (e.g. self.view), not the child view that has the constraints attached to it. Doing so will update all constrained views, including animating other views that might be constrained to the view that you changed the constraint of (e.g. View B is attached to the bottom of View A and you just changed View A’s top offset and you want View B to animate with it)
如下:
- (void)moveBannerOffScreen { [self.view layoutIfNeeded]; _addBannerDistanceFromBottomConstraint.constant = -32; [UIView animateWithDuration:5 animations:^{ [self.view layoutIfNeeded]; // Called on parent view }]; bannerIsVisible = FALSE;}- (void)moveBannerOnScreen { [self.view layoutIfNeeded]; _addBannerDistanceFromBottomConstraint.constant = 0; [UIView animateWithDuration:5 animations:^{ [self.view layoutIfNeeded]; // Called on parent view }]; bannerIsVisible = TRUE;} 参考文章:
EmojiPageVC
EmojiPageVC继承自UIPageViewController,关于UIPageViewController的使用请参考。
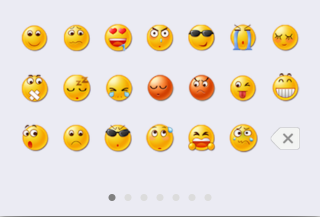
选中一个emoji后,在textView显示,通过block来处理:
_didSelectEmoji = ^(NSTextAttachment *textAttachment) { NSAttributedString *emojiAttributedString = [NSAttributedString attributedStringWithAttachment:textAttachment]; NSMutableAttributedString *mutableAttributeString = [[NSMutableAttributedString alloc] initWithAttributedString:textView.attributedText]; [mutableAttributeString replaceCharactersInRange:textView.selectedRange withAttributedString:emojiAttributedString]; textView.attributedText = mutableAttributeString; textView.textColor = [UIColor titleColor]; [textView insertText:@""]; textView.font = [UIFont systemFontOfSize:16]; }; 删除emoji:
_deleteEmoji = ^ { [textView deleteBackward]; }; 好友圈
显示emoji
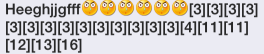
例如字符串为“Heeghjjgfff[发呆][发呆][发呆][发呆][发呆][发呆][3][3][3][3][3][3][3][3][3][3][3][3][3][3][4][11][11][12][13][16]”,在cell显示时,要显示emoji图像。
通过正则表达式来找到emoji符号,然后创建attribute string+ (NSAttributedString *)emojiStringFromRawString:(NSString *)rawString{ NSMutableAttributedString *emojiString = [[NSMutableAttributedString alloc] initWithString:rawString]; NSDictionary *emoji = self.emojiDict; //匹配emoji unicode编码[\u4e00-\u9fa5]匹配所有中文 NSString *pattern = @"\\[[a-zA-Z0-9\\u4e00-\\u9fa5]+\\]|:[a-zA-Z0-9\\u4e00-\\u9fa5_]+:"; NSError *error = nil; NSRegularExpression *re = [NSRegularExpression regularExpressionWithPattern:pattern options:NSRegularExpressionCaseInsensitive error:&error]; NSArray *resultsArray = [re matchesInString:rawString options:0 range:NSMakeRange(0, rawString.length)]; NSMutableArray *emojiArray = [NSMutableArray arrayWithCapacity:resultsArray.count]; for (NSTextCheckingResult *match in resultsArray) { NSRange range = [match range]; NSString *emojiName = [rawString substringWithRange:range]; if ([emojiName hasPrefix:@"["] && emoji[emojiName]) { //创建attachment 添加图片 NSTextAttachment *textAttachment = [NSTextAttachment new]; textAttachment.image = [UIImage imageNamed:emoji[emojiName]]; //调整位置 [textAttachment adjustY:-3]; //创建attribute string NSAttributedString *emojiAttributedString = [NSAttributedString attributedStringWithAttachment:textAttachment]; [emojiArray addObject: @{@"image": emojiAttributedString, @"range": [NSValue valueWithRange:range]}]; } else if ([emojiName hasPrefix:@":"]) { if (emoji[emojiName]) { [emojiArray addObject:@{@"text": emoji[emojiName], @"range": [NSValue valueWithRange:range]}]; } else { UIImage *emojiImage = [UIImage imageNamed:[emojiName stringByTrimmingCharactersInSet:[NSCharacterSet characterSetWithCharactersInString:@":"]]]; NSTextAttachment *textAttachment = [NSTextAttachment new]; textAttachment.image = emojiImage; [textAttachment adjustY:-3]; NSAttributedString *emojiAttributedString = [NSAttributedString attributedStringWithAttachment:textAttachment]; [emojiArray addObject: @{@"image": emojiAttributedString, @"range": [NSValue valueWithRange:range]}]; } } } for (NSInteger i = emojiArray.count -1; i >= 0; i--) { NSRange range; [emojiArray[i][@"range"] getValue:&range]; if (emojiArray[i][@"image"]) { [emojiString replaceCharactersInRange:range withAttributedString:emojiArray[i][@"image"]]; } else { [emojiString replaceCharactersInRange:range withString:emojiArray[i][@"text"]]; } } return emojiString;} 最后显示的结果为:
更多参考文档:
New To Me
NSTextAttachment
在app中会有如下形式的cell,类似图文混排,前面是图片,后面是文本内容:
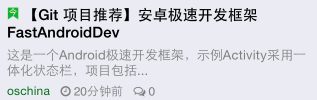 它是通过UILabel设置attributeText来显示的:
 [cell.titleLabel setAttributedText:news.attributedTittle];
创建attributeText,使用到了NSTextAttachment:
- (NSAttributedString *)attributedTittle{ if (!_attributedTittle) { if ([[Utils timeIntervalArrayFromString:_pubDate][kKeyDays] integerValue] == 0) { NSTextAttachment *textAttachment = [NSTextAttachment new]; textAttachment.image = [UIImage imageNamed:@"widget_taday"]; NSAttributedString *attachmentString = [NSAttributedString attributedStringWithAttachment:textAttachment]; _attributedTittle = [[NSMutableAttributedString alloc] initWithAttributedString:attachmentString]; [_attributedTittle appendAttributedString:[[NSAttributedString alloc] initWithString:@" "]]; [_attributedTittle appendAttributedString:[[NSAttributedString alloc] initWithString:_title]]; } else { _attributedTittle = [[NSMutableAttributedString alloc] initWithString:_title]; } } return _attributedTittle;} 参考文章:
Class
通用类可以这么定义:
@property Class objClass;@property (nonatomic, assign) Class detailsClass;
使用形式:
id obj = [[_objClass alloc] initWithXML:objectXML];
转载地址:https://windzen.blog.csdn.net/article/details/48806691 如侵犯您的版权,请留言回复原文章的地址,我们会给您删除此文章,给您带来不便请您谅解!
发表评论
最新留言
关于作者
